Showing posts with label Finished Objects Friday. Show all posts

Friday, May 24, 2013

Creature Comforts Knit Up

It has given me fits!

But IT is finished.  IT being the Creature Comforts Cardigan that over 600 Ravelry knitters have also completed.

This is the picture of the cardigan as shown by the creator of Madelintosh yarns, because I can't do as good a job of capturing the sweater as did their professional photographers.

 
Now here are a few of my pictures as the sweater progressed:
 
See how the oak leaf and acorns are being knit?  Pretty cool!  This pattern goes down the back of the cardigan.

The Sweater minus the sleeve cuff finished, but Too Big!

 Now it has been wet again and blocked to the appropriate size and Momma is Happy Again :o)

and my notes as it was being knit:
Love this hand dyed yarn; it s t r e t c h e s when blocked; it originally came out as 47” wide x 36.5” high, although it was knitted to 30.5 inches high as indicated in pattern.
Since it was too large, I machine dried the “blanket” for five minutes in the dryer, pressed the seams and came out with dimensions of 42” x 29.5 ” (see picture). 
After the machine drying for five minutes it turned out too small! So NOW I am re-blocking it with a 32” length. 
The leaf and acorn close up is NOT the color of the yarn! My computer did that.
I pulled from two separate balls of yarn because of the hand dye effect and was afraid of pooling colors. Even doing so, I still have one complete skein of yarn untouched and two small sized balls of wound yarn left over. 
After reading others’ notes about the size of the arms, I made the armhole 11 inches around. It happened to work out that I picked up 60 stitches, which the pattern called for. I did use size 6 DPNs for the cuffs instead of the called for 7’s. The snugness is just right below the elbow. 
Other than trying to get the right length and width for my body, it was an enjoyable knit. I might do this pattern again, having learned the ins and outs of the wool and how much to stretch it when wet.
Linking up with Finished Objects Friday and Tami.

Saturday, April 20, 2013

Making Double Sided Napkins

Tiring of my used and chipped dinnerware, I replaced it with Fiestaware in a turquoise/bright blue.  Newly painted dining room and kitchen walls are in a light peach color.


And did I tell you how much I like the Behr paint with primer?  Why yes, I think I did back in a post here in January.  So more Behr was added to walls and baseboards, not only in the prior color of Indulgent Mocha but also in a peach color for the kitchen.  Thusly:


Now to go with these blues in my Angry Birds and Fiestaware, I needed coordinating cloth napkins.  (Yes, there is a trip to Good Will scheduled soon with used linens.)

This tutorial told me everything about sewing double sided napkins.  Thank you, FiberFantasies.

A few of the steps are here in print form.

 Peachy and turquois-y fabrics sewn together (squares were about 18" before seaming) and turned inside out.

Oops, I see a bit a thread that needs snipping 


The magnets were a gift from my sweet daughter Julie.  Don't they just add a bit of zing?  And just to mix it up a bit, stair-stepping fabrics for a unique one:


Fun to make, with just a bit of cursing involved in machine sewing.

Linking to Tami at Finished Objects Friday

Friday, April 12, 2013

A Knitted Sweater for Baby

There is a niece in the family who is ALL THINGS BRONCO. 


Not only is she a Bronco fan, but she is also in her third trimester of pregnancy with a BOY.

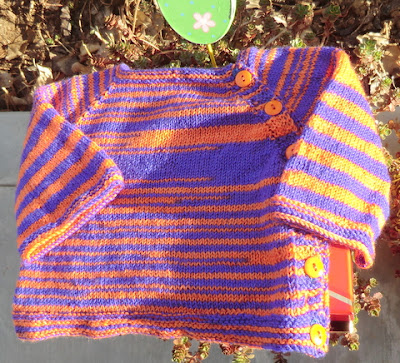
Bronco colors of orange and blue are pretty common in Colorado, home of the Broncos, but not so much elsewhere.  You would not think it so difficult to find orange and blue yarn, but it was.  I found some sock yarn from the Stray Cat Etsy store and it came in a cute orange box with a cat on it.
 
That baby boy, Jackson, will need a sweater next winter, so this pattern was the one chosen; got busy knitting with that self striping yarn from Stray Cat in New Zealand.

Accessories include grosgrain ribbon and buttons in coordinating colors:

Using the ribbon both behind the buttons on the button band and behind the button holes makes the knitted fabric more sturdy, stabilizing the buttons.

 This video explains in detail how to apply the ribbon.  It is on Vimeo, courtesy of Jasmin and Gigi of the Knitmore Girls.

Visual Featurette- Grosgrain Ribbon Tutorial from Jasmin & Gigi on Vimeo.

The top buttons, the ones that you actually see when looking at the garment buttoned up, are orange.

And the buttons on the bottom of the orange buttons, making the top buttons more secure, are blue:
 
 
Finished!
 
 
Enjoy, Baby Jackson, due June 5!
 
Linking to Finished Objects Friday.  And linking to Fiber Arts Friday.