Showing posts with label sewing. Show all posts

Monday, July 7, 2008

Sewing Decorative Vintage Pillow Cases (Fairies Part II)

A previous post on the drawing, coloring, and embroidering of a whimsical fairy dealt with that aspect of pillow decoration. The colored and embroidered fairy is at rest with a bumble bee on a lily pad leaf and has been made into its final application on a small pillow case.

These little pillows would make darling baby gifts, and would also look charming on a rocker as a back pillow, or as just another girly decoration on a bed or sofa; I plan to make a few more and display them on my Etsy store in the near future.

The following is a brief tutorial on how the pillow case was made with vintage fabrics that display hand embroidery, cut work and drawn-work. Pictures are shown to accompany the tutorial.

1) Decide on the picture you would like to transfer for embroidery purposes. Make sure the lines are as simple as your embroidery skills allow. (In this case, a fairy was used, but some child might like a brightly colored green frog on his pillow with contrasting bright colors.) Complete the tinting and embroidering of the chosen image.

2) Gather materials of small travel pillow (available at discount stores for under $4), vintage fabrics such as old table cloths, napkins, handkerchiefs, etc., threads and sewing equipment; lace seam binding or ribbons (optional), measuring tape and scissors;

3) The finished pillow (below) showcases two different fabrics laid on top of one another. In this case, a regular sized peach colored pillow case with a drawn-work interior was used for the under fabric; the outer edging of the existing case was turned inward and sewn down to further emphasize the previous vintage drawn-work. For the over fabric (white), a large tablecloth was cut into appropriate sizes to show off as much as possible of the lovely vintage needlework;

4) Cut both the under fabric and the over fabric the size to fit the purchased travel pillow, with a little less than one inch seam allowance added. Usual dimensions on these travel pillows are 15” x 20”, so cut the existing fabrics to allow for generous seam allowances, i.e., 31.5" x 41.5". (French seams create a more polished effect in its final appearance, so extra material for each seam was taken into account before cutting.) Hint: the under fabric should be of a contrasting color to enhance the cut-work shown on the vintage top fabric (in this case, a vintage peach pillow case was used for the under fabric);

5) You will likely need to piece together various parts of the vintage cloths in order to take the best advantage of the prior threadwork. I used lace seam binding to join two pieces of a tablecloth together to emphasize more of the cut work. Hint: ensure that the back of the pillow also incorporates as much as possible of the embroidery displayed on the vintage cloth.

6) Join the seams (french seaming, if possible) and complete the pillow case with simple straight stitching. An excellent tutorial on how to make french seams can be found here.

The finished pillow case with purchased travel pillow inside: (front view of the pillow case above, and back view at upper right)

More information about vintage fabrics can be garnered here. A reliable seller for vintage fabrics can be found here.

Thursday, July 3, 2008

Sew Liberated Apron

SewLiberated has this darling apron pattern for sale on the internet. It is named the "Emmeline" pattern.

It shows a high waisted, longer shift that goes great with jeans as a savvy sort of jacket. This flattering pattern is easy to sew, attractive to wear, and will brighten up an outfit and make wearing jeans a little dressier. Conversation will follow just by wearing it.

These are three coordinating fabrics I am going to use when making this apron:


Pictured above is the face of a Roaring 20's woman that will be one of the pockets to be added to the apron front. You can read about how this vintage pocket was hand colored with crayons and watercolor pencils and coordinating embroidery, here in a previous post.

Meg McElwee, the designer of this pattern, was interviewed on the podcast CraftSanity (catch it on a download from iTunes). Ms. McElwee was the featured guest on June 17, 2008 . McElwee is a Mexican expatriate and a current Montessori teacher. She has an interesting story about her designing efforts and how she started in the textile business. The podcast has some fun coversation about women wearing their liberation in a way that is both catchy, yet homespun. It is well worth a listen.

In the June podcast interview, Meg said that one of her readers' ironic comments was that the only bad thing about wearing her Emmeline apron was that her husband was constantly chasing her around the house (she must have looked so-oooooo cute).

Wearing aprons outside the home is going to be the next old-to-new trend, count on it. Wearing new styled aprons will say "I Am Woman, Hear Me Roar" in a big way, while at the same time being ultra feminine.

Meg's blog "Sew Liberated" can be accessed here. Ready-made aprons can also be purchased on her website, if you are not one to sew. She will be moving to North Carolina this summer, and will have further independent sewing design patterns in the future.

Tuesday, June 17, 2008

Corsets or "How to Make Your Own Girdle"

This illustration is from VintagePatterns. The type is in a small font, so you might not be able to clearly read it. The caption says:


"NOT ONLY HAVE I LOST MY SHEEP, THIS CORSET IS KILLING ME."
This picture and caption are too good not to use as a whimsical embroidery piece on a purse or quilt square.

With the advent of Oprah and her endorsement of Spanx, corsets have made a comeback, but in a much more comfortable venue.

The owner and founder of Spanx is Sara Blakely. What a gal. She had a great idea, and produced a successful company making comfy, workable girdles. Blakely even gave back $1 million to the OprahWinfreyLeadershipAcademy in 2007 in appreciation for Oprah's bringing Spanx to public attention back 8 years ago.

Not wanting to take anything away from Sara, I found a less expensive alternative HERE which says:

Starting at $25 a pop, they (Spanx) are a rather pricey solution to an embarrassing problem. But with some scissors, and old pantyhose, you can achieve the Spanx effect without paying the Spanx price!

Basically, you buy a pair of control-top pantyhose, cut off the legs, and you have made your own sized-to-fit corset. Granted, it would not look too attractive when undressing in front of your favorite person, but it could save some dollars.

Friday, June 13, 2008

Making a Mandarin Collar Several Ways

Wanting to create a mandarin collar from a large and outdated standard collar, I folded the corners of the regular collar downwards, then folded the collar in half, stitching down all sides. Voila! A mandarin collar was created in about ten minutes; you don't even need a sewing machine if you can thread a needle and make a running stitch.

Here is a picture of a mandarin modified collar that I made on a linen blouse with a standard, large collar. It was further embellished with sewn on Cat Buttons:

Other ways to make mandarin collars is to use scarves, tying it in manners depicted in Scarves:

1: Try a GQ oblong style! Fold a textured oblong scarf in half and place it around your neck. Feed one panel behind and then through the loop. Feed the other panel through the loop from the top. Finish the design by adjusting the panels. (Looks great over a jacket!);

2: Start by folding a large square scarf into a triangle. Place the folded edge next to your neck and tie a single knot. Twist the panels together. Wrap the twisted panels around itself and tuck the ends into the center, creating a rosette. Wear it off to the side or at the center of a collar.

Mandarin collars cover a multitude of "aging skin" flaws. Crepey skin can be concealed, as well as double necks.

In her later years, Kathryn Hepburn sure knew how to wear those turtlenecks well!

Thursday, May 29, 2008

Sewing Caddy

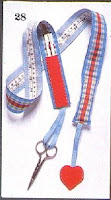
When knitting or sewing, it seems like embroidery scissors, a measuring device, pins, knitting bead markers, etc. never seem to be quite within easy reach. While browsing craft ideas, I came across a clever sewing caddy which could be made fairly quickly and inexpensively. When I saw the picture of this sewing caddy, along with a supply list and directions, I decided to make a similar one.

Here is what I found at the website Sewing:

Neck Ribbon Caddy Supplies:
1 1/8 yard (103cm), 1½” (3.8cm) wide blue plaid ribbon
1 1/8 yard (103cm), 1½” (3.8cm) wide blue grosgrain ribbon
½ yard (45.5cm) 3/8” (1cm) wide blue grosgrain ribbon
1 tape measure, 1 handful polyester stuffing, red felt scraps, embroidery scissors, thimble, sewing gauge

Directions:
1.Cut: Make a heart pattern. Cut one 1 1/8” x 4½” (2.8 x 11.5cm) pocket strip and 2 hearts from felt scraps. Cut 3/8” (1cm) wide grosgrain ribbon in 2 equal lengths. Cut tape measure off at 39½” (100.5 cm).

2. Assemble: Center and pin felt pocket strip to one end of plaid ribbon. Zigzag or use a decorative stitch along sides of felt pocket. Loop one narrow ribbon through scissors. Pin ribbon ends at raw edge of plaid ribbon and machine baste. Layer heart motifs together. Edge stitch, leaving 1¼” (3.2cm) top opening. Fold other narrow ribbon in half; center and tack fold to inside heart pocket. Center and machine baste ends to other plaid ribbon raw edge. Center tape measure on wide grosgrain ribbon. Edge stitch tape on all sides. With right sides together, stitch wide grosgrain to plaid ribbon with ¼” (6mm) seam across “heart” pocket end. Turn and press. With wrong sides together. Edge stitch ribbon sides.

3.Pin Cushion: Measure 4¼” (11cm) from open end, stitch across. Stuff tightly. Turn ¼” (6mm) raw edges inside and stitch closed.
I already had a small pincushion, so I did not need to make one. And instead of felt for the pocket, I had stashed pink flannel which I sewed on for a reading glasses pocket. The pink valentine heart bows were previously bought for my doggy, but she does NOT like to wear head ornaments. So I incorporated the bows as extra bling on the neck caddy.

The picture below shows supplies purchased for the project, and my resulting caddy is the bottom photo.

Now how neat is that?!

Monday, May 12, 2008

Bucket Hats - Art & Jazz Festival

Grand Junction, Colorado hosted their 20th Anniversary Wells Fargo
Art and Jazz Festival over the weekend.

Main Street comes alive with jazz music performed by local and national artists, artist demonstrations in a variety of mediums and artists selling beautiful, high-quality work. This three-day festival surrounds the re-installation of Art on the Corner sculptures. A celebration of art and music, this outdoor event features street vendors, live music, extended shopping hours with participating merchants and other fun activities.

One of the almost 100 juried art vendors along Main Street over the weekend offered handmade clothing products for children. All the items were reversible with different fabrics on each side.
Here is a contrasting vintage fabric bucket. How cute!! It has a Velcro bow attachable to either side of the hat. And it is just the ticket for my four year old grand niece in Texas.

If you would like to made a hat, a great website is this one: Hats. There are all types of patterns there that can be sewn, crocheted or knit. Be sure and scroll through to the last pages. Those last two pages have the pattern (downloadable to your printer).

And this picture is fabric and ribbon that I want to make up into a hat using a Butterick pattern. The material will be made into a similar one shown in yellow in the upper left corner of the photo. It is just one of those projects still on the drawing board.

Wednesday, April 2, 2008

Silk Ribbon Embroidery - Covered Buttons


Thinking I would like to embellish a few vintage vests which I previously sewed, (referring to March Post), it seemed a natural fit to incorporate ribbon embroidery onto buttons.

This site: Purl Bee ...shows in great detail how to make a covered button. It is a very complete and easy-to-read tutorial which I highly recommed taking a look at. A picture of completed buttons is shown at right, taken from the Purl Bee citation.

Ribbon embroidery can be used for decorating articles of clothing, sachet bags, purses, etc. It certainly gives a distinctive touch to any lingerie, outer wear, or craft item.


On the left is a picture of a few silk ribbon birds which I made for a size 36 (7/8”) button cover. I thought they would be in proportion to the button, but after I put these onto the button covers, they were WAY too large.


Then I decided that what was needed was to make much smaller silk ribbon birds in order for them to fit onto individual button covers.

The smaller birds shown in the image (right side) can more deftly be wrapped around the button cover.

Using examples from the book An Encyclopedia of Ribbon Ebroidery by the American School of Needlework (1996), these replicas of American Goldfinches worked much better.

I will show a picture of the completed button once I get several more embroidered. But for now, the vest needs to be completed so these buttons can be added to it!