Wednesday, December 31, 2008

Happy New Year!

It is 3 degrees right now in Grand Junction, CO. Brrrrrrr

Have a safe New Year's Eve, whatever your plans. DH and I are staying home and reviewing the best of 2008 which tv has to offer.

Be safe and I will be back tomorrow with a tutorial on making Japanese knotted purses.

Tuesday, December 30, 2008

How to Knit a Moebius Scarf

What is a moebius, exactly? It is a mathematical term and is simply a half turn in a loop of "something"; go here to see a diagram of a moebius.

It makes sense that a scarf can be make like a moebius, and can be used as a head scarf, a neck scarf, or as a tie around the waist.

Cat Bordhi gives a free pattern to make a moebius cowl scarf at Cat's Website.

An even simpler explanation of making a multi yarned moebius can be found at Planet Shoup. This is the pattern I am following. Here is a picture of my moebius cowl in progress, using size 7, 16" length circular knitting needles and two different types of wool yarn:


Linda at Planet Shoup says:

Here's a third method that's easy as pie - it's all flat, back and forth knitting. Approx. 150 to 200 g worsted yarn (5 1/2 to 7 1/2 oz) in however many colours you want, wool or wool blend preferred (like Fisherman's Wool or Wool-Ease)
Circular needle or pair of single points of suitable size for your yarn
Gauge: approx. 5 stitches per inch with worsted, though it's not critical

Choose a stitch pattern. It should be reversible, ideally one that looks the same on both sides. It should also be non curling (garter stitch works great). Cast on your desired number of stitches (50 or 60 work well in worsted for an adult scarf), using a suitable size needle. Note: If using more than one colour, you can change colours across each row, or every few rows, whichever you prefer. Just make sure your colour changes are well hidden - this scarf is basically reversible.

Work until the length of the piece is twice the length needed to fit over the wearer's head. Cast off.

Lay this strip horizontally in front of you. You're going to fold this strip in half and twist it. Bring the upper left corner of the fabric over and down to meet the lower right corner of your knitting , then, still holding this in place, flip up the (former) lower left corner to meet the upper right. Graft them together along their short edges (or sew) as neatly as possible. This creates the half twist that identifies this as a Moebius strip.

That's it - you're done!

How easy...how effective! It is easy and mindless to knit, and will add a bit of color to neutral based winter sweaters and jackets.

Monday, December 29, 2008

Art in the Eye of a Needle - Microscopically Small

Some of Wiggins' sculptures, often made from a fragment of a single grain of sand or a dust fragment plucked from the air, sell for $300,000. A hair plucked from the back of a housefly is used as a paintbrush. All his instruments were crafted by Wiggin.

Don't you love it that he inhaled Alice in Wonderland?

Tuesday, December 23, 2008

Sugar Cookies and Wilton Color Mist Food Color Spray

Those beautiful cookies were taken from a Pillsbury website. Wish I could take credit for them, but the Pillsbury Dough Boy cranked those out and put the picture of those festive creations on Google.

However, today was our day for making sugar cookies from good old Betty Crocker's recipe. The original version of the 1950's recipe can be found at The Recipe Link, or use your favorite recipe printed in any basic cookbook containing desserts.

A new product (for me, at least...you probably have used this before in your decorated concoctions) which graced the top our plain sugar cookies was this: Wilton Color Mist Food Color Spray in a 1.5 oz. aerosol can.

This easy-to-use spray gives decorators the versatility and dazzling effects of an airbrush in a convenient can!
Creates a rainbow of excitement on so many desserts
Use it to transform a plain iced cake with sensational color, add splashes of holiday color to iced cookies and cupcakes
Great for party desserts--highlighting whipped topping or ice cream with color
No mess, taste-free formula; add a little color or a lot
Choose your colors (... 8 colors)
Certified Kosher
And they turned out like this after I used the green color mist spray atop the unbaked cookies:

Not quite like professional results, but they tasted pretty sweet!

I'll be away from posting until next week. Merry Christmas to all!

Monday, December 22, 2008

I Can't Believe I'm Lace Knitting (by Kay Meadors)

In a previous post in October, knitting easy lace shawls was discussed. The pattern for knitting the shawl shown below came free from Knit Picks and can be found here.

I made two scarves from this pattern, and then got a bit more ambitious, using the same pattern, but repeating the lace row four times across instead of twice, resulting in a 16" by 83" shawl.

(photo courtesy of Knit Picks)

This pattern is versatile; according to the number of lace repeats, the shawl can be knitted as either a scarf, or by using more repeats, a shawl can result.

While listening to Episode 74 on the Knit Picks Podcast, it was a learning moment to listen to author Kay Meadors discuss her new book "I Can't Believe I'm Lace Knitting". The book was on my Christmas wish list, and DH let me open up this present early.


Author Kay Meadors says her passion is lace knitting, and after looking through this new book published by Leisure Arts, one is convinced of her love of knitting lace. It is a good read, with 12 projects included in this paperback. Each project is given in order of difficulty. I can't wait to try one of her intermediate patterns in the book and find a new challenge.

Here is a picture of my finished Knit Picks 1-2-3 Shadow Scarf Pattern, incorporating a 4 repeat row shawl, made from a fiber 70% wool and 30% soy. I wore it to church yesterday, and liked the warmth and the fact that it felt like a comfy warmer around my neck and shoulders, and not like a blanket which many shawls can mimic.


You won't believe you are lace knitting when following the simple directions given in the pattern.

Maybe you might even want to start one of the more challenging project in Meadows' new book about lace knitting.

Saturday, December 20, 2008

You Said Visiting Santa Would be FUN....

This morning I was reading blogs and came across Linda's Season of Life message and got a kick out of her memorable old photos of past Christmases with her kids and Santas.

It spurred me on to get out a picture taken of my older daughter Julie back in 1973 with a Michigan mall Santa.


Questions pondered over the years: Did Santa have a bit too much alcohol, and more than enough children that day? Answer: Yes

Isn't that picture priceless? It probably traumatized Julie for a lifetime. She does not see much humor in that picture now, but it has given me many smiles over the years.

One of my brother John's favorite irreverant films about Christmas is National Lampoon's Christmas Vacation. I love this scene:

Friday, December 19, 2008

Adoration of the Magi by Fabriano


A Christmas card came this week from John Linko, and it was so gorgeous that I framed it and displayed it with other icons of Madonna and Child on an entry way table for the holiday season. The artist is Gentile de Fabriano (1385-1427) and is entitled Adoration of the Magi.

The entire panel is 300 x 282 cm and is housed at the Uffizi Museum in Florence, Italy. I was fortunate enough to see this painting (tempera on wood) last year. It is breathtaking.

Go over to Kelli's House to partake of a feast for the eyes. Many bloggers have posted their favorite holiday items there, and it is a treat to see.

JibJab Makes Free Cards!

Try JibJab Sendables® eCards today!


This is a fun website, JibJab, where you can make an e-card, or buy a subscription and make videos with faces you know and love. They have a bunch of cards and videos to preview, but be prepared; it can be a real time sucker.

Thursday, December 18, 2008

Paper Beads used in Earrings

In yesterday's posting about making paper beads with instructions given by Instructables, I wrote about how to use magazines for cut-outs and showed pictures of the glued papers.

Here are pictures of some of the completed earrings made with paper beads, glass, spacers and wires.


These are some of the earrings now sold at the Wooden Horse Gift Shop

...managed by the St. Mary's Hospital Auxiliary, the Wooden Horse Gift shop features a variety of "get well" gifts including flowers, cards, stuffed animals, and novelty items. The gift shop is located on the hospital main floor across from the Columbine Cafe.

Proceeds from sales of gift items go to St. Mary's Hospital. They are priced at $10 a pair.

Tuesday, December 16, 2008

How to Make Paper Beads (for Earrings)

This YouTube video is an excellent "how to" regarding making paper beads. But wait, there is more information below!


The instructables website gives written directions on paper bead making. This source says to use archival paste for making the beads, which sent me on another search of how to make archival paste. I found a good source here at handboundbook paste. So I gave making the paste a try, cutting down the ingredients to 1 Tbsp. of wheat flour sprinkled atop 1/3 cup of water, whisked it together until the lumps were gone, and then cooked it for about 10 minutes until it had a glue-like consistency.

But you know what? This glue was not as good as Elmer's white glue which has been around for generations, and was what I ended up using instead of the flaky archival wheat glue. So much for that little experiment in making glue. I'm sticking with Elmer's.

Another website for making paper jewelry can be found here at Craftside.

And just in case you need to make a wrapped loop for holding the paper bead, michondesign.com will give you a quick tutorial on using wire or a T-pin for a wrapped loop.

Altered Paper Jewelry: Artful Adornments from Beautiful Papers (Paperback) by Jenn Mason (Author) is a book on my wish list. She has lots of good ideas in that little gem of a book. So check it out if you want to go further into paper embellishments.

Here are a couple of pictures of some of the beads I made, both with archival glue from the directions given at handboundbook paste, and with using Elmer's white glue. The more uniform colored green beads were rolled from patterned wrapping paper, and the rest were made from colored magazine photos.

The last step in the finishing process will be to cut the beads at both ends to make consistent sizes for each pair of beads, and then spray them with an acrylic finishing spray. Tomorrow's post will show pictures of the finished beads made into earrings, complete with glass beading.

Monday, December 15, 2008

My Life is But a Weaving (by Grant Colfax Tullar); A Crown as a Visual Aid

Through an exciting exchange of emails beginning in October with Lynda Jones, a lovely young Christian mother living in Ireland, I was introduced to Pam Rosewell Moore, a Christian author of five books, artist, and public speaker. Lynda found me through a prior blog posting and asked that I create a new visual aid for Pam Moore's Christian ministry.

Please visit Moore's website at PamRosewellMoore to read more about her background in the UK and caring for Corrie ten Boom during the last years of her life when she lived in the Netherlands. Moore's current ministry, book excerpts and a calendar of her speaking tours are also found at Pam Rosewell Moore's website.

Mrs. Moore, in a recent email, asked me to create a similar work of an embroidered crown as a visual aid to be used when she provides a testimonial and speaks about her experiences as companion to Corrie ten Boom. (Mrs. Moore as a companion and care giver to Corrie ten Boom during the last seven years of ten Boom's life.)

In part, Moore's email said:
Tante Corrie used the visual aid (of an embroidered crown to great effect ... it is not a tapestry, but a soft pliable, able-to-be-folded embroidery.

I am sending to you ... small pictures which depict the crown embroidery which Corrie used at the end of her speaking days. She had travelled all over the world for more than three decades and this was not the only crown used. She wore the embroideries out, I am sure!
The back of the crown, as you will see on the picture, is a muddle of threads, made even more muddled by Corrie who when she received the crown from whoever had undertaken to embroider one for her, would add extra threads to make the visual picture as confusing as possible … so that the upper side was given the more clarity. Corrie turned the embroidery several times from upper to underside as she quoted the poem “My life is but a weaving…”
Here is the original wording of the poem, supplied by Moore:
The Weaver

My Life is but a weaving
Between my Lord and me;
I cannot choose the colors
He worketh steadily.
Oft times He weaveth sorrow
And I, in foolish pride,
Forget He sees the upper,
And I the underside.

Not 'til the loom is silent
And the shuttles cease to fly,
Shall God unroll the canvas
And explain the reason why.
The dark threads are as needful
In the Weaver's skillful hand,
As the threads of gold and silver
In the pattern He has planned.

He knows, He loves, He cares,
Nothing this truth can dim.
He gives His very best to those
Who choose to walk with Him. (Grant Colfax Tullar)

These are pictures of the process I undertook to make a replica of a crown embroidered piece which Pam Rosewell Moore can use in her current speaking ministry:

1) The project starting with an antique, hand made, crocheted, heirloom doily with cream color tatting. I only wish I could give credit to the creator of this fine piece of handwork, but it came to me through a friend who did not know its origin;

2) And then adding a few supplies of yarns, threads, buttons, beads, threads and other embellishments and needlework, the work began;

3) I completed an embroidered crown, complete with beading and shiny glass embellishments on the top side of the visual aid, along with a tangled web of gold and silver threads on the underside, symbolic of the poem and God's unrevealed plan for those who choose to walk with Him.

This finished visual aid shown below will be sent to Pam Rosewell Moore.

The project was a bit daunting at first, but quickly completed once the ideas jelled. It will hopefully be what Mrs. Moore requested.

Friday, December 12, 2008

Madonna and Child for Display

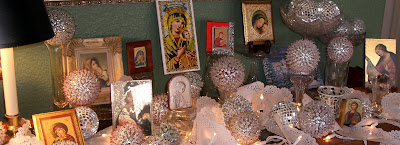
Some religious souvenirs I collect are small icons of Madonna and Child. When traveling, my eye is always out for different renditions of this subject. I have close to twenty of these icons and group them together for a Christmas display, along with miniature lights, crystal and silver ornaments, and sometimes candles.

Here is a thought on this type arrangement from Holiday-guide regarding tradition and whimsy:

A little green, a little red, something sparkly, a few lights --is that your holiday decor plan? Time to go hunting for heirlooms in your china cabinet, add some ... handicrafts and make your home personal and memorable for the holidays.... focus on three elements -- personality, iconic theme and interesting colour combinations -- when ... conjuring up holiday decor ideas. "I recommend starting with your traditional favourites and adding an unconventional twist."

This is a grouping of my display of The Madonna and Child icons, displayed under a large mirror in our entryway. These icons were collected from Mexico, Israel, Rome, Italy, Spain and Norway:


The traditional part of the display would be the icons, and the whimsical part includes paper doilies covering miniature lights which I previously researched in this blog about doilies and lights. So inadvertently, the suggestions from Holiday-guide regarding whimsy and tradition were followed.

This beautiful icon of the Madonna & Child was created by Richard G. Cannuli O.S.A., picture courtesy of The Augustinian Press:

From WorldandI:

The theme of the Madonna and Child is among the most ancient and widespread in Christian iconography and has the greatest number of variations because--beyond its symbolic religious functions--it allows one to analyze the relationship between mother and child in its many aspects.

Reviewing the history of Madonna and Child art was an interesting morning in blog land. Other sources you might like to look at are:

Stencils and Pages for Reproduction
and history-madonna-and-child and History of the Black Madonna and Child

Go to Kelli's House for lovely show-and-tell Christmas displays. Your eyes will have a virtual feast!

Thursday, December 11, 2008

Teaching Prayer to Children; O Holy Night Video

By praying, ourselves, we fulfill the desire we have as human beings to know the God in whose image we are made. Something in us wants to know God. “Our hearts are restless,” Saint Augustine says, “until they rest in you.”

By praying, we rest in God. As our children learn to communicate with God, they too find this special place of rest.

For more information about children and prayer, go to Teaching Children to Pray.


Music by Selah from the album "Rose of Bethlehem" and image sync by my new friend in Ireland, Lynda Jones

Wednesday, December 10, 2008

Former Gov. Adlei Stevenson's Christmas Letter - 1962

Faith and Values spoken by Harold Myra (click on this video link)

The above link is a video from Faith Streams which I saw this morning on the website 30 Good Minutes. It is about facing fear in uncertain times, and how we are called to "face fear with loyalty and courage, and above all, our love for one another."

It was the custom of former Governor Adlei Stevenson to send a Christmas letter to his constituents each year he was in office. This R.L. Stevenson quote was incorporated into his annual letter shortly after the 1962 Cuban crisis:
Give us grace and strength to forbear and to persevere. Give us courage and gaiety and the quiet mind, spare to us our friends, soften to us our enemies.
Robert Louis Stevenson
It is a different take on the Christmas story. The video is well worth a thoughtful look and listen.

Tuesday, December 9, 2008

Poinsettias for Sale

One of the many blogs I visit (virtually) is A Cozy Life. In her posting a few days ago, I came across this gorgeous 5" x 7" watercolor, an original. It is so lovely that I decided to bring out my watercolors and also paint some seasonal poinsettias for our home decorations.

This is Irina Akimova's rendition of a poinsetta. You can buy it from her Etsy shop for only $6. She says it is an original and signed; a bargain of a price!

Other handmade poinsettia items can be found at the Etsy Poinsettia Place. Take a virtual visit and see the lovely items for sale at reasonable prices.

If you need help in caring for a living poinsettia plant, go here for a link.

Sunday, December 7, 2008

Recipe Exchange: It Worked!

Usually, I ignore emails about "do this and you will receive (fill in the blank)". But last week, an email came through that was too, too easy for a quick reply, so I responded with a recipe within a minute. Wow! The response to that email request was almost overwhelming in the number of reciprocated recipes, so I was really pleased that I had emailed out that quick reply recipe (it was already on a saved word processing document, anyway). Some of the recipes that came back to me are printed at the end of this post.

Let me share what the email said, and you might want to start your own recipe exchange, using or modifying this wording:

You have been invited to be a part of a recipe exchange. Please send a recipe to the (2 emails you list) 2 people whose names are listed below (even if you don't know the person in the first space, I do...) and it should preferably be something quick, easy and without rare ingredients. Actually, the best one is one you know in your head and can type out and send right now.Then, copy this letter into a new e-mail, move my name to the number 1 position and put your name in the number 2 position. Only my name and your name should show when you send your email. Send to 20 friends. Seldom does anyone drop out because we can all use new recipes.

The turnaround is fast because only 2 names are on the list. THANKS!

Here are some of the recipes I received:
Jello dessert

Stir 1 1/2 cups boiling water into 2 packages (3 oz. size) Orange Jell-O gelatin in large bowl until completely dissolved. Add enough ice cubes to 1 cups cold orange or cranberry juice to make 2 cups. Add to gelatin, stirring until partially melted. Blend mixture in blender on medium speed for 30 seconds. Spoon 1 can (11 or 15oz. dole mandarin oranges, drained) into large glass bowl or 10 dessert glasses. Slowly pour blended gelatin mixture on top of fruit. Refrigerate 45 minutes or until set. The mixture sets with a frothy layer on top and a clear layer on bottom. Makes 10 servings. Can be made up to 1 day ahead.

Cherry Cheesecake

1 LG. PKG. CREAM CHEESE (AT ROOM TEMP): BEAT WITH ELECTRIC MIXER..SLOWLY ADD 1/2 CUP MILK - CONTINUE BEATING, SLOWLY ADDING ANOTHER 2 1/2 CUP MILK - BEAT UNTIL ALL LUMPS ARE GONE. ADD 1 LARGE INSTANT VANILLA PUDDING, BEAT UNTIL THICKENED. POUR INTO BAKED GRAHAM CRACKER CRUST. TOP WITH CANNED CHERRY PIE FILLING.

Carolina Barbecue (From my South Carolina Son-in-Law)

Take a good hunk'a pork like a butt er' a shoulder.
Rub it with salt brown sugar papriker and black pepper
Stick it in the oven at about 250 degrees for a good long time, 'bout 5 hours.
Make a sauce outta 'bout a half cup o' mustard, about that much ketchup, too , brown sugar bout half cup o that, clove a' garlic an' a cup a' vinegar.
When yer pork comes out, shred it off the bone with forks or meat cleavers. Put on about half the sauce save the rest for adding later if'n ye want. Let it marinate couple 'a hours. Reheat by the serving in the micro, serve on buns with slaw on the bun and hushpuppies.

Dangerous Chocolate Mug Cake
In a coffee mug mix:
1/4 cup flour
1/2 cup sugar
2 T baking cocoa
1 egg
3 T milk
3 T oil
3 T chocolate chips
a splash of vanilla
nuts (optional)

Mix well and place in microwave. Cook 3 minutes on high. Cake will rise over top of mug, so don't be alarmed. Allow to cool. Eat, serves two or three if you want to share.


Easy Chocolate Pie
1 Large Hershey bar + 1 smaller Hershey bar
15 Marshmallows
1/2 cup milk

Heat the above in a double boiler or in the microwave until melted. Mix and let cool,
Then add 1 cup whipped cream (I use whipped topping.) Fold in the whipped cream or topping and pile into a baked crust. Top with whipped cream and shave chocolate over the top. Refrigerate.

Cranberry Nut Bread

2 cups plain flour
1 1/2 teaspoons baking powder
1/2 teaspoon baking soda
1 tablespoon grated orange peel
1 egg, well beaten
1 1/2 cups fresh or frozen cranberries, coarsely chopped
1/2 cup chopped nuts
1 cup sugar
1 teaspoon salt
3/4 cup orange juice
2 tablespoons shortening

Preheat oven to 350 degrees Fahrenheit. Grease a 9 x 5-inch loaf pan. Mix together flour, sugar, baking powder, salt and baking soda in a medium mixing bowl. Stir in orange juice, orange peel, shortening and egg. Mix until well blended. Stir in cranberries and nuts. Spread evenly in loaf pan. Bake for 55 minutes or until a toothpick inserted in the center comes out clean. Cool on a rack for 15 minutes. Remove from pan; cool completely. Wrap and store overnight. Makes 1 loaf.

Ultimate Party Meatballs
1 - 16 oz can Ocean Spray Jellied Cranberry Sauce
1 - 12 oz bottle Heinz Chili Sauce
1 - 2 pound bag frozen, pre-cooked, cocktail-size meatballs (Beef or Turkey)
Place meatballs in a Crock-Pot slow cooker. Combine sauces and pour over meatballs. Cover and cook 4 hours on HIGH. Makes 30 appetizer servings.

Tip: For additional spice, add 1 teaspoon of cumin and 1/4 teaspoon cayenne pepper.
Enjoy!!!

Slow Cooker Chicken and Dumplings

4 skinless, boneless chicken breast halves
2 tablespoons butter (can be saved and mixed with 2 TBSP. flour in last 60 min. to thicken the liquid)
2 (10.75 ounce) cans condensed cream of chicken soup
1 14 oz can of chicken broth
1 onion, finely diced OR Onion Powder
Celery, 2 stalks, whole or diced, if desired
2 (10 ounce) packages refrigerated biscuit dough, torn into pieces
Salt and Pepper, poultry seasoning or paprika, to taste
Vegetables can be added in last hour if you’d like, frozen or canned; drained

DIRECTIONS
Place the chicken, butter, soup, and onion in a slow cooker, and fill with enough water to cover. Cover, and cook for 5 to 6 hours on High. About 90 minutes before serving, place the torn biscuit dough in the slow cooker. Push down into liquid so the tops get cooked too. (OR, roll the biscuit dough out and cut into strips) Cook until the dough is no longer raw in the center.
SERVES: 4-5

This was a fun way to share quick recipes. Thanks, Ronda!

Thursday, December 4, 2008

How to Make Chocolate Dipped Spoons

Isn't it odd that we often do not take our own advice? Case in point: my motto (sorta) is to "Make it Yourself", yet when it came to finding some chocolate covered spoons to give with my coffee mocha unique-edible-gifts-in-jar, I had a dickens of a time finding any.

Why did I not think of making them myself? When I did not find any readily available through my usual grocery and online sources, I found a website that explained how to make the chocolate spoons. It was quick and easy, and will be fun to give with the gifts.

Here are a few spoons with colored sugar atop the chocolate. One cup of chocolate chips covered about 25 spoons, whereas the directions below said it covered 40 spoons.
Just go to chocolate-covered-spoons for their easy instructions, copied here:

SUPPLIES NEEDED
12 ounce package of chocolate chips. You may use semi-sweet, white chocolate, raspberry flavored, or any other kind of baking chip of your choice.
40 heavy plastic spoons
Shortening
Deep glass measuring cup
Colored cellophane or Saran Wrap
Waxed paper
Thin Ribbon
Pour the chips into a heatproof container, such as a measuring cup. A deep cup is the best for this project.

Microwave the cup of chips at half power for one minute. Stir. Repeat in 30 second bursts until chocolate is smooth and fully melted, but do NOT over cook.

Add to the melted chocolate one teaspoon of shortening for each cup of chips. Stir lightly until just blended.

Dip plastic spoons into the chocolate to coat the bowl and about one inch of the handle. If the chocolate starts to harden, microwave 30 seconds at half power.

Lay spoons on wax paper to set. When chocolate spoons have set, put them in the freezer for 15 minutes. This makes them easier to handle when you start to wrap them.

Take squares of colored cellophane and wrap the coated spoons. Tie with a pretty ribbon.

Once you have mastered the basic technique, you can experiment! Try drizzling streaks of white chocolate over dipped spoons to create a design. Sprinkle colored sugar on chocolate before it sets for a holiday look.

A bundle of chocolate spoons set in a coffee mug makes a nice gift.

Tie a few spoons to a bag of gourmet coffee beans for a coffee loving friend.

Keep spoons on hand during the holidays to use when serving drinks to your visitors.

Wednesday, December 3, 2008

Beads and Sequin Ornamental Balls: Make it Yourself

Ten years ago, I came across a magazine article that gave a tutorial on making ornamental holiday balls to use either as gifts, tree ornaments, or to group together in bowls for light reflection. They looked especially nice with candles placed close to the sequin and beaded balls, because the light played off the surfaces giving a soft, glowing effect.

In total, I have made about 20 of these sparkly ornaments, all in different sizes. Not being able to track down the original source, a Google search came up with directions on how to make these decorative balls. The only difference I found in the directions provided by Thrifty Fun and the explanations in the older, previous version was that my steps included:

1) spraying the Styrofoam with acrylic paint (silver or gold being the preferred color for Christmas, ensuring a base of color which will show behind the sequins);

2) after the paint was not quite dry on the Styrofoam, I generously sprinkled silver or translucent glitter on the ball;

3) various sized Styrofoam balls make for a pleasing effect when grouped together

So here are the basic supply needs and further instructions given at the website for making these ornaments. This is from Thrifty Fun. Go there to read step by step instructions and see photographic illustrations for each step in the process.

Supplies:
2 1/2 inches foam balls
8 mm sized sequins
3/4 inch sequin pins
Beads with a hole big enough to fit on the pin and small enough that it won't slide past the head of the pin (size 9)
Ribbon, optional for hanging

Here are a few of the sparkling sequin and bead balls which we display each holiday season:


Remember to individually wrap and carefully store them away, and the balls look fine year after year.

Tuesday, December 2, 2008

Therapy Dog at Work

In May of 2008, Libby Sweetpea was discussed in her training as a therapy dog at a local nursing facility. And again, in June, Libby was featured in this post: therapy-dog-now-certified.

Now she has gone to work as a certified Therapy Dog and this is Libby's Video, complete with the background song "Shiftwork", made popular by Kenny Chesney. Libby is shown at St. Mary's Hospital and The Grand Junction Regional Center in this video. She and mom also visit with hospice patients.

Click here to see a working dog: Libby's Work Day.

Saturday, November 29, 2008

Paper Doilies, Miniature Lights and Christmas Wreath

(Photograph courtesy of Martha Stewart Living)
This wreath is lovely, unique, and easy to create from Martha Stewart:

A delicate-looking wreath that creates the magical effect of candles flickering in the snow is easy to make and surprisingly sturdy. Wreath frames are strung with twinkling lights that are nestled in frothy, doily like paper bouquet holders known as Biedermeiermanschetten...
In order to replicate the wreath according to the given directions, one must purchase German paper bouquet holders. That task was way too involved and expensive for me, so I purchased three sizes of paper doilies at the local craft store instead of the "Biedermeiermanschetten" which are available online.

In less than an hour, a table topper was created using white corded miniature twinkle lights and doilies (just punch through each doily with the tip of the light).

The complete directions for making the wreath can be found here at paper-doily-wreath.

This project was a fast way to create some extra lighting for sparkle on a table top with silver balls and Madonna and Child icons that I have been collecting for Christmas display. Daughter Heidy and I made this Thanksgiving morning while she was here to share the holiday.

And here is a picture (poorly taken) of the lighted Christmas vignette that Heidy helped create:

Tuesday, November 25, 2008

Volunteer Appreciation Photos

Over the past week, the organizations with which I volunteer sponsored some creative and enjoyable events.

On Saturday and Sunday, Western Colorado Hospice and Palliative Care hosted their annual Luncheon and Style Show to benefit the Children and Teen Programs. Table Hostess Karen Madsen is shown in one of the slide show photos. Thanks for your invitation, Karen! (All the clothes were lovely, and the models looked and danced sensationally!)

An appreciation afternoon tea for over 325 volunteers on November 18 at the Doubletree Hotel sponsored by St. Mary's Medical Center.

November 24 was a luncheon for social workers and patient care volunteers, again hosted by Western Colorado Hospice and Palliative Care. This was a time when staff and volunteer patient caregivers had a time to share ideas on the new patient care model which the hospice has recently implemented. About 50 employees and volunteers attended.

Monday, November 24, 2008

This Blog Promotes Mom-preneur Shop-a-Thon ! (moms who are entrepreneurs)

As a regular reader and contributor to The Tip Junkie, I came across her 12 Days of Christmas Give Away and am sharing what she has to say.


It's not too late to list your blog/site/shop in the directory. It’s easy! Just register and fill out the form to add your link. Each listing is only $5.45 and will be promoted until Jan. 1.

Disclaimer:
Only women are allowed to list their stores/blogs/sites in this Mom-preneur Shop-a-thon. I reserve the right to delete any stores that are not family-friendly or who are not owned and operated by women. No refunds. Need Help? Contact the Tip Junkie

This holiday season, the challenge is to buy your gifts from women & fellow bloggers. To help bring you some amazing products and gift-giving inspiration, Tip Junkie is hosting a Mom-preneur Shop-a-thon. I am so excited about our “created by women” holiday season. Your friends and family are going to be blown away by your thoughtful gifts this year! Please support these women with your orders, visits, and by blogging about your favorite products. With so many struggling with the economy, we have the combined power and influence to make a difference in these women's lives and give their families a wonderful holiday. All while enjoying their fabulous products in our own homes and those of our loved ones. {{hugs to all who participate}} Please note: most of these products are hand made and will require extra time for shipping.

So don’t delay and start shopping!

Wednesday, November 19, 2008

Prayer Shawl Pattern for Wheelchair Users and Those in Bed

In a previous post, prayer shawls were discussed. I was searching for a way to make a shawl from quilting or fleece fabric because it would be much quicker to construct by sewing, using purchased fabric.

While browsing the internet, I came across more than 200 sites about prayer shawls, but not one reference could be found on how to make a shawl using fleece or flannel material. So if you are looking for something not requiring the time and expertise commitment of using yarn in a knit or crochet technique, this pattern idea might work for you. It is especially useful for wheelchair users or for those who stay in bed most of the time.

Here is some background on prayer shawls before I get on to the quick pattern I devised below:
The Prayer Shawl Ministry was started by Janet Bristow and Victoria Galo in 1998. Susan Izard and Susan Jorgensen wrote Knitting Into The Mystery which is an excellent introduction into the rituals of prayer shawl knitting. A very good introduction into the process and a good reference for starting prayer shawl ministries. But, there was really only one pattern so it was a bit limited in terms of yarns that would look good with that pattern.
This reference to the Prayer Shawl Ministry was found at Kelly Petkun's site. Kelly has a weekly podcast that her dog Xena helps produce complete with voice-overs.... I mean bark-overs in the background. You can listen to the Knit Picks podcast here at KnitPicksPodcast.

Kelly talks about knitting, products, and interviews guests discussing recent knitting designs and life, in general. Kelly and her company are virtual friends by way of download! And every bit of yarn that I have purchased from the Knit Picks website has been of good quality and arrived quickly.
The above picture is a shawl used as a prototype for the pattern I cut out this morning. The original outside dimensions are 63" (length) by 50" (width).
To make this shawl for someone who stays in bed, the fabric was cut down in the back so that the shawl will drape across the shoulders and warm the front of the body. Cutting out extra fabric from the back makes it easier to maneuver in a wheelchair, and also decreases bulky fabric while using in bed.
Here are some easy directions and a picture of the work in progress:
PATTERN FOR PRAYER SHAWL (using fabric):
Fabric requirement: 2.25 yd EACH of two contrasting fabrics (fleece, flannel, old quilts, etc); or a total of 4.5 yd of 45" wide fabric from the same fabric bolt
Notions: thread

Directions:
1) Cut two pieces of fabric 39" long (includes 1/2 inch seam allowance). The total width will be 50", most of which will be used for the front of the shawl. You will need to piece these two cuts of fabric together, making a seam down the center back, ensuring the width of the cut pieces, when sewn together, is about 50" wide. Press pieced seams flat.
2) Cut a "U shaped" window from the fabric from the bottom up, leaving about 8" at the top for neck and shoulder placement (the "U shaped" cut out should be about 8 " wide and 29" deep and will be placed behind the neck).
Repeat the above steps for the second fabric side.
3) With right sides facing each other, sew the two fabric pieces together, leaving about a six inches opening for turning the shawl right sides out. Press seams flat.
4) Hand sew the opening together using a slip stitch.

Here is a picture of a finished flannel shawl using the same fabric on the back as on the front. It looks warm, will be easy to use in bed, is washable, and will be more comfortable because some of the bulky fabric has been eliminated in the back. This is for daughter Julie while in the hospital, at the nursing home, or in her wheelchair.
Good luck in making some of these for people you know who might need a little comfort, with a prayer sewn into them.
Leave me a comment if you have questions.

Monday, November 17, 2008

Unique, Edible Gifts in a Jar

Our next-door neighbors are great. They never complain, are quiet, friendly yet unobtrusive, pleasant to chat with, and are all around super people sharing fences.

At this time of year, it is always a challenge to figure out something to give friends and neighbors that will be both somewhat unique and useful as a Christmas token of friendship. So a handmade gift is usually the best I can come up with for sharing. Making it edible and disposable are also desirable attributes of a gift for "those who have everything".

This season, I am going to try several jars of layered food items (bean soups, pancake mixes, scone mixes, cake mixes, hot chocolate mixes, etc.) for gifting to family and neighbors. Here is a fantastic website to check out for just such an idea: Budget 101; it has lots of great ideas and thousands of recipes for hand made give-away dishes. And this site also gives tips on how to make the entire package look attractive and seasonally packaged.

Here are some of my gifting recipes gleaned from Budget 101:

from Christmas Coffee Mix in a Jar:

1/2 cup powdered non dairy creamer
1 cup mini chocolate chips
2 Tbsp vanilla powder
1/4 cup sifted powdered sugar
2 cups nonfat dry milk powder
2/3 cup instant coffee crystals

Combine all ingredients and seal in ziploc or vacuum seal bag (or jar).

GIFT TAG DIRECTIONS: Add 3 T of mix to mug of hot water, stir & enjoy. May serve with chocolate dipped spoons.

and from Italian Herb and Rosotto Rice Recipe, this package looks excellent, easy and should prove colorful in the jar:

3-1/2 C. arborio rice
3/4 C. snipped dried tomatoes
8 chicken bouillon cubes
3 T.instant minced onion
2 t. dried oregano
1 t. instant minced garlic
1 t. dried rosemary
1 t. dried basil leaves, crushed
1/2 t. pepper

Makes 4 half pint jars.

Equally divide the ingredients and layer into 4 jars (evenly). Gift Tag : Boil 3 cups of water, add 1 jar of mix, cover, reduce heat and simmer for 20 minutes on low. Add 1/2 c. Romano or Parmesan cheese, stir well and enjoy.

Here is a picture of a peanut butter cup cookie recipe in a jar filled with the dry ingredients (enough for two dozen cookies):

Recipe from Peanut Butter Cup Cookies:

Reese's Peanut Butter Cup Cookie Mix in a Jar

3/4 cup sugar
1/4 cup packed brown sugar
1 3/4 cups flour
1 tsp. baking powder
1/2 tsp. baking soda
8 large Reese's peanut butter cups candies cut in quarters & Placed on top.

Combine all ingredients in Jar (in Layers) or vacuum seal bag.

Recipe to attach to jar:

1 Jar of Mix (take out candies; Set aside)
3/4 cup softened butter
1 egg, slightly beaten
1 tsp. vanilla

Combine all, except candy, in good size bowl; mix well. Once mixed, add Reese's cups and mix them in gently, or press them into each spoonful on the cookie sheets. Drop by big spoonfuls on greased baking sheets; Bake in 350 F oven for 12-14minutes.

These jars are fun to make, fun to give, and hopefully, will be easy to assemble for the giftees, and delicious when served.

Friday, November 14, 2008

How to Get Free Pictures

Guests for Dinner

Just a Bunch of Clips
I just found out about a great website where you can obtain about any type of photograph you might want. This site is especially useful for bloggers looking for images to perk up their writing (remember the old saw of "a picture is worth a thousand words"). The photos above were grabbed from this free site.

Here is the website: Acobox. Just register with your name (and website, if applicable), and thousands of pictures are yours, royalty free and you do not have to worry about copyright infringements. Cool!

Thanks to busybeevillage for the heads up on this free service!

Wednesday, November 12, 2008

Paperback Swap Exchange Club - Pay Postage Only

There are more than 2.5 million books available at the PaperBack Swap internet club. All you must do is list ten books which you are willing to send to someone else, and your account is established. This morning I listed ten paperbacks in a New York minute and requested two back. The sytem works on a credit basis (2 points per book), and the only cost that is incurred is when you agree to send one of your listed paperbacks to another member of the club.

And to think of those tons of paperbacks that are who-knows-where before I was aware of this great deal!
Example:
Here is what they post:
Do you have any used paperback books lying around? I did, and I finally found a great way to share them with other people.

It seems that a few guys were sitting around one night talking about all the paperback books that they purchased over the years when they traveled on business. Each of them had a stack of books that they had read. So they decided to set up a web site http://www.PaperBackSwap.com/ that allows all of us to swap paperback books with each other. Now it's grown to include ALL books--hardcovers and audio too!

Let me tell you how it works because it is so easy. I listed a bunch of books on the site (you have to list at least 10 books to get in the club) and I got 2 free book credits to get me started. So you can order 2 books right away - free of charge and have them mailed directly to you. No strings attached. No gimmicks. No spam mail. Nothing! You just have to love reading.

Then when another member selects one of my books that I have listed, I mail it to them. Yes, I pay for the postage. But then I get a book credit and I can select a book that I want. So another Club Member returns the favor and mails me one of their books free of charge. For every book I mail out, I get another book in return - a true shared system!

And when someone requests one of your books, all you have to do is print a two page document on regular paper from your printer, and use them to wrap the book. The wrapper includes the mailing address and the amount of postage. Then drop the package in the outbound mail. Hey, most of the time you don't even need to go to the post office!

Right now the annual club membership is FREE! Eventually the founders will ask everyone to help contribute to pay for the upkeep of the web site, but for now the annual club membership is free. The annual dues will probably be between $10 and $20 based on the number of people in the club. But again, right now you don't even have to pay any dues for one year if you become a Charter Member.

You really need to check this out! And if you do sign up, please list my email in the referral section because then I get another free book. This is a great club http://www.PaperBackSwap.com/

Monday, November 10, 2008

November is National Hospice Month; Veterans' Day Appreciation

All of us must face grief in our lives. Coping with grief is a topic which I have been researching lately because it has hit so close to home in these past months.

Grief comes in many forms, not only in the loss of a loved one through death, but also in the form of other significant losses. Loss of a job, a relationship, an income, our youth, good health, and even the realization of losing unreached expectations can all be forms of deep loss.

There are online support groups for loss who have experienced loss, such as Grief Net, “where grace happens” and Grief Recovery, dedicated to grief loss and recovery. There are community based programs dealing with grief, such as Western Colorado Hospice and Palliative Care Program, with which I am proudly associated.

Last month I completed 30 hours of volunteer training for this group, and look forward to working in the patient care setting for this organization either at the inpatient care center, in private homes, or in nursing homes. Our local hospice has over 300 volunteers, which is a real tribute to our giving community.

From Gifts of Grief, a 52 minutes film can be ordered:
The Gifts of Grief asks a timely important question - How do we transform the tragedy of our losses into a life altering experience that deepens and enriches our lives?...We explore the possibility that grief while very painful, it is one of the closely guarded keys to true transformation and joy.
In a previous post Certified Therapy Dog, and also here at Therapy Dog in Nursing Facility, Libby Sweetpea has been highlighted as a helper dog. She will continue to help me at our local hospice.

An excellent video which I watched over the weekend, entitled "Wounded Warriors", gave helpful information about dealing with war veterans as they face their own mortality and deaths. Post traumatic stress disorder (PTSD) was high on the list for acute awareness in dealing with those who have been engaged in our armed forces, and especially those who have faced battle.

Grief issues addressed to Vietnam veterans are covered succinctly in an article at this Australian supported site A Digger and a Bloke. The article is much too long to quote in this post, but it is worth reading for the enlightenment factor of what veterans often face when dealing with PTSD.

Thank you, veterans, for your service. Thank you, all hospices world-wide, in sensitively dealing with end of life issues.

Pulled Pork Barbeque with Liquid Smoke (the whole bottle)

Wow! Did we have a taste treat yesterday courtesy of a recipe I heard about in a podcast last week from The Splendid Table. It was Bar-B-Que Pork made with an entire bottle of Liquid Smoke.

In all my cooking life, I have only used liquid smoke by the dropful because of the power packed into it. So when I heard about using the entire 4 oz. bottle, I was dubious of the results. But the pork was fantastic and tasted like real Southern Barbeque.

It took a total of about ten minutes to put together, and cooked about eight hours in the crock pot. (And YES, use every bit of the contents of the rub recipe on the pork, although it seems like a large amount of spices. The original recipe calls for using 1/4 cup of the basic rub, but I used the entire 2/3 cup and was pleased with the results.)

Here is the recipe found at this website: Recipes

Ultimate Cheater Pulled Pork
Reprinted from Cheater BBQ: Barbecue
Anytime, Anywhere, In Any Weather by Mindy Merrell and R. B. Quinn (Broadway
Books, A Division of Random House, Inc., 2008) Copyright 2008 by Mindy Merrell
and R. B. Quinn.

Okay, here we go. Either we have you hooked at "Ultimate Cheater Pulled Pork" or this book is headed straight for the library's used book sale. We know that. You know that. So, let's drop the chitchat and make some cheater barbecue.

In short, you drop a pork butt into the slow cooker, add dry rub and bottled smoke, close the cover, go away for a while, pull or chop the meat and pile it on a bun, add sauce, get out the pickles, open a beer. BOOM! That's barbecue, baby. Can you feel it? That's Ultimate Cheater Pulled Pork.

Makes 12 to 14 servings

One 5- to 6-pound boneless Boston butt pork roast or same weight of boneless country-style pork ribs
1/4 cup Cheater Basic Dry Rub (recipe follows)
1/2 cup bottled smoke
Barbecue sauce of your choice

1. Cut the pork butt into medium (2- to 3-inch) chunks (the ribs don't need to be cut up).

2. Put the pieces in a large slow cooker (at least 5 quarts). Sprinkle the meat with the rub, turning the pieces to coat evenly. Add the bottled smoke.

3. Cover and cook on high for 5 to 6 hours or on low for 10 to 12 hours, until the meat is pull-apart tender and reaches an internal temperature of 190 F.

4. Using tongs and a slotted spoon, transfer the meat to a rimmed platter or baking sheet. Let rest until cool enough to handle. Pull the meat into strands. It should shred very easily. Serve the barbecue piled on buns with your favorite barbecue sauce.

5. To serve the barbecue later, cover and refrigerate the meat when it has cooled. Pour the meat juice into a separate container and refrigerate. Before reheating the juice, skim and discard the congealed fat layer on the top.

6. To reheat the barbecue, place it in a saucepan moistened with some of the reserved juice. Gently heat the meat on medium-low, stirring occasionally. Or, place it in a covered casserole with some of the reserved juice and heat in a 350 F oven for 20 to 30 minutes.

7. While the meat warms, combine the barbecue sauce and some of the additional reserved meat juice in a saucepan. Heat through and serve with the barbecue.

Cheater Basic Dry Rub (Makes about 2/3 cup)

1/4 cup paprika
2 tablespoons kosher salt
2 tablespoons coarsely ground black pepper
1 tablespoon garlic powder
1 tablespoon dry mustard

Combine all the ingredients in a jar with a tight-fitting lid. Shake to blend.

I was so hungry after smelling that aroma of meat cooking in the kitchen all day, I forgot to get out the camera and take a photo of it. Instead, we delved into the pork and a couple of side dishes of cole slaw and garlic bread, and the camera was left aside for the mouth watering event.

Oh, and our choice of purchased bottled Barbeque Sauce on the side was "KC Masterpiece Sweet & Tangy".

Saturday, November 8, 2008

Autumn Photo


Our sweet sister Pam sent me three lovely metallic acorns yesterday in honor of fall. What a thoughtful thing for her to do. Thanks, Pam! I will use them in several ways over the next years and always think of you when I see them.

In the lower right hand side of the picture is yet another lace scarf that is almost off the needles. It will go on the Flickr and Ravelry websites today as a UFO (unfinished object), with another pair of socks begun for the December Pair a Month challenge, also on Ravelry, the international and internet knitting and crocheting community.

Friday, November 7, 2008

Vintage Patterns & Prayer Shawls Made From Quilts

One of my favorite weekly emails is from Debbie Colgrove, a sewing whiz with a company which someday might rival Martha Stewart, if given the right opportunities.

Here is what Colgrove said today:
I have a gazillion patterns.... so many that it's usually easier to glance through pattern books and buy a new one than it is to try and find the pattern I want...
And who hasn't wanted to go back in time and retrieve that classic pattern used years ago?

There was one particular dress pattern my SIL Charlotte and I used until the pattern was worn thin: that of a long jumper dress.


So I went on a search through vintage patterns on the internet. There are many listed websites for vintage patterns, but the site where I purchased this pattern from was Old Patterns. This is the pattern I purchased:

My favorite is the jumper displayed in the middle of the photograph (it uses 4.5 yd. of 45" fabric).

Reading emails and others' blogs is dangerous to my personal economy, but I did pick up another thread of conversation from the Colgrove email that was a link to a book titled Prayer Shawl Quilts.

This book piqued my interest, so I went to my blog sidebar (see the little picture of the book with AMAZON printed on top of the box) and ordered the book. It should be here by next week.
Making prayer shawls through the knitting and crocheting method is a lovely sentiment; the time requirement is intensive. My daughter Julie (in a nursing home and due for another surgery on Nov. 18) is always cold, so using quilts, blankets, fleece and other warm materials to make washable shawls for her will be my answer to keeping her cozy while in bed.

And I can sew prayers for her comfort into the shawls, as well. Look for a report on the book Prayer Shawl Quilts from me soon.

Wednesday, November 5, 2008

The Color Red - Mood Affectation, Use of Red in Art

Red is a color I am attracted to. It is in my home, wardrobe, knitting projects, artwork and even favorite foods. I love the mixing of red with other colors, especially blues and oranges, to make a differing palette of colors from which to choose. Using red in the mixing of oil paints gives visual impact in painting.

One of the examples of red used in my artwork is linked previously at this site.
From Information on Color:

The most emotionally intense color, red stimulates a faster heartbeat and breathing. It is also the color of love. Red clothing gets noticed and makes the wearer appear heavier. Since it is an extreme color, red clothing might not help people in negotiations or confrontations. Red cars are popular targets for thieves. In decorating, red is usually used as an accent. Decorators say that red furniture should be perfect since it will attract attention.

The most romantic color, pink, is more tranquilizing. Sports teams sometimes paint the locker rooms used by opposing teams bright pink so their opponents will lose energy.

It is interesting that wearing the color red makes one appear heavier. This fact must not have significant impact on the majority of males, according to The Future Pundit.

A groundbreaking study by two University of Rochester psychologists to be published online Oct. 28 by the Journal of Personality and Social Psychology adds color—literally and figuratively—to the age-old question of what attracts men to women. Through five psychological experiments, Andrew Elliot, professor of psychology, and Daniela Niesta, post-doctoral researcher, demonstrate that the color red makes men feel more amorous toward women. And men are unaware of the role the color plays in their attraction.

The research provides the first empirical support for society's enduring love affair with red. From the red ochre used in ancient rituals to today's red-light districts and red hearts on Valentine's Day, the rosy hue has been tied to carnal passions and romantic love across cultures and millennia. But this study, said Elliot, is the only work to scientifically document the effects of color on behavior in the context of relationships.

Another view on the color red from Web MD is worth the read.

What does this say about the US going blue in yesterday's election? Hmm, it is food for thought in many blogs today. Take a look at my husband's blog, "Living the Grand Life", for his Simpson cartoon comment on the country going blue overnight.

Monday, November 3, 2008

Easy Lace Scarf; Independent Wool Dyers


The easy lace scarf pictured here was knitted using only four stitches: the knit stitch, the purl stitch, the yarn over stitch, and by knitting two stitches together.

Here is the pattern for the lacy scarf:

Cast on 38 stitches (size 6 or 7 needles)
Row 1 Knit
Row 2 Purl
Row 3 K1, [K2 tog] 3 times, [YO, K1] 6 times, [K2 tog] 6 times, [YO, K1] 6 times, [K2 tog] 3 times, K1
Row 4 Knit

In a previous post on this blog, this scarf was also mentioned, and now it is completed.

If you need to refresh your knowledge on the "yarn over" technique, this video will show you how.

The yarn used for this project was 50% wool and 50% silk, hand dyed by the Hand Maiden, a Vancouver dyer. It is functionally warm, and soft with the silk woven into the wool fibers. An excellent link can be found at this site; all kinds of useful information is given there about the dying of fibers.

At the Etsy shop, over 8,000 items of hand dyed wool can be found at this website: Independent Wool Dyers.

I have purchased several items from Etsy independent dyers and sellers and have been very pleased with their products. Try them out, and buy handmade!

Saturday, November 1, 2008

Halloween Night Dress Up

Halloween Night: Waiting for Visitors at the Door


We only had a few trick-or-treaters last nite. It could not have been due to the shrinking dollar....


The weather was nice in Colorado, so maybe it was because of the quality of the candy we handed out that the goblins did not come out in droves. Whatever the reason, there was a lot of candy left in the treat bowl after our porch light was turned off!


And here is a picture of my sis-in-law's dogs all dressed up in their winter capes. They look like they are awaiting Halloween visitors, too.

Friday, October 31, 2008

Attitude of Gratitude; Request for Cards for Julie

Several months ago, in this post, I wrote about my daughter Julie, who was born with spina bifida. On August 25, 2008, she was admitted to the Carolinas Medical Center for a urinary diversion procedure. Medical complications arose and and led to a revision of her AV brain shunt , and an entirely different procedure of a nephrostomy, yet another medical complication. She is still under constant medical care at Hunter Woods Nursing and Rehab. in Charlotte, NC.

She has been hospitalized for eight weeks and is now in a nursing rehabilitation hospital. This is another in a long line of surgeries and hospital stays she has experienced throughout her life. Julie will likely go back into the acute care hospital for another surgery next week. There is not much to break up her long days in bed, and she enjoys mail.

Julie has given her permission that I write in this blog asking for cards or letters from people who might read of this request, and wanted me to be sure and say that she is one of the more fortunate people born with the birth defect of spina bifida.

I am asking you to please drop her a card. It would make her day to get something in the mail addressed to her, even if it were from a stranger. You may not know her personally, but this act of kindness on your part would be received by her with more than heartfelt thanks. I will send you her name and address if you would contact me at nmccarroll at mindspring dot com, or if you leave a comment asking for her address, I will immediately get back with you. For the next week, she may receive mail addressed to

Juliet Heniford, c/o Hunter Woods Nursing & Rehab Center,
Room 605, 620 Tom Hunter Road
Charlotte, NC 28213
.

In talking with her on the phone, I was struck, once again, by her positive attitude. Yes, she has been hospitalized and stuck in the nursing home for going on three months now, but what she said to me was amazingly wonderful:
"But, Mom, it could be so much worse. At least I hallucinated for only a week and was not in Intensive Care very long this time. Another guy had this same type procedure two and a half weeks after I did, and he is still in Intensive Care and intubated. I'm just in bed, but am awake and I can watch television."
Her attitude of gratitude was powerful, and led me to post this message.

From How to Develop an Attitude of Gratitude:
True gratefulness comes from a conscious decision to recognize your blessings, coupled with the emotional feelings that accompany a thankful heart. An ungrateful person can utter the words “thank you” in protest. A thankful person can hold their gratitude as a guarded secret, yearning to be shared.
“Do not fret or have any anxiety about anything, but in every circumstance and in everything, by prayer and petition, with thanksgiving, continue to make your wants known to God.” Phil. 4:6

While writing of gratitude, this prayer in the form of a benediction written in 1513 by Francesco Giovanni is most appropriate:
There is nothing I can give you which you do not have; But there is much, very much, that while I cannot give it, you can take.

No heaven can come to us unless our hearts find rest in today. Take heaven! No peace lies in the future which is not hidden in this present instant. Take peace!

The gloom of the world is but a shadow. Behind it, yet within reach, is joy. There is a radiance and glory in the darkness, could we but see,and to see, we have only to look. I beseech you to look.
Again, please get in touch with me if you would be willing to mail Julie a card to her home address. Also feel free to use the Hunter Woods address above through November 7, 2008, prior to her next surgery.

Your prayers for God's Hand to be on her are so very much appreciated.

Thursday, October 30, 2008

Quick Halloween Costumes for Dogs

Want a fast, easy way to dress up that pup of yours? How about a simple scarf cut from a 1/4 yd. of Halloween or (insert appropriate holiday time here) seasonal fabric? Cut a triangle on the diagonal of the grain of fabric, put the fabric piece around the dog's neck and tie under his chin.

Or, go a bit fancier and make a double sided scarf with two coordinated fabrics, sewn together right sides facing one another, leaving a few inches gap for turning the fabric right side out. Attach a button or velcro for closing the scarf, and your furry dog friend will not be bothered by a heavily knotted piece of fabric under his chin.

A paper pattern is shown here and looks like a modified bell curve, with the length of the pattern at the longest end being about 20 inches for a small (10 lb.) dog.

Therapy International Dog Libby Sweetpea is shown sporting her Halloween scarf. This tie was made by cutting out two coordinating fabrics in the shape shown above, sewn together, turned, and a buttonhole and button added on each side of the rounded triangular shaped scarf.


Another idea for making dog clothes from the ever popular onesies for babies can be seen here at DIY Quick & Easy Dog Clothes. If you click on the link, a darling tiny Chihuahua will be shown sporting a pink onesie easily made with directions given at the same site.

My DH does not like animals in sporting outfits, and will not walk either of our pups with their pink leads, but once in a while he goes along with a themed scarf around their necks. What compromises we make for family harmony!