Saturday, March 14, 2009

Crafting Boxes and PaperDolls

Looking for a box template on the internet, I came across a variety of sources. One especially talented crafter came up with many different designs, including a template for making articulated paper dolls.

The directions given for making these creations are given for using card stock. You can enlarge the size to make almost any small box. This being said, I looked through my file of greeting cards which I save for just such a project, and came up with a sweet little bear card which I cut out, making a small puffy box to hold gifted handmade earrings. There is no need to purchase new card stock paper if you have a few cards on hand. (This is a good way to recycle your previously received birthday or other special occasion cards.)

Here is the template for a box made from cardstock from websource Mirkwood Designs for the puffy box:
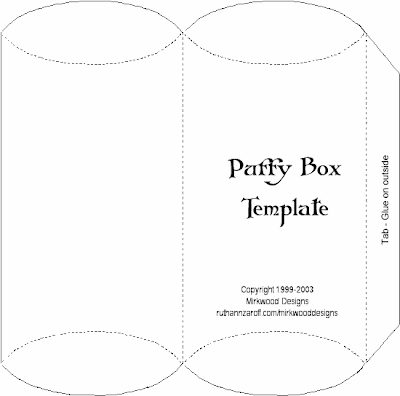
Please note the restrictions:
Copyright 1999-2008 Mirkwood Designs, a division of ruthannzaroff.com. These templates are free for your use to make craft items to give or sell, to use for teaching purposes, or for submitting projects to magazines. I would appreciate it if you provide a link to my Web site. The templates themselves may NOT be auctioned, sold, or published in any way without my permission.
This adorable template could provide hours of fun for all age groups from children to adults. One of my blogpals, Diane at Dianes Mixed Art could go to town with her mixed media talents, making a spectacular work of art from this template, courtesy again of Mirkwood Designs:

I am going to make this doll about 7-8" in height for an indoor potted plant, whimsically dangling from one of the leaves.

Here is the original template:

Wednesday, March 11, 2009

Salt Cellars and a Contest for Best Uses Today

Several cut glass anachronistic salt cellars were among my mother's prized what-nots in her dining room buffet. She used these little dishes as water holders when she painted with watercolors (a "no-no" in art instruction now, since one is taught to use large containers of water with this paint medium). As a child, I thought it odd that these little containers used to be set on the table for individuals instead of the larger salt shakers now in play.

Since I inherited these little glass objects, it was worth a look into their history. Here is some information about them:

This site gives a bit of history about salt cellars:
...historically, salt was a very precious and valuable commodity -- and salt was kept on the table in small but sometimes elaborate dishes known as salt cellars -- and just being able to afford salt was something of a status symbol. Where salt cellars were shared amongst a number of people at the dinner table, unless an individual spoon was not provided with the salt cellar, the proper way to take salt from the salt cellar was not with one's fingers but with the clean end of one's knife or fork (rather than the side that goes into one's mouth!).

Collectors of salt cellars even have annual conventions where they can meet, greet and purchase their favorite item of collection. This seems odd to me, but then again, I play tournament Scrabble, so who am I to say?

Salt cellars, also known as salt dips, open salts, and salt dishes, are not cellars at all, but an open dish, without a lid, that was used by wealthy families from the middle ages until WW II.
Now I'm in a quandary about how to best use these little salt cellars. Maybe I should.....

1) leave them out on the armoire in the evenings, and fairies could use them as wee bathtubs; or
2) perhaps they can be used as earring holders in the boudoir?;
3) or how about fire ants using them as a punch bowl for an outdoor picnic?

If you would like one of these antique salt cellars shown in the photograph, just leave a comment below about what you would do with one of them. I will pick a random respondent to receive one of these antique salt cellars, postage paid, with my compliments.

Don't you just love a contest where you have nothing to lose?


Monday, March 9, 2009

African Violets - Crowning Problem

In the state of today's economic and emotional downward spiral, let's talk about something positive: plant resuscitation. Case in point, our poor little African violet plant seems to be on its last legs. Its roots are above the soil about three inches, its leaves are drooping, and it looks like maybe this is the end of plant. But, wait! Maybe there is hope. After all, it was still blooming one week ago, so there may be a solution to this crowning problem; maybe it can be revived.

From The African Violet Factsheet, this source gives hope:
Repot violets about once a year, or when the leafless portion of the stem is about 1 to 1 1/2 inches long. Gently remove the plant from the pot with a paring knife. Remove all lateral crowns, leaving only the center crown. Trim off one or two rows of leaves, leaving a wheel of leaves around the crown. With the paring knife, scrape the neck as you would a carrot until all the brown plant material is removed and the neck is firm and green. Break or cut off the bottom half of the root. Have a clean pot ready for the pruned violet. Gently firm in new soil around the plant and water well. The pot should be one-third the diameter of the plant; a 4-inch pot is usually adequate.
Similarly, from Gardening Guide:
When it is time to repot, remove all crowns from your African violet except for the central one. Also, trim leaves from the plant, leaving a circle of leaves around the crown. Use a paring knife to scrape through the brown plant matter on the neck of your plant. When you see green, break off half the root and set your pruned African Violet into the pot, placing the crown just above the surface. Press the mixture firmly around the crown and water your plant well.
Alrighty, let's see what happens. Here is a picture of the sickly African Violet before, and after, transplantation into fresh potting soil especially designed for this delicate little guy.


Time will tell if these efforts of paring down the root and repotting the pruned plant will bring it back to better health. More pictures to follow in the future ... let's hope it survives.
The final replanted violet, the crown pruned, its roots tamped into fresh soil, re-watered, but still in need of its bottom leaves pared down to a circle: