Friday, February 11, 2011
77,777 visits to my corner of the world
After almost three years of blogging on this site:

Compared to The Huffington Post with 28 million visits a month, my blog readership is definitely small potatoes.
But that number will all the sevens in it just struck me as somehow significant.

Compared to The Huffington Post with 28 million visits a month, my blog readership is definitely small potatoes.
But that number will all the sevens in it just struck me as somehow significant.
Thursday, February 10, 2011
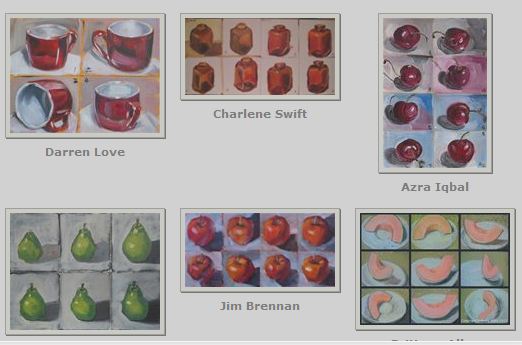
Take the 10 Minute Art Challenge
Ninety-one entries as of 2-9-11 came into The Daily PaintWorks Challenge found here. This is a fun experiential art challenge. More information from the same site says:
Here are some of the entries for Carol's challenge:

 Now YOU try it.
Here is an owl I chose to view, and then paint:

Looking for shapes? I think not...still too focused on detail!
 The fourth attempt was the better one. But it still had too much detail. However, it did look a bit less like a cat and a bit more like an owl. Back to the drawing board.
The 10 Minute Challenge was a great exercise. IMHO.
The rules: Get a timer. Divide your canvas or canvases (I used 2 - 6x6in Raymar canvases) into 8 or so small squares (or rectangles). They should be smallish – a couple or 3 inches square or thereabouts – they don’t have to be perfect. Now choose ONE object. Just one. Set your timer for 10 minutes. Paint your object in the first square. When the timer goes off – stop! I mean it. Repeat until you are done. You can rotate your object and/or change the light for each new square.
The objective: You want to get a feel for your object in terms of brush strokes. Make sure you SQUINT and SIMPLIFY! Whatever you do, DON’T get bogged down by the details or you’ll never finish. Try to think of it NOT as an apple (or whatever you’ve chosen) but rather just shapes and colors and values. Paint what you see – not what you THINK you see. If you find yourself doing the same thing every time – experiment! You won’t learn unless you try something different. Expect the first one to be bad – you are getting a feel for just how long 10 minutes is. They will only get better.Carol Marine of Austin posted the above challenge on the Daily PaintWorks website.
Here are some of the entries for Carol's challenge:

Here is an owl I chose to view, and then paint:


The 10 Minute Challenge was a great exercise. IMHO.
Wednesday, February 9, 2011
Norwegian Shawl (Sivia Harding)
Four months later, the Sivia Harding Norwegian Shawl found here on Ravelry is finished. Dimensions are 74" x 33" from 2-ply, Cascade lace weight yarn, hand dyed in Cherry Creek, NC.
 (blocked and drying)
Here is the couch wearing the shawl:
 Of all the shawls in all the towns I've ever knit, this one was the most difficult (for me) to finish. But I'm glad I did, and ya can't say it will ever be too small at over six feet in width.
Sivia Harding has a wonderful line of knit patterns found here at Sivia Harding Knit Design.

 (blocked and drying)
Here is the couch wearing the shawl:

Sivia Harding has a wonderful line of knit patterns found here at Sivia Harding Knit Design.

Monday, February 7, 2011
Half-Time at Super Bowl
Were you underwhelmed with Super Bowl entertainment?
 picture: Dave Martin/AP
Hope your snacks and friends made it more enjoyable.
The Black Eyed Peas brought the youth, but little else. "I Gotta Feeling" the NFL will be looking to try and find a better balance in time for Indianapolis next year.
 picture: Dave Martin/AP
Hope your snacks and friends made it more enjoyable.
Thursday, February 3, 2011
Tuesday, February 1, 2011
Hospice and Knitting: The Beat Goes On
A new group is starting up tonight at our local hospice (Hospice & Palliative Care of Western Colorado) where I volunteer. The group is "Knit & Chat" for both staff and volunteers. It will be a chance to socialize, knit and gain information to help with patient care.

In 2010, the Education Department at hospice offered Online Education. I completed a course in one day entitled "Because You Never Died Before". Great information, excellent speakers, and a quick test at the end. I'll be taking more online courses this year. We will likely chat about some of the new online offerings while we knit.
This is my current knitting project, still on the needles, and found here on Ravelry. It is the Norwegian Scarf found at Silvia Harding Knit Design. The yarn is laceweight, 100% silk, hand dyed, purchased in London in October. About another month of intermittent knitting, and it should be finished. This Norwegian Scarf is what I'll be working on tonight at the Knit & Chat group.

This is the Bandito scarf I finished on Sunday. It was an easy pattern with good stitch definition, and I'll definitely be making more scarves from the Bandito pattern (free).
 And back to hospice: if you have ever thought about volunteering at your hospice, now is the time. It is truly a rewarding experience.

In 2010, the Education Department at hospice offered Online Education. I completed a course in one day entitled "Because You Never Died Before". Great information, excellent speakers, and a quick test at the end. I'll be taking more online courses this year. We will likely chat about some of the new online offerings while we knit.
This is my current knitting project, still on the needles, and found here on Ravelry. It is the Norwegian Scarf found at Silvia Harding Knit Design. The yarn is laceweight, 100% silk, hand dyed, purchased in London in October. About another month of intermittent knitting, and it should be finished. This Norwegian Scarf is what I'll be working on tonight at the Knit & Chat group.


Sunday, January 30, 2011
Modge Podge is Genius
A great idea for creating artwork on canvas by scanning color pictures and using Modge Podge can be found here.
That useful product Mod Podge is a favorite medium when decoupaging. It is fast drying, and tough as nails. A little goes a long way with this finish, and sanding between coats of the varnish is not necessary.
A couple of examples from Charlie Harper Wall Decor:

On another note, here are a couple of picture frames I finished in a few hours using photographs and Modge Podge:

More information about how to decoupage picture frames with photographs and Modge Podge can be found here.
An inexpensive, fun, and quick art project for both adults and kids. Genius.
Wednesday, January 26, 2011
Grace
Grace
is the force that infuses our lives and keeps letting us off the hook.
It is unearned love - the love that goes before, that greets us on the way.
It's the help you receive when you have no bright ideas left, when you are empty and desperate and have discovered that your best thinking and most charming charm have failed you.
Grace is the light or electricity of juice or breeze that takes you from that isolated place and puts you with others who are as startled and embarrassed and eventually grateful as you are to be there.
I do not at all understand the mystery of grace -- only that it meets us where we are but does not leave us where it found us.
by Anne Lamott

Sunday, January 23, 2011
Sewing Notions: Necklace You Don't Want to be Without!
When knitting or sewing, it seems like embroidery scissors, a measuring device, pins, knitting bead markers, etc. never seem to be quite within easy reach. While browsing craft ideas, I came across a clever sewing caddy which could be made fairly quickly and inexpensively. Whe n I saw the picture of this sewing caddy, along with a supply list and directions, I decided to make a similar one.
Here is what I found at the website Sewing:
The picture below shows supplies purchased for the project, and my resulting caddy is the bottom photo.
Now how neat is that?!

 n I saw the picture of this sewing caddy, along with a supply list and directions, I decided to make a similar one.
Here is what I found at the website Sewing:
Neck Ribbon Caddy Supplies:I already had a small pincushion, so I did not need to make one. And instead of felt for the pocket, I had stashed pink flannel which I sewed on for a reading glasses pocket. The pink valentine heart bows were previously bought for my doggy, but she does NOT like to wear head ornaments. So I incorporated the bows as extra bling on the neck caddy.
1 1/8 yard (103cm), 1½” (3.8cm) wide blue plaid ribbon
1 1/8 yard (103cm), 1½” (3.8cm) wide blue grosgrain ribbon
½ yard (45.5cm) 3/8” (1cm) wide blue grosgrain ribbon
1 tape measure, 1 handful polyester stuffing, red felt scraps, embroidery scissors, thimble, sewing gauge
Directions:
1.Cut: Make a heart pattern. Cut one 1 1/8” x 4½” (2.8 x 11.5cm) pocket strip and 2 hearts from felt scraps. Cut 3/8” (1cm) wide grosgrain ribbon in 2 equal lengths. Cut tape measure off at 39½” (100.5 cm).
2. Assemble: Center and pin felt pocket strip to one end of plaid ribbon. Zigzag or use a decorative stitch along sides of felt pocket. Loop one narrow ribbon through scissors. Pin ribbon ends at raw edge of plaid ribbon and machine baste. Layer heart motifs together. Edge stitch, leaving 1¼” (3.2cm) top opening. Fold other narrow ribbon in half; center and tack fold to inside heart pocket. Center and machine baste ends to other plaid ribbon raw edge. Center tape measure on wide grosgrain ribbon. Edge stitch tape on all sides. With right sides together, stitch wide grosgrain to plaid ribbon with ¼” (6mm) seam across “heart” pocket end. Turn and press. With wrong sides together. Edge stitch ribbon sides.
3.Pin Cushion: Measure 4¼” (11cm) from open end, stitch across. Stuff tightly. Turn ¼” (6mm) raw edges inside and stitch closed.
The picture below shows supplies purchased for the project, and my resulting caddy is the bottom photo.
Now how neat is that?!


Friday, January 21, 2011
What Are Your Favorite Apps?
Here are mine, many that were free:


 What are YOUR favorite apps? Word-of-mouth is sometimes the best way to find new apps, so I'd appreciate your telling me which ones you find useful.


Subscribe to:
Posts (Atom)