From
The DIYnetwork, lots of good information was given by author and artist Edie Stockstill.
Reverse painting on glass looks more complicated than it is. It requires painting a design on one side of glass that is viewed from the other side.
Materials: Traced or freehand design, Glass, Black acrylic-enamel paint, several colors of acrylic-enamel paint, long liner brush, small paintbrushes, water
Begin by choosing a design to duplicate. Trace the design or draw one freehand. Tape the traced pattern on the right side of the glass -- the side that will be viewed.
Use acrylic enamel (which is a permanent glass paint) and a long liner brush to begin painting the outline of the pattern on the reverse side of the glass. After main colors have dried, begin adding accent colors.

So I chose a dark blue, an orange, and a light yellow-orange color of acrylic enamel, using the
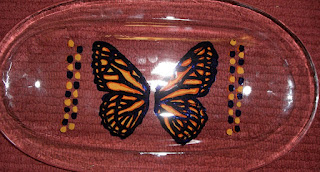
color wheel and split complementary colors which I thought would be effective for a butterfly image. The butterfly is a piece of clip art found under a search engine on the internet. I first drew the outline of a butterfly on the bottom side of the platter and began painting on the bottom, ignoring the step recommended for tracing your image on the "right side" of the glass. Either way would work.
The
DIY Network also gives this information:
Anything that is glass can be used to paint on. The plainer the glass the better to paint on. Do not let the painted glass sit in hot soapy sink for long because other objects bump up against it and can chip it. Just paint simple designs on your glassware. You do not want to cover the entire glass with paint, because part of the beauty of the glass is being able to see what is inside. Once you have painted your design on the glassware, let it cure for at least 24 hours. Make sure your oven is off and then put your glassware in and bake at 325 degrees for 30 to 40 minutes but no longer because the colors will change.

Above is a picture of the platter painted with a butterfly (set atop a red rug background) before it was popped into the oven for a quick bake. The colors look more brilliant than the digital camera captured, but you get the idea of this easy project.
My friend Janet will be the recipient of this painted platter, even though she asked me to do this for her ages ago. Did you forget, Janet?
 According to Watercolors Using Kool Aide:


