Showing posts with label Painting. Show all posts

Friday, April 17, 2009

Oil Paints on Wood Furniture; Minwax Wipe-On Poly

Last summer, I posted about painting a wooden table top with fine art oils. You know the type of medium: the small tubes of paint found at craft stores for canvas work. The individual tube of oil paint costs about $5. Compared with buying a new quart of paint for repainting a small project, this type refinishing product that you can mix up yourself is less expensive, and gives a stained result that allows the wood grain to show through the color.

A wooden rocker, painted for donation seven years ago for Hospice of Western Colorado, needed a face lift. It had set for about 2,500 days in a sunny east window of a business owner who generously purchased the rocker for the Hospice CHAIR-ity Fundraiser. He proudly shows off the CHAIR for CHAIR-ity in his waiting room, where his clients made good use of it. However, after seven years of strong sunlight exposure, the back slats were VERY washed out, as shown below:

So it was definitely time for a quick face lift to freshen up the red color. DH picked up the rocker from our accountant's office and carted it home so I could do a little color tuning on it. Here is how it the colorization was done:

Gather materials of oil paint, mineral spirits, rags or paper towels, a container for mixing the stain, a disposable stirring utensil, linseed oil, and rubber gloves for skin protection.

Squeeze out about a two inch ribbon of paint from the tube and mix it with about a 1/3 cup linseed oil and 1/3 cup minerals spirits. The mineral spirits will help dissolve the oil and allow the paint to spread more easily.

Spread the mixture over the wood (first primed with a light sandpaper brush to take off that old and faded top layer). Use several coats for thorough coverage. Let it dry for several days and then apply a polyurethane gloss for durability. I found a clear gloss product, Minwax Wipe-On Poly, that worked very well on the rocker. "Hand rubbed beauty with polyurethane protection" is labeled on the front of the can. It was accurate; truth in labeling definitely applied to Minwax.

Here is a picture of the rocker with its original colors (the yellow flower was not repainted):

Refurbishing it made a HUGE difference in the looks of the rocker, and its backside is a bright new red. It is again ready to face the sun with a shiny new finish.

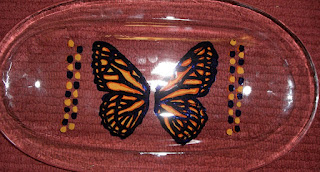
Now this rocker, donated and painted with butterflies and poppies in 2003, is the next one up for a face lift:

Friday, August 8, 2008

Watercolored Altered Art* Vintage Girl

Thought I would give a quick blog shot of the finished "altered art" for Baby Ella Ann, due in about two weeks. This gift was referenced in yesterday's Blog posting. Shhhhh.... her mom and dad don't know about it yet.

Similar ones (with applicable baby's name) will be for sale at my Etsy Shop.

* Altered Art - Album/Book/Tag/Anything - Collaging, embellishing, enamelling, stamping or doing anything else to a book or other household item to reflect a creative idea, theme or narrative (from ChewingPaper).

Thursday, August 7, 2008

Watercolor Paints & Pencils- Picture for Baby's Room

A new baby niece will be making her entrance in a few weeks. One of the presents we bought her was from an Etsy Store (all things handmade) called RockaByeBabyRetro. It is a darling Onesie made into a dress. There is a pink bow at the neck and applique on the front, with a full skirt. Carousels and animals are the dress theme in pinks and reds.

Another small gift will be a hand water colored 5" x 7" little girl in an old fashioned dress. It will be drawn, painted and personalized for little "Ella Ann." The original stamp block can be purchased from stampington.

Here is a similar picture of the girl before sketching, sizing and colorization process:I plan on using all my watercolor skills on this little beauty, and will matt and frame it in a girly, pink flowered frame.

Congratulations, Kim and Jeremy, on adding this new life to the world!

Friday, July 25, 2008

Triptychs - Paintings

"Triptych", the word itself, means three items consecutively joined. It could be thoughts, prayers, icons, or paintings that are used or grouped together that follow the same theme.

Here is further information about painted Triptychs:

...painting consisting of three panels, usually hinged together with the central panel being twice the width of the wings, which may fold inwards. The triptych developed from the diptych and was used both as a portable altar and, on a larger scale, as an altarpiece.

Above: Anonymous painter. Triptych with Virgin and Child Flanked by archangels, scenes from the life of Christ, apostles and Saint George and Saint Mercurius. Ethiopia (Gojjam?), late 17th century. Tempera on panel. 14 78 x 4 5/16 inches left; 15 1/8 x 9 inches center; 15 1/16 x 4 7/16 inches right. 36.7 museum purchased, the W. Alton Jones Foundation Acquisition Fund, 1996, from the Nancy and Robert Nooter Collection. (taken from Tadias)
But triptych art does not always have the middle panel larger, nor must it always fold. Triptych art can be found for sale many places, and is especially easy to purchase over the internet on either Etsy or eBay.

Last year, I completed a triptych in oil paints which is displayed in our home, and is currently for sale at my Etsy shop. I shamelessly promote this site since I have several things for sale here.

Each panel is 10" x 20", and if put side-by-side, the triptych measures 30" x 20".

Here are pictures of my triptych oil paintings, entitled "Three Peas in a Pod":

Get 'em while they're hot!

Saturday, July 5, 2008

Fairies and their Origin (Part I)

According to Charles Perrault,

The word Fairy is derived from the ancient "faunoe o fatuoe" which, in the pagan mythology, indicated the faun's (deer) companions, creatures endowed with power of foretelling the future and ruling the human events. The word Fairy also comes from "fatigue", which in Middle Ages was synonymous with "wild woman", that is woman of woods, waters and, in general, of the natural world.

Fairies are so prevalent in mythical culture that it's natural to wonder where they came from. Different societies have come up with very different explanations of the origins of 'the little people'.

The Little People are said to be the dispossessed early tribes of the British Isles.They faded away into uninhabited places, growing smaller and smaller with time as they were forgotten and passed into legend. The Tuatha de Danann, People of the Goddess Dana, ruled Ireland before the Milesian invasion. They were driven underground where they became theDaoine Sidhe fairies.

The Irish believe that the fairies are a previously conquered society, the Tuatha De Danaan (People of the Goddess Dana), who were driven into hiding when the Celts invaded Ireland. The Pagan gods of the Tuatha, skilled in building and magic, went underground to live in the tombs and mounds they had built. Hidden from sight, they grew smaller in the popular imagination until they turned into fairies.

Other cultures believe that fairies are the souls of the dead, people not good enough to enter Heaven yet not bad enough for Hell. They wander the Netherland in between and are occasionally seen by humans. Along a similar theme, fairies are also believed to be angels that had been cast out of Heaven. Some fell into the sea and some onto the land, where they would do no harm if left alone.

In Wales, fairies are thought to be a race of invisible spiritual beings living in a world of their own. Some people also believe that fairies were originally local gods or nature spirits that dwindled in majesty and size over time.

In any case, those ethereal creatures have held my fancy since childhood. Beautiful pictures of fairies can be found here and here and here. These sites held me captive for long minutes. Then I decided to draw, color and then embroider one of these captivating images onto a vintage pillow cover.

Using previous instructions given on June 25 and the excellent tinting linen tutorial originating from Giggleface, here are the first steps toward embroidering this fairy project to be used on a pillow casing:

1) Find a transfer you like of a fairy or whimsical creature, or draw one yourself. An easy transfer can be found here: fairy (in the middle of the page is a tooth fairy for download);

2) Draw or transfer your image onto the pillow case fabric; be sure to use a transfer pen like Sulky;

3) begin the coloring/tinting of the fabric and go on to the embroidering process. Excellent embroidery "how-to" skills can be found here.

The next post will show the completed pillow project with the fairy in pinks.

Friday, June 27, 2008

Making a Mosaic from Digital Pictures

Photographic mosaics can be made on this site: Mosaics; the process is free and explained fairly simply.

You DO need to establish a Flickr account (free), or have pictures previously uploaded to a URL to use this program.

After uploading your favorite pictures, the program runs your personalized mosaic. Here is what MOSAICS generated for me from my Flickr "knitting stream":

Then I decided to be a bit more adventurous in making another mosaic, and used digital photos containing pictures of only flowers. Again, I uploaded my floral pictures of to Flickr from a previously saved file and created a new summer mosaic.
There are a number of applications where this program might come in handy. For instance, Mosaics would be a good source for making a Christmas card of favorite family pictures.

Stay tuned. Christmas is just around the corner.

##############################

A new painting completed!!

Here is a newly finished house-warming gift in oils which I finished yesterday for my sister-in-law, Kathy Kinsey. It is painted on a 16" x 20" canvas, framed in white wood (frame not shown). Belated congratulations on your new house, Kathy!

Friday, June 20, 2008

Painting Flower Pots

Michaels has a good tutorial on painting flowerpots.

If you go to that site, the instructions seem somewhat complicated. And they do not state that it is desirable to apply a gesso product on the clay pot prior to painting on the pot. It is advisable to paint on the clear product so that the paint won't soak into the clay.
At your local home improvement center, you can find a clay product sealer which will allow your acrylics or oils to lay on smoother. Otherwise, without a sealer, the clay soaks up the colors and more layers of paint are required in order to get the desired coloring effect.

This site gives excellent step-by-step instructions for preparation of the pot prior to painting. That same reference will further explain the importance of preparing the clay surface for paint.

The picture on the right upper corner is one from the Michaels website. Near right photo shows a flower pot which I painted two years ago (using a clay sealer undercoating), which has held up fairly well. I used oil paints on this flower pot, but acrylics also might be applied for a quicker drying time. (The painting on the flower pot to the right was taken from an original Linda Le Kniff drawing.)

If you were to paint on the newer heavy duty plastic pots, prep time would be quickly shortened.

Remember to spray a clear acrylic coating on the finished pot for a bright, clear finish.

Thursday, June 19, 2008

Using Oil Paint as Furniture Stain

A Quick Tutorial on how to Use Oil Paint as a Wood Stain:

1) Gather materials of tubed oil paint, mineral spirits, rags or paper towels, a container for mixing the stain (disposable), a stirring utensil (plastic fork), linseed oil, a little patience and elbow grease;

2) Now squeeze out about a two inch ribbon of paint from the tube and mix it with about a 1/4 cup linseed oil and 1 cup minerals spirits. The mineral spirits will help dissolve the oil and allow the paint to spread more easily.

3) Mix the paint, the oil and the minerals spirits really well. But don't worry if it does not have a thoroughly incorporated texture, because that is where the elbow grease comes in (by rubbing the paint mixture onto the wood);

4) Apply the paint, mineral spirits and linseed oil mixture directly to the wood. In this case, I purchased a table top from the local home improvement center;

5) Allow to dry for a few days as the linseed oil needs to soak into the wood;


6) Apply an acrylic protection over the stained wood - - even a spray acrylic covering works fine. Let the acrylic dry for several hours before final use.

The finished table topper is shown at the left as used on our pato to hold colorful summer annuals.

This particular batch of stain made enough to cover the table top, and to give a spring refreshment of stain and oil to the accompanying patio rocker.

Tuesday, June 10, 2008

Beading: Asus Eee with Crystals & Mirrors

A traveling grad student showed a tutorial on covering her Asus Eee PC with crystals. Here is a picture of her beautifully blinged out PC. She explains about how she glued on Swarkovski crystals onto its top in AK's Blog.

AK used Swarkovski crystals in fuschia, rose, light rose and aurora, in SS12, SS9 and SS5 sizes, gluing them to entirely cover the top of the case.

Using AK's tutorial, I decided to make my little Eee a pretty covering. Not only would it have its own T-shirt case, but it would also be personalized with initials. The T-shirt case was blogged about previously here.

First I sketched two calligraphy capital letters of "N"and "M" on the Eee top, using a ruler and approximating letter placement.

Since my Asus Eee has a light blue top, I used flat backed round crystals in small sizes in two different colors of turquoise and one dark rose color. I also purchased small mirrors at the craft store. Good old Wal Mart rounded out my accessories for the decorations with adhesive backed rhinestones (at a much cheaper price than those crystals). The heart-shaped BigBoxStore rhinestones are at the at the bottom of the initials, along with two earring fronts, tiny square mirrors, and more heart-shaped larger rhinestones.
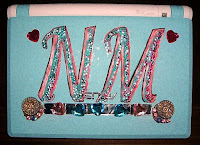
The initials are painted with acrylics. Although the shadowing does not show very well, those crystals certainly brought out personalization in the middle of the letters.

I used a gel type glue; it was a mess to work with. But I was afraid Elmer's School Glue would not hold up to the light abuse which I tend to give my working machines.

This project took lots longer than I had anticipated, but at least my beading and painting efforts won't allow ownership confusion with any other Asus Eee that might be hanging around at the local coffee shop.

Note: Actual sizes are larger than they appear (the top is 5.5 inches by 7 inches).

Wednesday, June 4, 2008

How to Paint on Glass (Reverse Glass Painting)

From The DIYnetwork, lots of good information was given by author and artist Edie Stockstill.

Reverse painting on glass looks more complicated than it is. It requires painting a design on one side of glass that is viewed from the other side.

Materials: Traced or freehand design, Glass, Black acrylic-enamel paint, several colors of acrylic-enamel paint, long liner brush, small paintbrushes, water

Begin by choosing a design to duplicate. Trace the design or draw one freehand. Tape the traced pattern on the right side of the glass -- the side that will be viewed.

Use acrylic enamel (which is a permanent glass paint) and a long liner brush to begin painting the outline of the pattern on the reverse side of the glass. After main colors have dried, begin adding accent colors.
So I chose a dark blue, an orange, and a light yellow-orange color of acrylic enamel, using the color wheel and split complementary colors which I thought would be effective for a butterfly image. The butterfly is a piece of clip art found under a search engine on the internet. I first drew the outline of a butterfly on the bottom side of the platter and began painting on the bottom, ignoring the step recommended for tracing your image on the "right side" of the glass. Either way would work.

The DIY Network also gives this information:

Anything that is glass can be used to paint on. The plainer the glass the better to paint on. Do not let the painted glass sit in hot soapy sink for long because other objects bump up against it and can chip it. Just paint simple designs on your glassware. You do not want to cover the entire glass with paint, because part of the beauty of the glass is being able to see what is inside. Once you have painted your design on the glassware, let it cure for at least 24 hours. Make sure your oven is off and then put your glassware in and bake at 325 degrees for 30 to 40 minutes but no longer because the colors will change.

Above is a picture of the platter painted with a butterfly (set atop a red rug background) before it was popped into the oven for a quick bake. The colors look more brilliant than the digital camera captured, but you get the idea of this easy project.

My friend Janet will be the recipient of this painted platter, even though she asked me to do this for her ages ago. Did you forget, Janet?

Sunday, April 27, 2008

Windows Movie Maker - Song & Spring Pictures to Video

I have been trying out a new craft on my computer through the free Windows program called "Movie Maker". Since I had lots of digital pictures of growing flowers and some original oil paintings of flowers, I decided to marry them and created this video. Superimposed into the video is the upbeat song from the recent movie JUNO. This might give you a smile (just click on the arrow on the blue screen below).

lyrics from the movie JUNO

If I was a flower growing wild and free
All I'd want is you to be my sweet honey bee.
And if I was a tree growing tall and green
All I'd want is you to shade me and be my leaves

If I was a flower growing wild and free
All I'd want is you to be my sweet honey bee.
And if I was a tree growing tall and green
All I'd want is you to shade me and be my leaves

All I want is you, will you be my bride
Take me by the hand and stand by my side
All I want is you, will you stay with me?
Hold me in your arms and sway me like the sea.

If you were a river in the mountains tall,
The rumble of your water would be my call.
If you were the winter, I know I'd be the snow
Just as long as you were with me, let the cold winds blow

All I want is you, will you be my bride
Take me by the hand and stand by my side
All I want is you, will you stay with me?
Hold me in your arms and sway me like the sea.

If you were a wink, I'd be a nod
If you were a seed, well I'd be a pod.
If you were the floor, I'd wanna be the rug
And if you were a kiss, I know I'd be a hug

All I want is you, will you be my bride
Take me by the hand and stand by my side
All I want is you, will you stay with me?
Hold me in your arms and sway me like the sea.

If you were the wood, I'd be the fire.
If you were the love, I'd be the desire.
If you were a castle, I'd be your moat,
And if you were an ocean, I'd learn to float.

All I want is you, will you be my bride
Take me by the hand and stand by my side
All I want is you, will you stay with me?
Hold me in your arms and sway me like the sea.


By Barry Polisar (from Polisar)

Tuesday, April 8, 2008

Watercolor Montage - Art

Have you ever wanted to create a collage or montage of related subjects as an object 'd art? It is fun and relatively easy to make one using your computer and most associated photo capturing software.

I was reared in the south where magnolia blooms were present in my grandparents' yard for most of the spring and early summer months. Their fragrance holds a fond memory for me. My grandmother used to clip those sweetly aromatic magnolia blossoms in the early morning and put a few in a vase that always stayed on her kitchen window sill.

Mom (my grandmother) has been deceased for over twenty years. In remembrance of her life, I wanted to paint a magnolia blossom and somehow incorporate that image onto a piece of her original, copyrighted sheet music. This montage would be a unique memoriam to her talented life as a musician and strong Christian teacher.

Here are the steps to make your own montage:

  • obtain your image (in this case, an original watercolor painting of a magnolia) and take a picture of it with digital camera, saving it to your computer in a temporary folder containing pictures


  • obtain second image (I used a piece of my grandmother's sheet music which I scanned and saved to my computer in a temporary file)


  • obtain and save third (or more) object in the preceding manner (the back of my montage includes copyrights from 1921, the year some of this music was copyrighted in Canada)


  • using the picture software on your computer, compose the montage and choose the "collage" feature (most all software has this type editing choice)


  • ...in this case, I blended both images together, creating a soft, ethereal effect.

  • Here is image #1, which is a digital copy of the original 5" x 7" painting, retrieved and held in a temporary file:

    After choosing the "collage" feature on the software, the resulting image (left) was created after incorporating the two pictures together (the digital picture of the painting and the scanned copy of the sheet music) via the tricky software.

    Now YOU can make a montage!