
Showing posts with label crafts. Show all posts
Showing posts with label crafts. Show all posts
Saturday, January 8, 2011
Friday, January 7, 2011
How to Make an Envelope Laptop Bag
My new little HP netbook needed some padding to protect it when it is carried. So an internet search on how to make a laptop cover came up with a LOT of information about how to craft one. A detailed yet applicable site I found for my needs was here at Instructables. But it sure looked like a lot of trouble.
Modifying the materials of what was needed to make my laptop case sans cardboard, foam padding and buckles, this is the resulting list of necessary items for an envelope case:
 But all I really needed was a sort of "envelope" for the netbook. And I wanted to make it look sharp, updated and personalized.
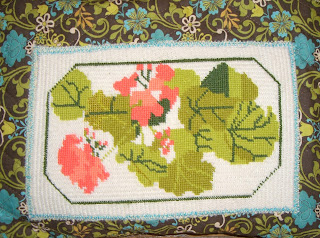
In comes a small piece of needlepoint that my mother completed in the 70's. Finally, I found a use for this piece that would be just right for using on the front of the case:

And I bought a half yard of this quilted Amy Butler fabric for the casing from the local fabric store:

Also, I found a previously used leather identification tag to adhere to the back of the case. In my notions stash was an old ribbon belt just the right colors to match the quilted fabric. That ribbon belt is actually old enough to be called vintage! So the belt was cut up and used for the front and back closing flap finishing.
This is the resulting envelope laptop case that was quickly sewn with right sides together, taking into account the 10 inch by 7 inch by 1 inch size of the HP netwook (the needlepoint was appliqued on by machine).
This is the back of the case showing the id tag, velcro closing, and belted ribbon for extra jazz:

Final picture of the back of the case with flap closed:

Better get cracking and quit playing with my new laptop because Libby needs her face washed, needs her walk, and then must get dressed for her hospital "therapy" visitations today. (Her dog master even bought her a new purple leash and lead to match our purple hospital volunteer vests!)

Modifying the materials of what was needed to make my laptop case sans cardboard, foam padding and buckles, this is the resulting list of necessary items for an envelope case:
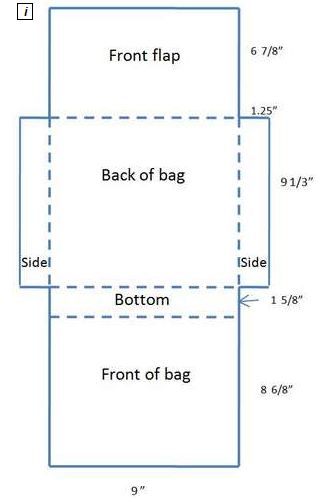
1/2 yard of quilted fabric (quilted material takes the place of extra padding)This is a picture of a laptop pattern from Instructables (you can go there and look through all those instructions):
Sewing machine
Thread, scissors, velcro and adhesive for velcro
In comes a small piece of needlepoint that my mother completed in the 70's. Finally, I found a use for this piece that would be just right for using on the front of the case:

8" x 6"
And I bought a half yard of this quilted Amy Butler fabric for the casing from the local fabric store:

Also, I found a previously used leather identification tag to adhere to the back of the case. In my notions stash was an old ribbon belt just the right colors to match the quilted fabric. That ribbon belt is actually old enough to be called vintage! So the belt was cut up and used for the front and back closing flap finishing.
This is the resulting envelope laptop case that was quickly sewn with right sides together, taking into account the 10 inch by 7 inch by 1 inch size of the HP netwook (the needlepoint was appliqued on by machine).

This is the back of the case showing the id tag, velcro closing, and belted ribbon for extra jazz:

Final picture of the back of the case with flap closed:

Tuesday, January 4, 2011
Crafting Every Day
Came across KatKnits and her video of all the crafts she attempted and finished in 2010. You can see it on her blog. Kat says:
Here is a new challenge Kat mentioned that sounds fun from Iron Craft:.
Entry details can be found here. Are you up to it?
My goal is to spend time everyday working on something handmade for a year & photograph it.And she pretty well did it!
Here is a new challenge Kat mentioned that sounds fun from Iron Craft:.
Welcome to our 2011 craft challenge!
Crafting connects us. Glitter glues our friendship together. If we embark on a quilting expedition, we will put on our pith helmets, and do it together. Across the miles, we admire, advise and sympathize.
Here’s how it works:
Every Thursday one of us will post a creative challenge to be completed by the following Wednesday. The challenges maybe as specific as a particular pattern or as vague as a theme. They'll cover the gamut of crafting skills: knitting, sewing, quilting and so on. Every Wednesday we'll spotlight the results of the previous Thursday's challenge from our Flickr group. We'd love to have you join us for the year of what we hope will be a lot of fun.

Entry details can be found here. Are you up to it?
Saturday, December 18, 2010
Carving on Cottonwood

Having all the appropriate paraphernalia (including several pieces of tree wood, the Dremel set and wood carving tools, sandpaper and paints), inspiration was all that was needed.
My first thought was to try and carve a forest gnome from this "raw branch" from the wood pile we use as fuel for our fire pit:

This rescued branch had an outgrowth of small twigs growing from it. After a bit of finessing with the Dremel sander and various small drills, it began to resemble an open mouth. Those twigs were filed down and refined and lo and behold, they began looking like big old teeth!

This is what the "Christmas deer" or gnome, or dog is looking like, but he still needs lots of work on his ears, forehead and temple.

It is a warm Saturday, so more carving refinement might be on today's agenda. And it will need paint!
To read more about carving heads from Gene Graham:
Thursday, August 26, 2010
Ink Jet Printer for Maps on a Tote Bag
Craftlit followers are going to London, Bath and Wales in October. Being part of that entourage, I decide that a tote bag was needed. To track our journey, I printed out Google maps on either side of a purchased tote to show the cities we will tour.
Included on the map are places visited and written about in the UK by Jane Austen, Louise May Alcott, Charles Dickens, Mary Shelley and others. These are just some of the authors that Craftlit fans have been listening to over the past couple of years, and just a few of the cities referred to in the classics by these authors.
We are also planning on meeting up with other knitters in the UK at various pubs and yarn shops, whiling away our visiting time with our Craftlit neighbors across the pond.
Here is the website that helped me create injet printing of the maps on scrap fabric.
First, I Googled maps for London, ensuring our "home hotel", The Rembrandt, was the center of the map. Then I took a screen shot of the map, downloaded it and placed a few titles on the maps.
Similarly, for the second map used on the reverse side of the tote, Wales in the UK was Googled, with the Cardiff Hyatt as our central point of departure for various tours.


Then the maps were printed out onto fabric adhered to the freezer paper. After printing, the paper backing was ripped off and discarded.
After splitting open an inexpensive canvas tote bag, the fabric maps were sewn onto the outsides, secured with an applique edging over a corded ribbon for additional glitz.
Behind the map, a border of "foreign coin" fabric was used as a border for the map. After sewing on the maps and borders and ribbon, the tote was sewn back to its original shape.


This will holds lots of fiber which I hope to purchase on tour of English and Welsh knitting shops.
Included on the map are places visited and written about in the UK by Jane Austen, Louise May Alcott, Charles Dickens, Mary Shelley and others. These are just some of the authors that Craftlit fans have been listening to over the past couple of years, and just a few of the cities referred to in the classics by these authors.
We are also planning on meeting up with other knitters in the UK at various pubs and yarn shops, whiling away our visiting time with our Craftlit neighbors across the pond.
Here is the website that helped me create injet printing of the maps on scrap fabric.
First, I Googled maps for London, ensuring our "home hotel", The Rembrandt, was the center of the map. Then I took a screen shot of the map, downloaded it and placed a few titles on the maps.
Similarly, for the second map used on the reverse side of the tote, Wales in the UK was Googled, with the Cardiff Hyatt as our central point of departure for various tours.
This is what I came up with for each side of the tote:


Fabric was ironed, freezer paper adhered to the fabric, and then the fabric/freezer paper was fed into the ink jet printer.
Then the maps were printed out onto fabric adhered to the freezer paper. After printing, the paper backing was ripped off and discarded.
After splitting open an inexpensive canvas tote bag, the fabric maps were sewn onto the outsides, secured with an applique edging over a corded ribbon for additional glitz.
Behind the map, a border of "foreign coin" fabric was used as a border for the map. After sewing on the maps and borders and ribbon, the tote was sewn back to its original shape.

Step One: Canvas tote scissored down the side
And the finished bag:

One side of the bag

Reverse Side
Monday, August 16, 2010
How to Make a Watchband with Beads
Repurposing a watch, adding beads and a clasp, here is the result:
 This band was loosely based on the pattern by My Bagatelle.
Here is how it was made:
Cast on three stitches, using #1 double point needles and waxed cotton cord available at your local craft store. Knit three rows (for strength and attachment of the clasp on either end of the band). Then knit in one bead on each row, alternating putting the beads on either on the first or second stitch, ensuring the bead is facing the front and then purling it in place.
Attach the watch face to the beaded piece you have completed (about 2 inches long), and bead the other side in the same manner. Attach clasp end pieces to either side of the band. Done!
Here is a video showing the process of beading while knitting:
This was a fun and quick project.
Sunday, July 25, 2010
Toad House
An easy way to make toad and frog houses for your hopping critters can be accessed here.
With that process in mind, a bit of looking around on the internet came up with some classy accommodations for toads that can be purchased here (picture also courtesy of that site):

 It took several days for Mr. Toad to find his new home, but hopefully we can keep this renter through the rest of the summer.

Amazing how his toady skin is camouflaged in the dirt!
With that process in mind, a bit of looking around on the internet came up with some classy accommodations for toads that can be purchased here (picture also courtesy of that site):
DIY showed the handmade toad house below. That required a clay pot, glue and pebbles.
Our backyard toad is a big fellow, so he needed a fairly large opening for an entrance. Using a galvanized steel vase turned on its side and half filled with dirt, here is what I came up with:

Amazing how his toady skin is camouflaged in the dirt!
Monday, July 12, 2010
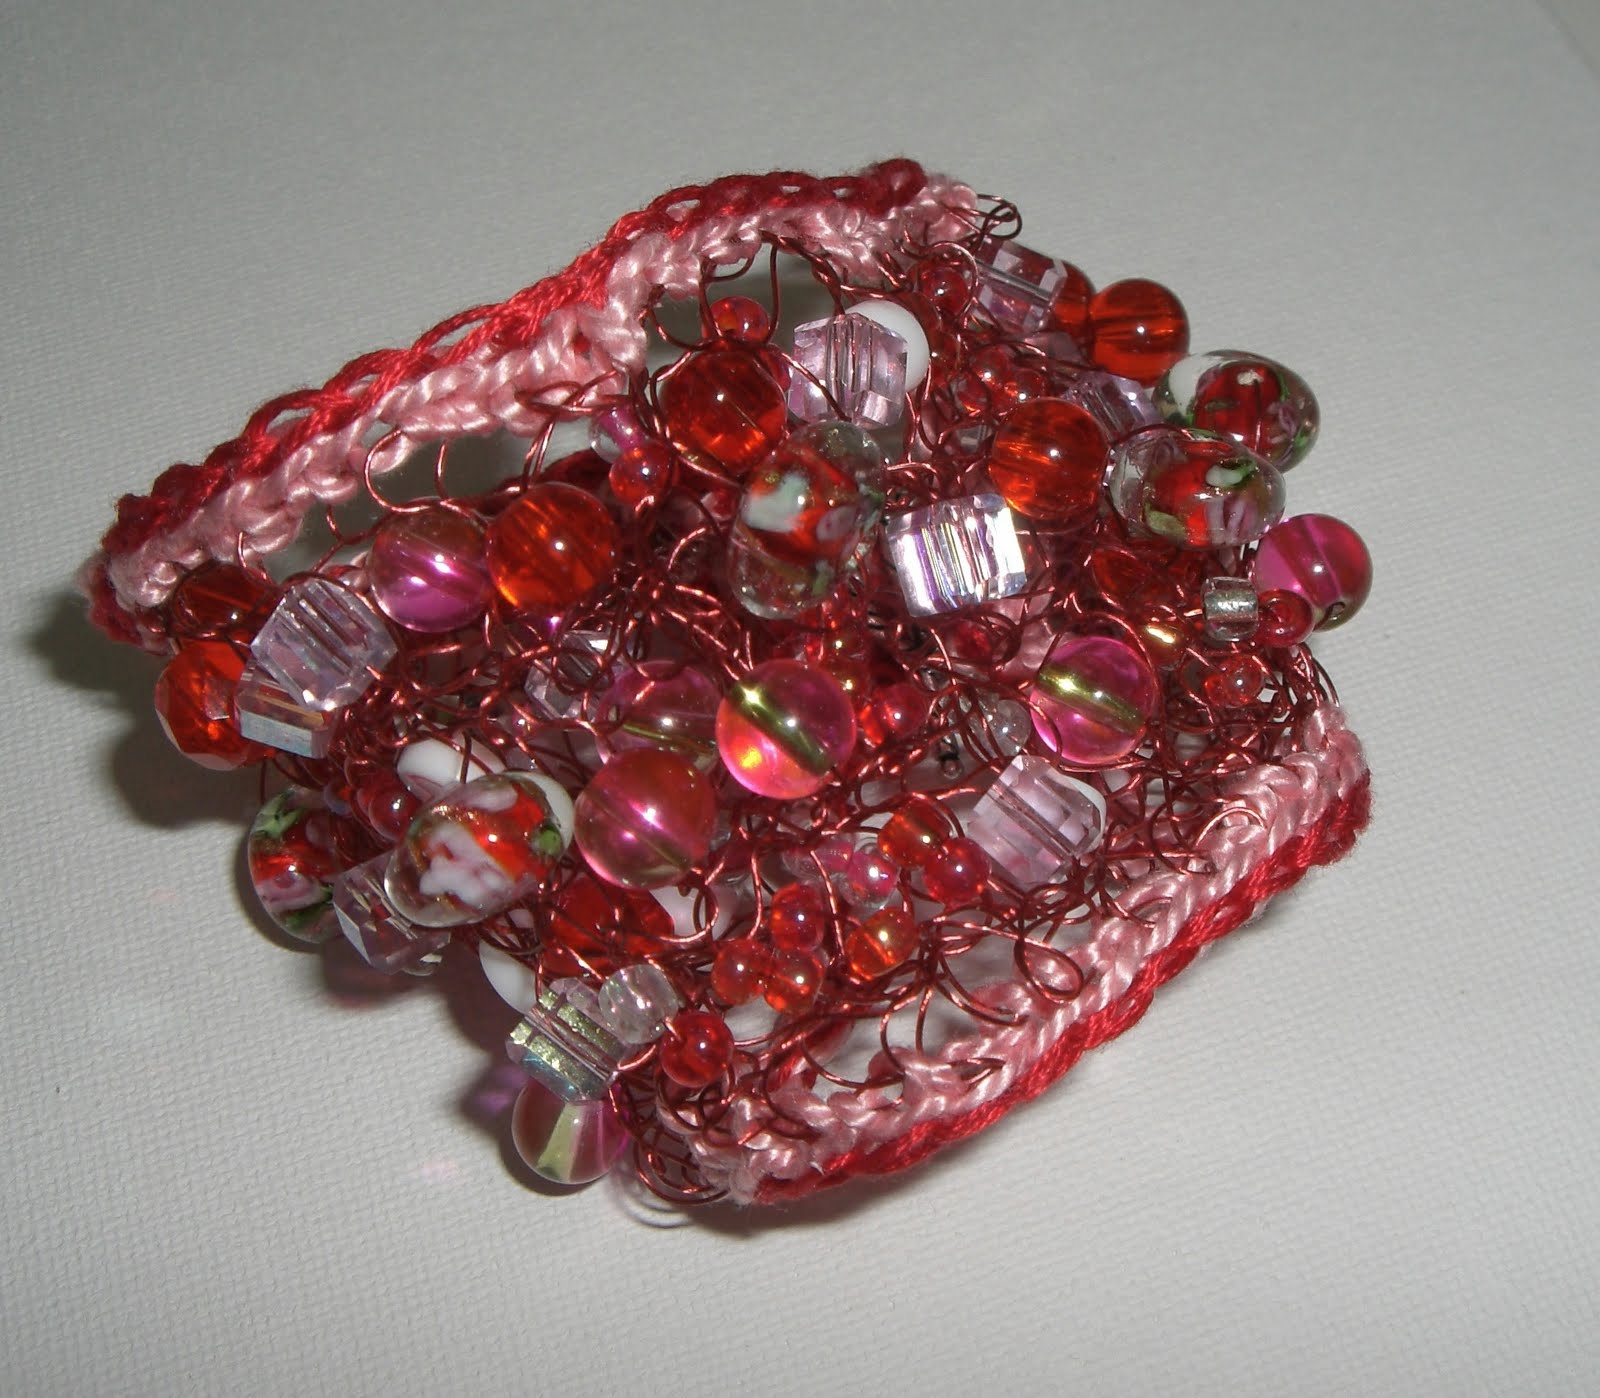
Knitted Wire and Beaded Bracelet
Attempting to make a bracelet with about two hundred 4-10mm glass beads, I was hung up on a technique relating to securing the beads to a flat surface. This video was helpful:
and here was good information and a free pattern to make another attractive bracelet.
With stretchy cord in hand, the first attempt was too bulky. Rip. Out it went.

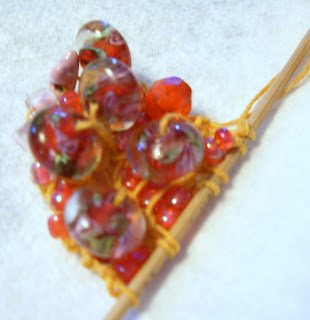
Below is a picture of the final cuff. It was made in a similar manner to that found free at this site. Not only did I end up knitting on size 3 needles and copper wire, but also added embroidery floss crocheted edges.

and here was good information and a free pattern to make another attractive bracelet.
With stretchy cord in hand, the first attempt was too bulky. Rip. Out it went.
There was another attempt at beading a bracelet, but the fiber was polyester, too thick to easily bead, and too glitzy:

A third attempt at beading yet another bracelet using waxed weaving floss (a small diamater orange macrame thread) resulted in this clash of colors:

Below is a picture of the final cuff. It was made in a similar manner to that found free at this site. Not only did I end up knitting on size 3 needles and copper wire, but also added embroidery floss crocheted edges.
At Spun Magazine, the author of this pattern says:
If you are one of those knitters that has to touch every yarn you see (and owns a good bit of it), then you probably look at the myriads of beads on the market with an envious eye. All of those colors and textures are just begging to be tried. But – how can you possibly knit with every yarn and learn to bead at the same time? Here’s a logical solution: knit with beads.
Like you, I like to try new ideas, but so many seem to take too long to learn or too much of an investment. That is what led me to design a beaded bracelet that a beginner knitter could do with expert results. While knitting jewellery is a bit more tedious, in just a couple of hours you will have a piece that costs hundreds of dollars at a jewellery show (and you can say you knit your original yourself).
There are thousands of beads: glass, crystal, gemstone, clay, wood, etc. Any of which could be incorporated into a unique piece of jewellery, but for a basic bracelet (shown here in blue topaz, crystal quartz, and aquamarine) I recommend beads approximately 4mm in size.Give it a go and made a beaded bracelet, if you have the will. It is not a project for the faint of heart. I'm thinking that was my last beaded bracelet knit with wire the size of dental floss.
Monday, June 28, 2010
Earbud err.. Earwire Covers & Ishbel Scarf
Let's not be petty with our little problems. But...
Craftster gives an explanation of how to cover the wires shown in this picture of earbud wires covered with a sport zipper:

Don't you jthink that is a great solution to keep your wires straight? Yes, my pretties, you know it is.
Here is my rendition of earwires, using a red 18" sport zipper and sewn up within ten minutes:
 Now you go and make some for yourself and show me yours. Mr. Piggy is just too classy with his new listening accessory, and his earwires are now tangle free.
Ravelry friends, the Ishbel scarf, in rendition number two, is completed. All knitting specs and intricacies are shown on this Ravelry page regarding the lace weight sparkly kid merino and silk yarn.
 (That silk and baby merino yarn is softer than a baby's behind.)
Do your earwires on your mobile listening device seem to tangle at the most inopertune times? Yes, my dear, I understand your pain.
Here is a very clever and quick remedy to your tangled listening problems: earwires in their own separate holders that keep them from getting on one another's turf.
Here is a very clever and quick remedy to your tangled listening problems: earwires in their own separate holders that keep them from getting on one another's turf.

Don't you jthink that is a great solution to keep your wires straight? Yes, my pretties, you know it is.
Here is my rendition of earwires, using a red 18" sport zipper and sewn up within ten minutes:

Ravelry friends, the Ishbel scarf, in rendition number two, is completed. All knitting specs and intricacies are shown on this Ravelry page regarding the lace weight sparkly kid merino and silk yarn.
Here is Dolly showing off the Ishbel scarf:

Saturday, June 26, 2010
A Good Recipe for Oil Stains
Have you needed a certain color stain for wood and did not know how to come up with an oil and paint formula? Stains (colored) will allow the grain of the wood to show through, and are an attractive alternative to opaque paints.
In staining wood chairs, picture frames and even wooden siding on a small outdoor utility house, I have mixed together turpentine, oil paints and linseed oil in various proportions. Now I find a real formula for creating a stain! Here is the formula given from the site Antiquerestorers ...

This is an unfinished wood frame purchased at a craft store for an 8" x 10" oil that I am working on. I got the canvas first, then found the open backed wood frame with the same dimensions. Now all I need to do is paint the picture, and stain the unfinished wooden frame.


The frame colors will exactly complement the colors in the poppies, and will alleviate the need for a costly framing job.
The reason that the colors are an exact match is because they came out of the same tubes as the paints used in creating the poppies. Otherwise, you could never find a "finished" frame in the colors as the ones used in an original artwork.
This idea and stain formula works for wooden chairs, too!
 Wooden Rocker painted, stained and donated (for Hospice Chair-ity Fundraiser)
Friday, June 11, 2010
Refinishing An Old Cedar Chest
Since the 1970's, I have lugged throughout the U.S. an old cedar chest. It has been with me over perhaps twenty apartment and house relocations.
But this was no ordinary cedar chest, because it once held the baby clothes of my now 91 year old father. So the chest has to be at least close to 100 years old. It just cannot be relegated to Good Will after being in the family for a century.

Here is a peak of a little of what was stored in the old cedar chest, if there is a bit of closet voyeur in you:

But this was no ordinary cedar chest, because it once held the baby clothes of my now 91 year old father. So the chest has to be at least close to 100 years old. It just cannot be relegated to Good Will after being in the family for a century.
As far as I remember, it has never been refinished. Seize the day! It is time for the old girl to get a facelift.
Here is how she looks before the refinish:

Naturally, I had to look up "What to Do and How to Do It for old cedar chest restoration" and came up with information from several sources, including a step-by-step approach from EHOW:
And simple advice: "A good paint stripper, a stain color that best matches the original, and finish with 3 coats of low lustre tung oil from All Experts.Secure the necessary tools and materials for refinishing a cedar chest. You will need sandpaper for removing the old finish and smoothing the cedar before refinishing. You can also select a mild stripper for removing the old finish; the cedar may be old and fragile, thus requiring a less abrasive method of finish removal. Stain will not be necessary; however, you will need to purchase water- or oil-based clear finish for the chest. Oil-based finish dries faster, and water-based cleans up easier. Choose satin, semi-gloss or glossy for the level of shine that you desire on the chest. You can also purchase wipe-on or brush-on finish. Use a cotton rag for the wipe-on finish and a fine-bristled brush for the brush-on finish.
Here is a peak of a little of what was stored in the old cedar chest, if there is a bit of closet voyeur in you:

Let the elbow grease commence. And just maybe it is time to get rid of those baby blankets from the '70's?
Sunday, May 30, 2010
Jewelry Made from Silver Plated Flatware
In his retirement years, my dad made hundreds of jewelry items from plated flatware. Not only jewelry, but also napkin rings, key chains and belts were some accessories he fashioned from old spoons and fork handles. He sold these pieces at craft shows, always regaling the customers with stories of how the flatware came into being.
In 1993, a Dallas newspaper wrote a story about dad's silver pieces and his crafting business.
 Dad wrote several volumes of his memories, and one of my favorite stories was about Orange Blossom flatware and how it came to be collected. The gist of the story was that oranges in California were prolific, and these "delicacies" over a hundred years ago made their way from the west coast to the east coast by way of railroad.
Wm. Rogers Company cashed in on the deal of the popular oranges being shipped all over the country, and began plating flatware with orange blossoms on the handles of tableware. In 1910, Orange Blossom was one of its most popular flatware patterns.
From Charles McCarroll's memoirs:

This is a photo of some of Dad's jewelry he made and sold for over twenty years. These are just the pieces he gave me, among many others.
In 1993, a Dallas newspaper wrote a story about dad's silver pieces and his crafting business.

Wm. Rogers Company cashed in on the deal of the popular oranges being shipped all over the country, and began plating flatware with orange blossoms on the handles of tableware. In 1910, Orange Blossom was one of its most popular flatware patterns.
From Charles McCarroll's memoirs:
The railroads had refrigerator cars manufactured to carry ice in order to keep the fruit fresh. Huge ice plants were built in stations across the country. The railcars were moved slowly so that the blocks of ice could be dumped from overhead into the refrigerator cars. The citrus fruits were picked from the trees, wrapped in tissue paper and packed in layers into the special wooden boxes in order to extend the freshness of the fruit. The California citrus growers found that Wm Rogers & Sons were plating silver. They made a deal for them to plate a unique pattern of dinnerware called Orange Blossom with silver.
Our families had numerous pieces of Orange Blossom and did use them. The spoons and tines of the forks were well worn but the handles can be used for key rings

Tuesday, December 29, 2009
New Lamps from Old
Retrofitting tired lamps into a newer look is included in the comprehensive craft blog, All Free Crafts.
From the All Free Crafts Blog:

From the All Free Crafts Blog:
...don’t relegate that old, boring lamp to the trash heap just yet. Take another look at it, and think what a coat of paint, a fancy button and some new feet could do.

picture copyright by Susan Spatone
Spatore gives a tutorial here about how she rewired and created a new look for an old lamp. These are the supplies needed:
Wood Lamp base of choiceWhite Paint
Decorative Button
Super Glue or Household Goop
Fine Sandpaper
Brass Corner Feet (optional)
Lamp Shade
Decorative Beaded Trim
Hot Glue Gun and Glue or Fabric Glue
Tuesday, December 22, 2009
Making Fabric Labels
Personalized labels for special hand made items can be produced using an ink jet printer. A special quilt or hand made item can be finished off with an individualized fabric label.
How do you begin? Instructables comes to the rescue with a simple method of transferring printing onto fabric. All that is needed is freezer paper, a pair of scissors and an iron, along with the fabric for printing.
A Piper Knits showed a nice label for her prayer shawls, thusly:

How do you begin? Instructables comes to the rescue with a simple method of transferring printing onto fabric. All that is needed is freezer paper, a pair of scissors and an iron, along with the fabric for printing.
A Piper Knits showed a nice label for her prayer shawls, thusly:
Instructables will be the guideline to use for my future labels to be made and sewn into hand knitted gift items.
It's a good idea.
It's a good idea.
Saturday, November 28, 2009
Nostepinne: a yarn winding tool
Here is my new yarn winder (made in Poland by Kromski & Sons), purchased at the Hatchtown Website:

It was hand turned, all wood, with a natural finish, available for less than $15.
You can go here to a video of how to use it, courtesy of Designed by Kristi.
This should make crafting with yarn a bit easier, insofar as winding goes.

You can go here to a video of how to use it, courtesy of Designed by Kristi.
This should make crafting with yarn a bit easier, insofar as winding goes.
Monday, November 23, 2009
LED Lighting for Decoration
Coming up with a new lighting decoration for Thanksgiving dinner being served after the sun goes down, here is an idea: use LED cool white bulbs. What are the advantages of LED bulbs?
Here is a good summarization of LED cool white lights:

Michael's had last-of-season silk flowers on sale for 90% off, so I bought a bunch of sunflowers and cut out the centers of the stamins so that a LED bulb could be pulled through. Silk foliage was added, and the resulting lighted garland now decorates the window sill of one of the dining area windows. This was an inexpensive Thanksgiving decoration project for less than $10.
Although the cool lights do not emit a "warm" glow, hopefully the candles on the table centerpiece will add to the soft lighting ambience.
Please visit tomorrow for a famous cranberry relish recipe supplied via an NPR podcast.
Here is a good summarization of LED cool white lights:
LEDs present many advantages over incandescent light sources including lower energy consumption, longer lifetime, improved robustness, smaller size, faster switching, durable and reliable. However, they are relatively expensive and require more precise current and heat management than traditional light sources. Current LED products for general lighting have higher costs than fluorescent lamp sources of comparable output.Also, the lights are stated to have a 25,000 hour average light bulb life. The purchased light string consisting of 30 bulbs was less than $5.

Although the cool lights do not emit a "warm" glow, hopefully the candles on the table centerpiece will add to the soft lighting ambience.
Please visit tomorrow for a famous cranberry relish recipe supplied via an NPR podcast.
Thursday, October 8, 2009
Fall Decorations - Quilted Centerpieces
Underneath the pumpkins and candles in the centerpiece below is a quilted fall fabric piece given to us several years ago by our Famous Family Quilter Pat McCarroll. Pat has won many awards for her quilting art at the Texas State Fair, and at local quilt guild shows in and around Dallas, Texas.
Pat has also shown one of her quilts at the annual International Quilt Festival always held in Houston.

Thanks again for that pretty, seasonal and hand made item, Pat. And congratulations on your latest recognitions for quilting arts in Sulphur Springs, TX this month.
And another table topper:


Wednesday, September 16, 2009
Faux Pearls, Satin Ribbon and Lace Bible for Brides
Are you looking for a unique bridal gift? Try using your embroidery and beading skills to embellish a Bible for use in the wedding ceremony.
If you would like to design a personalized Bible covering, here is a website where standardized sizes for Bible slip covers can be found for purchase. You can use this type base for cross-stitch, embroidery and beading to create a unique and beautifully crafted keepsake.
 Aunt Mary George made me this Bible cover back in the 60's when I married my children's father. As you can see, I could not bear to discard it. Perhaps it can be repurposed for another wedding years later, if the bride cares to use it as a "something old, something new, something borrowed, something blue" sentiment to be carried for the ceremony.
The yellowing of the white lace adds to the vintage look, so perhaps only a touch of new ivory lace is all that will be added for a later bride.
Then again, if the bride and groom trade vows while skydiving or wearing hiking boots on an Australian walkabout adventure, this sentimental touch would be a bit anachronistic.
Maybe I'll just hang on to this vintage decorated Bible as a touch of the past.
Wednesday, September 9, 2009
Affirmation Journal - Keeping Centered
Over thirty years ago, my mother was making affirmation journals, although that term would never have come to her mind. In looking over one such book she had compiled, and wondering if others had made similar journals, it took me on a search to find information about an Affirmation Journal.
 Keeping positive thoughts and quotations cut out from newspapers and magazines was mom's forte - remember that was in the day prior to computers when we actually held books in our hands for reading. Whenever she came across a written thought or even a paragraph that she knew she would like to re-read in the future, she would clip it from Sunday morning church bulletins, newsletters or even copy by hand her favorite scripture passages. Then she would paste these little snippets into a blank book for further pondering. She also illustrated portions of the books she put together with her own artwork. It was an activity from which she gained much benefit, as she battled depression her entire lifetime.
 Looking through her journals today and seeing her signature watercolors makes me smile long after she has died.
 While working on a psychiatric hospital mental health team a few years ago, I used this form of "paper and reading craft" in helping severely depressed clients. Giving each patient the knowledge that positive affirmations kept in the forefront of our spirits is an aid to better mental health, and then teaching this simple act of clipping and pasting, proved to be a valuable teaching activity. Call it occupational therapy if you wish; affirmation journal making was engaging and helpful in channeling innermost thoughts toward a higher plane of purpose.
Keeping positive thoughts and quotations cut out from newspapers and magazines was mom's forte - remember that was in the day prior to computers when we actually held books in our hands for reading. Whenever she came across a written thought or even a paragraph that she knew she would like to re-read in the future, she would clip it from Sunday morning church bulletins, newsletters or even copy by hand her favorite scripture passages. Then she would paste these little snippets into a blank book for further pondering. She also illustrated portions of the books she put together with her own artwork. It was an activity from which she gained much benefit, as she battled depression her entire lifetime. Looking through her journals today and seeing her signature watercolors makes me smile long after she has died. While working on a psychiatric hospital mental health team a few years ago, I used this form of "paper and reading craft" in helping severely depressed clients. Giving each patient the knowledge that positive affirmations kept in the forefront of our spirits is an aid to better mental health, and then teaching this simple act of clipping and pasting, proved to be a valuable teaching activity. Call it occupational therapy if you wish; affirmation journal making was engaging and helpful in channeling innermost thoughts toward a higher plane of purpose.One client told me it was the most helpful thing she learned in her seeking solutions for greater well being. In gratitude, she showed me her newly begun personal clip-and-paste book that she had started while hospitalized. What a humbling satisfaction it was for me to learn this particular activity passed on by my mother was yet helping someone else a third generation later.
Above are some pictures of the pages of Ann McCarroll's journal. I hope you enjoy them, and perhaps this simple idea may set you on your own personal journey of seeking, saving and reviewing affirmations.
Above are some pictures of the pages of Ann McCarroll's journal. I hope you enjoy them, and perhaps this simple idea may set you on your own personal journey of seeking, saving and reviewing affirmations.
...one of my favorite affirmations: "I can do all things through Christ, who strengthens me". Philippians 4:13
Saturday, September 5, 2009
Foliage Centerpiece inside Centerpiece
Back in the spring, this centerpiece was begun by purchasing a large container at a Big Box Store, and embedding a bowl inside the container. Then the inner bowl was surrounded by an inch of potting soil tamped around it, making a circular ring of soil.

After the soil was watered, transplantation of blooming grape hyacinths and ajuga ground cover completed the task. Then it was time for Mother Nature to take over, helping roots to establish and the plants to begin flourishing.

In the middle of the container, I placed this plant to take up the negative space:

After the soil was watered, transplantation of blooming grape hyacinths and ajuga ground cover completed the task. Then it was time for Mother Nature to take over, helping roots to establish and the plants to begin flourishing.
In the middle of the container, I placed this plant to take up the negative space:
Then all that was needed to finish off the project were some silk fall foliage.
Supply list: One large decorative container; one smaller container to fit inside the decorative one; potting soil, perennial plants and silk flowers to dress up the project
It is outside on the patio table, still blooming and looking "fallish". It was an easy project and fun to complete. The plastic pot inside the larger teacup container is a bit too high for this particular centerpiece, but you get the idea of how this can be finished off.
Subscribe to:
Posts (Atom)