Showing posts with label tutorial. Show all posts

Tuesday, October 2, 2012

How To Prune Philodendrons

Now that seems like a silly post title, "How to Prune Philodendrons", but if you get as many Google referrals as I do, you will notice that the search term "HOW TO" is ubiquitous.  (I love that word.)  People constantly search for "how to" do something.  On my Google analytics dashboard page, that term of "how to" is everywhere, so this will be a test post just to see how many hits I get from this topic of how to prune philodendrons.  (Believe it or not, my post found here on pig feet is my number ONE referral to this blog! Who knew pigs would draw such a crowd?)

So even though this mundane chore of pruning household plants might not interest you, dear reader, someone out there on the world wide web might be searching for just this topic that will make me a long distance teacher.  Here goes.

HOW TO PRUNE A PHILODENDRON
If your plants are getting leggy, with too few leaves along the stem, or if the leaves are spaced out too far apart and it looks like the stem is becoming thick, scissor intervention is necessary.  Now is the time to be ruthless, all for the good of the plant.  See how large the plant is? See the stems?


OK: now for a closer look at the roots and you can really see those legs that appear anemic, woody,  and too close together.  Tsk, tsk.


Next step: get out some new potting soil, some jars with water for sustaining your cuttings, a pair of scissors, and an aggressive attitude.

Take out the soil and plant from the pot, cut through those roots, discard the old roots at the bottom of the plant, and start your cutting.
Ensure that you have a nodule at the end with a bit of a root attached as this will help the root cutting adapt to the new soil.

Discard all the leggy runners.  Keep the shorter stems, again ensuring that a nodule is attached.  You should cut off leaves close to the nodule because you do not want any green leaf touching the water where they will stay until new roots have developed.

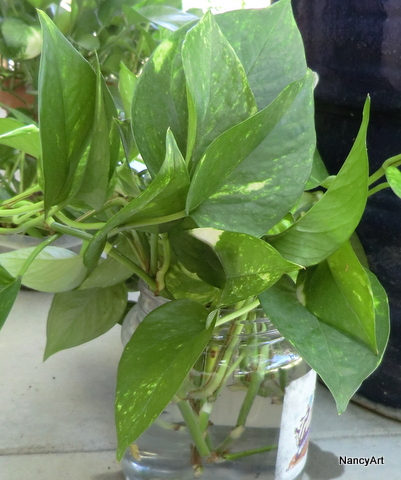
From just one plant, here is a picture of the salvaged leaves now in water awaiting new roots to grow.

With those stems that have been trimmed, roots longer than two inches mercilessly cut off from the main stem, they can be buried into the new potting soil.  Add even more soil to the top to ensure stability of the stem.  Here are two of the newly potted plants, looking much healthier and with more room to breathe.


From three plants I re-potted yesterday, we now have five jars of leaf and stem cuttings in water awaiting their roots to develop.  One jar is on the kitchen windowsill and the other four are tucked away in filtered light awaiting the same fate.  Maybe we should go into philodendron farming since there are so many awaiting future planting.  Would you like to adopt a jar?  Free for the taking!

Wednesday, September 5, 2012

Shrinky Dink Charms: Downton Abbey Peeps

Making shrinky dinks is not just for kids, although they would have fun making them.  This site has a good tutorial, but you can just buy a package (six sheets per package) at your local craft store, instructions included.


These are Downton Abbey characters downloaded and printed on to the special paper (remember to dull down the colors as they become brighter once they are baked).

They are stitch markers used for knitting up this sock which is in progress.  Sock pattern here.


Linking to WOYWW.

Friday, August 31, 2012

How to Make Two Sided Baby Blankets

Mary Cassatt (1844-1926)

Hot off the press (ironing board, if you will) are three baby receiving blankets.  On each, one side is flannel and the other side is decorative cotton material.  Piping in contrasting fabrics is sandwiched between the sides.


These blankets are versatile.  They are large enough to use as a nursing cover, as extra warmth for a newborn, as a swaddling blanket, as an impromptu diaper changing area...or just maybe the baby will later want to use one as their very own Banky to wag around!  Hand sewn blankets can be much prettier than the ready made blankets available for purchase.  And who does not want something that you have personally made for a sweet new life?

The Knitmore Girls Podcast (click here for their blog link and be sure to listen to their podcast) raved about two sided baby blankets.  BTW, the Knitmores are a multi-generational knitting production with the youngest member of the troupe still in diapers.  And the new mama is ga-ga over these blankets.  So I decided to forge ahead and make up a few, along with a quick tutorial about how they were sewn.

HOW TO MAKE A TWO SIDED RECEIVING BLANKET

Materials: Each blanket requires one yard of flannel and one yard of a coordinating cotton fabric, along with matching thread.  Piping is optional, but adds a decorative touch.  A piping tutorial website is linked here showing how to make bias binding from fat quarters.  Ingenious!  Purchase medium sized cording for covering your bias tape if you make it yourself.  Get out your coordinating scrap materials or buy fat quarters to make bias binding for the piping.  And remember that a piping foot for your sewing machine makes things much easier.

(hand made bias seam binding that covers cording sandwiched between right sides of fabric, ready to be sewn as outlined in second step below)

Steps:

  • Trim pre-washed and machine dried pieces of one yard flannel material and one yard of a pretty coordinating 100% cotton decorative material into square of cloth the same size.  Press each piece of material to make it wrinkle free.  It is cotton, after all.  Put them together with right sides facing each other.  Then measure your fabrics and cut them (one on top of the other) to made all sides equal.  One of the blankets I made turned out to be 37" x 33" after both fabrics were squared up with one another and the selvaged edges removed.  (Receiving blankets are usually 34 inches or 36 inches square, but since you are making this blanket, you can approximate lengths and widths.)
  • Sew the optional piping using the tutorial above (four yards of it), or purchase piping (four yards per blanket), or leave off the piping altogether...sewer's choice.
  • Right sides of fabric together, sandwich the piping between the two fabric pieces, ensuring the piping edge is between the fabrics with the cording side to the left of the seam.  Sew around all four sides of the fabrics, leaving a 6 inch space free.  Turn to the outside. Smooth out the blanket and baste closed the six inch opening in the side, catching the piping between your basting area.  Close to the hand basted area, stitch "in the ditch" close to the piping, making sure to catch your basted areas with the machine stitching.
  • Press again.  You might want to go around one side of the piping with a machine stitch all the way around each side of the blanket to further flatten the fabrics together, but it is not necessary.
  • Sew your personalized tag onto the blanket to autograph your work.  (Thanks, Charlotte, for reminding me of those tags I bought back in the '70's!)


Such pretty and practical blankets for that new little one.  (Beatrix Potter would approve.)

Monday, June 18, 2012

Costume Jewelry and Picture Frames

It seems it is the current rage to use vintage costume jewelry for picture frame decoration.  With just a wire cutter for removing backings from earrings and broach pins, a handy hot glue gun, along with a few decorative buttons and charms and two small purchased picture frames, I made a couple of embellished beauties in just an hour.

Frame #1;  a pair of ruby slippers, a couple of breast cancer pins, a Scrabble pin from 2002, button covers, broken earrings, a few glass marbles, a couple of glass beads, leftover glass squares from a mosaic, one broach, and a rhinestone necklace resulted in this...

Photobucket

Frame #2:


It was fun to poke around in my jewelry boxes and look into bins of vintage costume wares in thrift stores.  It is amazing what you can find. A fun, creative and easy project can be made with minimal effort.  A picture frame can be personalized with your own little treasures that will give your frame special meaning.  Give it a try!

Previously, I wrote a blog post found HERE when I had a milagro necklace made of some of my mother's favorite memory charms.  We dug around in her mementos and found several treasures to use as charms.  Here are some picture from that post showing mother's necklace:


Tuesday, June 5, 2012

Watercolor Tutorials Overview

Betty, this one's for you.  Over at the WoodFairy blog, Betty got me back into painting on silk. She had asked for a tutorial on watercolor techniques, so I will gladly oblige.  This may be a bit tedious, so we shall see how it goes.

Not only will there be one, but there will also be several tutorials focusing on using watercolor paints on 140 lb. watercolor paper.  I will add each lesson on the sidebar as they progress and time allows.


Tutorial Outline
  • Materials needed: watercolors, at least 140 lb. watercolor paper, brushes, water, ruler, palette knives, miskit, cloth or paper rags to start.  Paint tubes of watercolors are available in hundred of colors.  They will last years and it takes just a dab of color on a palette.  When the paint dries, just add a wet brush and the lively shades reappear on the brush.  Sable brushes are best, but brush prices vary, so just be sure you have a half dozen brushes in various sizes that are dedicated to watercolors and have no oil or acrylic residue left in the hairs.
But I am getting carried away.  (an entire lesson on just materials to follow)
  • 2.  Material preparation, including soaking of water, wet on wet, wet on dry, etc.  (another lesson)
  • 3.  Choosing your subject  ... the less lines the better as we start off.  Perhaps you might choose a coloring book picture to replicate.
  • 4.  Drawing in the subject you will be painting in pencil...pencil marks will be erased after color is applied. (another lesson on using the grid method for ease in replication of drawing in a picture if you are not painting from a still life)  And using the internet to check accuracy of completing subjects drawn ( ...i.e., porcine feet)
  • 5.  Using miskit barriers (another lesson)
  • 6.  Choosing your palette colors.  Look to the great artists and determine the colors they use in a painting that you are particularly drawn to.  An example below highlights colors I like with pinks, purples, yellows, whites, greens, and blues.  How many shades of just green can you count?
source (Frederick Frieseke (1874-1939)The Garden in June 1911)

 ...and then creating your own palette from the colors you have acquired (another lesson)

(the palette I made and use)
  • 7.  Painting, shading, backgrounds, salt preparation for backgrounds
  • 8.  Finishing techniques
There are probably more parts that will be added later.  Stay tuned!  And if you would care to view a few of my watercolors, they are displayed here.

Wednesday, February 15, 2012

Reupholstering Dining Room Chairs with Painted Silk

Supplies Needed to Reupholster Six Dining Room Chairs:

Silk Paints (Jacquard Brand), water based resist (note to self: purchase heavier gutta next time) and six yards of12 mm raw silk (only available on line): slubby and heaviest available.  The silk was ordered from Dharma Trading for about $6/yd.  Wash the fabric and dry in dryer on medium heat.  The product says there is an 11 percent shrinkage fabric on this silk.  This is correct!


Process: silk fabric was cut larger than the chair seat and a large canvas frame was turned over and re-purposed for stretching the silk canvas. A heavy staple gun was used to attach the fabric to the back of the canvas frame...the staples are easily removed after the project is completed.

Resist was applied and painting started.  Note: Allow paints to dry thoroughly and then steam following the technique using newsprint for wrapping and steaming (three hours).  I used this tutorial from Dharma.  Newsprint was purchased from the local art supply store.

As a learning experience, I used two types of silk fabric paint.  One product for painting on silk must be steam set for three hours to set the dyes.  The advantage of this type dye is that it allows colors to flow into one another and results in greater control of the colors.

These are a couple of pictures using this steam set type silk dye and paint brushes with the too-thin resist that spread much too freely, creating large areas that were barriers (resists) to the liquid paints.


Finished piece of painted 12mm thickness of silk before the steaming process:


This is the finished silk painting on the seat of one of the dining room chair cushions: steamed, dried, cut and stapled onto the bottom of the seat cushion:


The second type of silk dye is set by heat only (simply pressing on the back of the painted fabric with an iron set to the silk setting). This type of paint is thick and requires a $13 bottle of formaldehyde based thinner which some painters might not desire because of the associated negative environmental factors.


The above picture shows the same type resist was used (I was too frugal to purchase another gutta for the second chair cushion and wanted to start the second cushion while the first one was drying).  The paint is the heat set type product, with little room for blending colors.  Instead, the colors were applied one on top of the other.

Finished but not yet applied to the chair cushion: (note that the background is the natural color of the silk fabric):


Completed chair cushion with poppy motif:


Four more chair cushions to complete.  I will continue using the dyes requiring the steam method.  These cushions will NOT be matchy-matchy.  For people with OCD, this might make you squirmy, but it is OK in this household.

Update on 2/16/12, third chair cushion finished:


Update on 2/18/12, fourth cover completed with heat set dyes and little blending allowed:


5th chair cover:

Last one...a bird of paradise.  Who wants to sit on the bird of happiness?