Thursday, March 19, 2009

The Sisterhood of the Traveling Shawl

Have you heard about the The Sisterhood of the Traveling Shawl Project?

The Traveling Shawl is a pink lace shawl that will be knit by compassionate knitters in each of the United States, and travels from person to person in increments of three days per person until it has been completely knitted. It will then be raffled off in late 2009. All profits will go to the Susan Komen Foundation. This site states:

... The shawl will visit all fifty states of the US, with one knitter from each state adding 6-8 rows of intricate stitching. Upon completion of the shawl it will be won by someone who has donated to the Passionately Pink for the Cure campaign.

If you would like to be entered in this drawing, make a donation to our Traveling Shawl Team (ID # 3408007). Then forward your confirmation email to travelingshawl@gmail.com For each $5 donation you will be entered into a raffle to win the Traveling Shawl. If you'd like to join our Ravelry group, please visit us at http://www.ravelry.com/groups/traveling-shawl. You can also join our group on Facebook. Simply search Traveling Shawl.

And from the internet Ravelry Knitting Group:
This is about 50 Ravelry knitters from 50 different states...to document the journey of a traveling shawl. It’s journey will begin in Arkansas and once it has been passed to a knitter in every state of our GREAT country, it will return. We hope to accomplish this by October 2009.

For each $5 donation made to the Susan G Komen Foundation via our Donation Page you can be entered in our drawing to win a chance of owning the completed beautiful lace Traveling Shawl.

Everyone has been impacted in some way by breast cancer. Each entry will highlight the knitter, their state, and the person in whose honor or memory that they are knitting for. Enjoy the journey with us. Check out our blog. The journey has begun - share the news! Don’t forget to get your mammogram.
To follow the progress of the shawl, log in to The Traveling Shawl Blog. Today it is in Oklahoma.

Be generous and donate. Who knows, you might just win the shawl and be able to give it to someone who is in The Fight!

Monday, March 16, 2009

Try Decoupage with Wood Picture Frames

That useful product Mod Podge is a favorite medium when decoupaging. It is fast drying, and tough as nails. A little goes a long way with this finish, and sanding between coats of the varnish is not necessary.

In just a bit over two hours, I created two picture frames from unfinished wooden frame blanks purchased at the craft store. The frames cost between $1 and $2, depending on size.

There are many sources to learn how to make a picture frame using the decoupage technique. Check here and here for complete, easy instructions.

These two frames have an undercoating of blue acrylic paint. Then various photographs from the trip and a few post cards were used in the decoration of the frames, including maps and tour tickets as mementos. (You can tell that the recent New Zealand and Australia trip was good photo fodder for decoupage pictures.) There is even a whorl of indigenous possum and wool fiber incorporated into one of the frames that I am currently using to knit a lace shawl.

This is an easy and fun project to create for your favorite vacation photos that will incorporate even more memories preserved on the surface of the frame.

Saturday, March 14, 2009

Crafting Boxes and PaperDolls

Looking for a box template on the internet, I came across a variety of sources. One especially talented crafter came up with many different designs, including a template for making articulated paper dolls.

The directions given for making these creations are given for using card stock. You can enlarge the size to make almost any small box. This being said, I looked through my file of greeting cards which I save for just such a project, and came up with a sweet little bear card which I cut out, making a small puffy box to hold gifted handmade earrings. There is no need to purchase new card stock paper if you have a few cards on hand. (This is a good way to recycle your previously received birthday or other special occasion cards.)

Here is the template for a box made from cardstock from websource Mirkwood Designs for the puffy box:
Please note the restrictions:
Copyright 1999-2008 Mirkwood Designs, a division of ruthannzaroff.com. These templates are free for your use to make craft items to give or sell, to use for teaching purposes, or for submitting projects to magazines. I would appreciate it if you provide a link to my Web site. The templates themselves may NOT be auctioned, sold, or published in any way without my permission.
This adorable template could provide hours of fun for all age groups from children to adults. One of my blogpals, Diane at Dianes Mixed Art could go to town with her mixed media talents, making a spectacular work of art from this template, courtesy again of Mirkwood Designs:

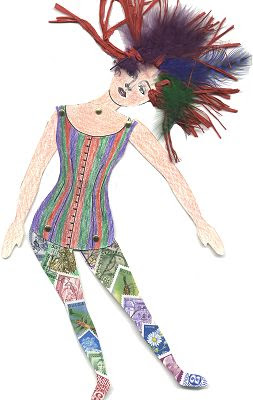
I am going to make this doll about 7-8" in height for an indoor potted plant, whimsically dangling from one of the leaves.

Here is the original template:

Wednesday, March 11, 2009

Salt Cellars and a Contest for Best Uses Today

Several cut glass anachronistic salt cellars were among my mother's prized what-nots in her dining room buffet. She used these little dishes as water holders when she painted with watercolors (a "no-no" in art instruction now, since one is taught to use large containers of water with this paint medium). As a child, I thought it odd that these little containers used to be set on the table for individuals instead of the larger salt shakers now in play.

Since I inherited these little glass objects, it was worth a look into their history. Here is some information about them:

This site gives a bit of history about salt cellars:
...historically, salt was a very precious and valuable commodity -- and salt was kept on the table in small but sometimes elaborate dishes known as salt cellars -- and just being able to afford salt was something of a status symbol. Where salt cellars were shared amongst a number of people at the dinner table, unless an individual spoon was not provided with the salt cellar, the proper way to take salt from the salt cellar was not with one's fingers but with the clean end of one's knife or fork (rather than the side that goes into one's mouth!).

Collectors of salt cellars even have annual conventions where they can meet, greet and purchase their favorite item of collection. This seems odd to me, but then again, I play tournament Scrabble, so who am I to say?

Salt cellars, also known as salt dips, open salts, and salt dishes, are not cellars at all, but an open dish, without a lid, that was used by wealthy families from the middle ages until WW II.
Now I'm in a quandary about how to best use these little salt cellars. Maybe I should.....

1) leave them out on the armoire in the evenings, and fairies could use them as wee bathtubs; or
2) perhaps they can be used as earring holders in the boudoir?;
3) or how about fire ants using them as a punch bowl for an outdoor picnic?

If you would like one of these antique salt cellars shown in the photograph, just leave a comment below about what you would do with one of them. I will pick a random respondent to receive one of these antique salt cellars, postage paid, with my compliments.

Don't you just love a contest where you have nothing to lose?


Monday, March 9, 2009

African Violets - Crowning Problem

In the state of today's economic and emotional downward spiral, let's talk about something positive: plant resuscitation. Case in point, our poor little African violet plant seems to be on its last legs. Its roots are above the soil about three inches, its leaves are drooping, and it looks like maybe this is the end of plant. But, wait! Maybe there is hope. After all, it was still blooming one week ago, so there may be a solution to this crowning problem; maybe it can be revived.

From The African Violet Factsheet, this source gives hope:
Repot violets about once a year, or when the leafless portion of the stem is about 1 to 1 1/2 inches long. Gently remove the plant from the pot with a paring knife. Remove all lateral crowns, leaving only the center crown. Trim off one or two rows of leaves, leaving a wheel of leaves around the crown. With the paring knife, scrape the neck as you would a carrot until all the brown plant material is removed and the neck is firm and green. Break or cut off the bottom half of the root. Have a clean pot ready for the pruned violet. Gently firm in new soil around the plant and water well. The pot should be one-third the diameter of the plant; a 4-inch pot is usually adequate.
Similarly, from Gardening Guide:
When it is time to repot, remove all crowns from your African violet except for the central one. Also, trim leaves from the plant, leaving a circle of leaves around the crown. Use a paring knife to scrape through the brown plant matter on the neck of your plant. When you see green, break off half the root and set your pruned African Violet into the pot, placing the crown just above the surface. Press the mixture firmly around the crown and water your plant well.
Alrighty, let's see what happens. Here is a picture of the sickly African Violet before, and after, transplantation into fresh potting soil especially designed for this delicate little guy.


Time will tell if these efforts of paring down the root and repotting the pruned plant will bring it back to better health. More pictures to follow in the future ... let's hope it survives.
The final replanted violet, the crown pruned, its roots tamped into fresh soil, re-watered, but still in need of its bottom leaves pared down to a circle:

Friday, March 6, 2009

Embroidered Fairy


Today is "Show & Tell" over at Kelli's House, and the fairy painted, sewn and appliqued on a baby pillow case is my Show and Tell, previously blogged about here in July.

Please visit Kelli's House for more spring pretties. She has some sweet bunnies on her blog today. And have a nice weekend; maybe take a Sunday nap to catch up on your lost hour of sleep?

Thursday, March 5, 2009

Needle Felting: Who Knew?

Perusing email this morning, my update from Knitting Daily discussed needle felting, a craft which has not yet become one of my crafting obsessions. Here is what Sandi Wiseheart, Editor of Knitting Daily had to say today. It spoke to me!

I made a vow with myself several years back: I Will Not Get Into Needle Felting. I figured I had enough "hobbies" (let's just be honest and call them"obsessions," shall we?) and I didn't want any more reasons to spend money that might detract from my knitting stash expansion efforts. Plus...I know myself. I love all things crafty. I just thought it wise not to add one more obsession to my already craft-crazed psyche.
My crafting interest aroused, I just had to Google "needle felting" and came up with two quick and easy tutorials on YouTube. The first video gives a textbook approach to making a more structured applique, while the second video is valuable in its approach to free thinking needle felting.

After watching these videos, I am running down to Michael's this morning to get a needle punch. All the rest of the materials are on hand (use Styrofoam for the board: much less expensive). Thus,my little needle felting project should be completed before dusk. (Libby and I do have to make a few therapy visits after the run to the craft store.)


Here is a helpful book:

Simply Needlefelt
Jayne Emerson
Paperback
Item #: 09FE01
ISBN: 978-1-59668-108-8112

Tuesday, March 3, 2009

Therapy Dog Has Letters after her Name!

Back in June, Libby the Maltipoo was certified by Therapy Dogs International. A LOT has gone on regarding her work status since last summer. She has been a very busy pup with her visitations.

A slideshow of Libby's Typical Work Day, complete with music, can be viewed here:
Kenny Chesney singing "Shift Work" as background for Libby's Work Day.

And, after fifty (yes 50!) times that she has made rounds visiting patients at hospitals, nursing homes, assisted living centers and our local Regional Center, she has now attained her credentials of "TDIA", standing for "Therapy Dog International Active" status.

In a letter received yesterday from TDI based in Flanders, NJ, she received this message that says, in part:

In creating the TDIA title, it was our intent to inspire more members to actively participate in therapy visits. We encourage you to continue this important work, documenting your next 100 visits for your... (next certification which terms her as an outstanding volunteer).
A certificate of Achievement was presented to Libby Sweetpea, and that is now displayed on the refrigerator in our kitchen.

Here is Libby looking proud:
A little more about the Therapy Dog Program and requirement for the dogs:

In 2007, over 15,000 handlers and approximately 18,000 dogs were registered with TDI. Libby passed the qualifying steps of sitting and staying on command, being out of the owners' sight for three minutes without stressing, being able to accept strangers and their attentions, and being nonchalant around wheelchairs,crutches, walkers and crowds (among other tasks).

Keep on trucking, Libby!

Monday, March 2, 2009

Yarn Weights Explained (courtesy of Meg Swansen)

In her iconic book A Gathering of Lace, first published in 2000 and with a cast of 34 fiber artists, Meg Swansen explains the differences of yarn weights clear at the back of the book. Mind you, it took a few hours to get there since the lace projects are intriguing to review, but when I found the chart (copied above), this was a revelation to me.

For a long while, I thought a "DK" weight yarn was the abbreviation for "Double Knit". Thanks to a chart I found in the back of this delightful book, I learned the exact size and look of a DK weight yarn, as well as other sizes of yarns.

The chart pictured above can be found on page 165 of the book A Gathering of Lace. Here is the site where you can purchase it on Amazon.One more trick that I learned from this book is quoted from page 4 of the book:

When it comes to joining in a new ball of wool, the usual methods are not very satisfactory for lace knitting.. (but) splicing... when done done properly, ... is totally undetectable. If you have a 2-ply wool, separate the last few inches of the old skein into its individual plies and break off (do not cut) one ply several inches from the end. Repeat this procedure on the end of the new skein. Now overlap the two ends in your left palm, moisten your right palm (spit does work better than water) and rub your palms together briskly for 5 to 10 seconds...or until you can feel heat. You have fused the fibers and, because you broke off one of the plies on either end, the diameter of the wool remains constant.
Let me tell you, this method works! The fusion is invisible from either side of your knitting.

Here is a picture of a the Clair lace shawl (pattern can be found here), compliments of Vyonne Senecal on Ravelry, where this method of splicing yarns was applied yesterday as I was knitting a shawl with the new possum and wool fur from Dunedin, New Zealand.

About half way up the thirty rows of knitted lace shown in the picture, I had to splice together two balls of yarn. Using Swansen's technique of splicing yarn, there is absolutely no detection of where the splicing occurred.

This was an idea too good not to share!

Saturday, February 28, 2009

Inspirational Stories for Publication

A fellow blogger and author recently put out a call for inspirational stories that she will compile and publish in the near future. This individual, Jena Isle, has the website GewGaw Writings. Here is her banner:Ms. Isle states in her blog the term "gewgaw" ...

... in this site means " bauble" - "baubles" of writing....an attempt to write poems, short stories, essays, quotations and what-nots...
She plans to put together twelve inspirational stories which she has garnered for a book she believes will be a good read for a wide audience.

The oral story I submitted last August to the National Public Radio Story Corps was one about a moral and medical decision which was made almost forty years ago that has had far reaching impact. You can read it here at Jena Isle's blog. If you scroll through her blog, all twelve stories she has chosen can also be read.

When she publishes, she will send each of the contributors one of these books. Thank you, Jena, for selecting this story as one of the twelve you believe worthy of publication. Best success on your book, as well.

Thursday, February 26, 2009

Using Blingee Program for Glitter Graphics

glitterlily
Make custom Glitter Graphics

...just stumbled upon a free graphic program found at Blingee. An example of a blinged out picture is shown above. It is a free program and has dozens of graphics from which to choose.

These are the two main photographs shown below (but not blinged out) that I am using as inspiration to create a new oil painting that should be finished before the start of summer.


The lovely close-up picture of the pink and purple lily was taken by Kelly Sheimberg while on the New Zealand/Australia Scrabble cruise trip last month.

Thus far, two coats of underlying orange and yellow primer have been put on the canvas, and I hope to sketch out the lily and foliage by the end of the day. This painting will incorporate some of the newer water based oils readily available on the market. I'm thinking of jewel tones for the petals of the flower with lots of greens/blues for background foliage.

The first painting will be on a 11" x 14" canvas. By the start of summer, I would like to paint a similar lily in varying hues of pinks, reds and purples on a 36" x 48" canvas. Please contact me if you are interested in acquiring either of these original works.

Tuesday, February 24, 2009

Using Index Cards for Knitting Directions

Listening to a podcast about knitting tips a few months ago on Knitpicks, Kelley Petkun talked about translating lace charts for knitting on to index cards for easier reading while knitting. Since lace knitting was not on my radar back then, it did not occur to me that I would be looking for just such a tip in the near future.

Now that I am knitting with lace motifs, Petkun's hints made so much sense that I had to try it for myself: using index cards, that is!

If you are not a knitter or need any chart interpretation tips, stop reading here. (pause)

But if you are looking for an easier way to decipher knitting instructions from the written page, this posting may be your ticket to easier knitting.

The key is to write down ONE row of instructions at a time, transfer that ONE row of directions to an index card, and then organize the cards sequentially so that your directions are all transferred onto a set of index cards held together by a big locked ring available at any office supply store. After the completion of one row of instructions listed on the index card, just flip over to the next card. Be sure to check and triple check your typed instructions against the original pattern.

By following ONE row of instructions at a time, put on a separate card, your eye will not confuse which row of pattern you need to follow... much easier on the eye and brain!

Another hint: type out the instructions on a word processing program, using the appropriate label format for the labels you have on hand (mine is a 10 year old box of Avery #5366 Laser File Folder Labels). Then just peel off each label and affix to an index card, row by row.

Below is a close-up picture of a portion of a lace scarf recently completed using the index card method of following a more complicated set of instructions:


To hear Kelley Petkun expand on the merits of using this easier way to read charts, go to this podcast for step by step directions: Podcast on Lace Knitting Tips.

This is a picture of the completed lace scarf (the scarf pattern is from Kay Meadors' I Can't Believe I'm Lace Knitting book):

Trust me, I ripped and re-ripped this scarf many times before completely starting again and using the index card method of following knitting directions; the Petkun tip allowed me to finally finish the project. Thanks, Kelley and Knitpicks!

Monday, February 23, 2009

Glass Jar Uses in Photo Crafts


Another tip for going green and creating fun crafts is using old glass jars.

Picture and instructions from Photojo:

It’s so simple we can’t believe we didn’t think of it before: just slide a photo into a jar, turn it upside down and display your upcyclin’ genius for all to see.

How simple is that?

It is a useful idea to use on a kitchen window sill: water splatters come off the glass in the dishwasher (but take out your photo prior to washing.....hehehe).

Thursday, February 19, 2009

Beaded Earrings for Hospice Fundraiser


Hospice of Western Colorado will host a fundraiser and an appreciation dinner for their volunteers in April. The theme for the fundraiser is "Art for Hospice".

My contribution to the effort is a dozen pairs of handmade earrings , some made by using the Japanese method of Makume Game technique using polymer clay, and others with glass beads and purchased findings.


If you have any extra glass beads or earring supplies that you would care to give to the Hospice of Western Colorado, please email me at nmccarroll at mindspring dot com and let me know, and your beads will be used in making more earrings for this fundraiser. (Some of you who read this blog make lovely things, and if you have some extra pieces not being put to good use, this would be a nice gesture on your part. Please be sure and let me know your website, and I will pass that along also.)

Thanks!

Tuesday, February 17, 2009

Felted Bowls as Blessing Bowls

Last year I whipped up five or six felted bowls with directions from the book One Skein, 30 Quick Projects to Knit and Crochet, by Leigh Radford (Interweave Press). Back in the spring last year I blogged about the book here, and said that felting was a fun project since all kinds of mistakes in knitting can be camouflaged simply by the way the shrinkage factor covers blunders.

One of the bowls I made is just perfect to be given to my friend undergoing chemotherapy for breast cancer. I filled it with candies and attached a little cross tied on to it with a pink ribbon, and filled it with peppermint candies. Here is the card I copied, with a verse from Walt Whitman, that she may enjoy pondering:
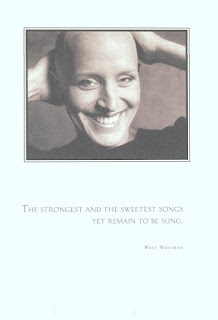

The quotation by Whitman is: "The strongest and the sweetest songs yet remain to be sung."

That is something to think about, isn't it? So if you feel you are used up and tired, remember that there is more life ahead!

Hopefully, a Blessing Bowl is the right gift given at the right time (later today, while she is undergoing treatment) for my friend Carole. This site: Eclectic Gallery gives a summarization of my heartfelt thoughts being conveyed to Carole with this bowl:

The Blessing Bowl is a vessel to share caring, love, thoughtfulness, compassion, joy, feelings, gratitude, and more. The Blessing Bowl... holds written acknowledgment of the blessings in your life.... it is a given as a gift of gratitude, a way to connect with our spirituality, a customized gift that celebrates life's blessings.

So often we forget to tell people in our life how much they mean, the Blessing Bowl gives you the opportunity to tell them how important they are.

This is Carole's gift, along with an attached charm in the shape of a cross that was purchased at the local craft store:

"The Lord is gracious and full of compassion, slow to anger and great in mercy. The Lord is good to all, and His tender mercies are over all His works." (Psalm 145:8)

Monday, February 16, 2009

Lemon Tart with Rosemary and Strawberries

Ok, it's about time for a recipe.

The man of the house reaaaaallllllly enjoys cooking. And he is good at it. But every now and then, a dessert is nice. He does not bake, so that excursion into food decadency is left to me.

This recipe from Woman's Day Magazine caught my eye. Perhaps it was the fresh rosemary leaves in the tart shell that seemed like an interesting combination in a pastry.

Here is a picture of the featured dessert "Lemon Tart with Strawberries", courtesy of Woman's Day.


If a list of ingredients calls for sweetened condensed milk, it MUST be tasty! The ingredients are shown below, in case the picture whets your appetite, and all the instructions can be found here at Woman's Day.

Tart Shell: 1 1⁄4 cups all-purpose flour
1⁄4 cup confectioners’ sugar
1 Tbsp freshrosemary leaves
1⁄4 tsp salt
1 stick (1⁄2 cup) cold unsalted butter, cut into pieces
1 large egg yolk mixed with 1 Tbsp water

Lemon Filling: 1 (14 oz) can sweetened condensed milk
5 large egg yolks
2 tsp grated lemon zest
1⁄2 cup lemon juice

Decoration: 12 strawberries, hulled and halved
Our tart did not finish up quite as pretty as the professional picture, but it probably tasted just as fine. Man, was it good!

Any by the bye, there are 400 calories per serving. Sigh.

(Picture found at Flickr.)

Saturday, February 14, 2009

Knit Sweater Finished by Valentine's Day

When I saw the sweater pattern highlighted in Ravelry on this page: Pullover for Women, I knew I wanted to knit this since the needlework begins at the neck.

So, months later, here it is finished:

This pattern can be found at Knitting Pure and Simple. And a better picture of the same knitted sweater, again supplied by Knitting Pure and Simple, is this one:


This gal is much cuter than the broad sporting the red sweater, and the model's sweater does not have the mistakes in it that can be seen on the red sweater!

But with a scarf around the neck, most of the glaring mistakes are (hopefully) camouflaged.

This sweater took 10 skeins of DK yarn to complete, and the pattern is only $5.00. Check out more patterns at Knitting Pure and Simple.

Thursday, February 12, 2009

How to Make a Pop-up Valentine Card

Looking for a way to make a personalized valentine, I came across this video; the two cuts that are the beginning of any pop-up card are the key for a three dimensional look.


Using recycled Christmas cards (many are red in color), "thinking of you" sentiments on all occasion cards, and a pair of scrap booking scissors with a decorative edge, you can make many different kinds of cards for your valentine.

Here is one re-made from a get-well card with the Bible verse included: I am overcome with joy because of Your unfailing love, for You have seen my troubles." Psalm 37:7 -- That verse is on the inside of this little recycled note card.


A bit of confetti or excelsior used in packaging adds a decorative touch. Knock yourself out, and give others a lift with a hand made card for any occasion.

Monday, February 9, 2009

Making Suet Cakes for Birds

Even birds like food treats, especially in the winter. From Feeding Birds, here is an easy homemade suet cake that your birds might enjoy now:
Making homemade suet cakes is simply a matter of melting fat down to a pour-easy consistency, adding a few ingredients of your choosing, then pouring the mixture into a mold. The shape of the mold is determined by the type of suet feeder you'll use.

If you are using lard or shortening for homemade suet cakes, adding equal parts of peanut butter flour will help maintain correct consistency of regular suet cakes.

To this warm and pour-able mixture you could add rolled oats, bird seed, cornmeal, raisins, unsalted nuts and anything else you think the birds would enjoy. Then, pour your warm suet 'soup' into the mold (a bread pan where you could slice off bits for your store bought suet feeder, cupcake tins that you could pierce with wire and hang from a tree, etc).
This little guy was photographed Saturday by Jack Heniford in South Carolina:

Cardinals (redbirds) are attracted to sunflower seeds and safflower seeds, according to Plant Answers.

Let me know if you have success with feeding birds, and what type feeder you have.

Friday, February 6, 2009

Possum Fur and Wool Fiber Blend for Knitting

Who knew that knitting with possum fur was a rage? In Dunedin, New Zealand, I picked up five skeins of wool that was manufactured there and is indigenous to the region because it consists of 40% possum fur, 50% Merino wool and 10% silk. It is soft, warm, and light weight.

When I got home, I looked up properties of this type blended wool and found a website Handknitting Possum Wool Yarn that stated the following:

Hand knitting Possum-Wool Yarn... Possum fur blended with merino wool makes a variety of yarns that are very special. Possum-wool yarn has all the properties that a 21st Century garment demands:

Feels like cashmere...
Is hard wearing...
Is light weight...
Is warmer than wool in winter and cooler in summer...
Breathes...
Has an angora 'glow' or halo to it...

NZ Nature says:
Possum Wool is luxuriously soft, incredibly lightweight, exceptionally warm and easy to wear. It won’t pill, it won’t wrinkle, it’s anti-static and is a market solution to an environmental challenge facing New Zealand. Once you’ve tried it nothing else will feel as warm and soft.
This yarn will be made into a shawl from a pattern I have used previously, written about in this prior posting found here, with the pattern from Knit Picks that can be found here. It may take a while to work up this possum fur, since I am making a wider shawl.

Not only can we knit with doghair, but we can also knit with possum, thanks to our furry friends.

I can't wait to start on the possum project!

Join me over at Kellis House for Show and Tell Friday. There is a lot of eye candy to behold there.

Thursday, February 5, 2009

Glass Beads, Wool Yarn and Wooden Buttons

Q: What favorite souvenirs did I bring back from New Zealand?
A: Anything from the Christchurch Artisan and Craft Galleries.

This artisan center (map shown above) houses several dozens of working artisan shops. Their website says:

Once the University of Canterbury, The Arts Centre today is a unique and colourful complex that promotes community education and the growth of arts and crafts in Christchurch. Located in the greenest and architecturally most harmonious part of the city, The Arts Centre is only six minutes walk from the central city, and 15 minutes drive away from the Christchurch International Airport.

West on Worcester Boulevard, The Arts Centre’s role as a venue for cultural recreation in the heart of Christchurch is enhanced by it’s immediate neighbours; the Canterbury Museum, the Christchurch Art Gallery and the Botanic Gardens.

Here are some glass beads from one of the largest bead stores where I have ever shopped, the Beadz Unlimited store. (Photo courtesy of Beadz Unlimited.) Aren't they gorgeous? I found some unusual glass beads in colors that are difficult to match, and also purchased a few beading staples.

This is NZ wool fibre from Fibre Artisans located within the gallery. It is a "Kid Mohair/Merino" blend, produced by Touch Yarns in New Zealand. The quantities and selections were vast, and I had a hard time choosing from their inventory.

Hand carved buttons made from prolific rhododendron branches were another souvenir. An artisan there makes buttons from about a dozen different native woods. Each button in each set was unique. Unfortunately, this artisan is retiring soon. Maybe someone else will take over his trade.


That gives me an idea...Grand Junction is in the heart of wine/vine country in Colorado. Perhaps cutting circles from grape vines and using the Dremel tool to make tiny holes could result in making some grape vine buttons. Hmm...that does not sound too difficult.

Wednesday, February 4, 2009

Flowers In New Zealand


Flowers in New Zealand are gorgeous. Everywhere you look, various species showed off their foliage. Most of the photographs of flowers were taken in Auckland, New Zealand at the Wintergarten Horticultural Centre.

Showcased are lily pads in a water garden, begonias, a carnivorous pitcher plant, and the embryonic parts of a fiddle head fern (after blanching, they are a delicacy used in salads). You can easily identify the day lilies and coral berry bush, as well as fuchsias in hanging baskets.

Here are a few flower photographs incorporated into a video: