Thursday, March 20, 2008

Easter Decorations


Palm Sunday is past and the palm used in church is displayed along with bunnies and spring ornaments placed below a vase of alstroemeria.

Enjoy your beginning of the spring season today.

Wednesday, March 19, 2008

Terrariums


The terrarium pictured above is my attempt to revive a plant which seemed to never get enough water, no matter how often or how much it was watered. The problem appeared to be with the original commercial soil mixture in which it was planted. That mixture allowed water to seep right through it and down to the bottom of the container where it quickly evaporated.

In order to revive the plant, and to make a conversational item placed on a side table in the living area of our home, I repotted the pepperomia large-leafed plant in a wide-mouthed glass snifter. I also transplanted some ground cover from our back yard which was sprouting back from the winter. The plant(s) have now been thriving in their new environment for about two weeks.

The instructions of how I prepared the terrarium are listed below, as well as the link to the site which was investigated.

Garden Helper
Creating your terrarium: Before you begin construction, get all of your tools, materials, plants, and of course your container, together in one convenient place. Your planting foundation will consist of four layers.

The bottom layer is for drainage, and consists of pea gravel, pebbles, or very coarse sand.
Proper drainage is essential to ensure that the soil doesn't become over-saturated, which may lead to root rot, and the death of your plants.
Depending on the size of your container, you will want to spread at least an inch of drainage material evenly across the entire bottom of your terrarium. For large or deep containers, up to 3 inches of material may be used.
On top of the drainage layer, it is a good idea to spread a thin layer of activated charcoal (like you would use in your aquarium filter).
This layer will help to clean the air of the fumes caused when the organic materials begin to decompose.
The third layer is a thin cover of sphagnum moss, spread over the first two layers.
The purpose of this, is to prevent the soil from sifting down into the drainage layer, which would render it useless.
The final level is that of your soil. Many garden centers sell a potting mix specifically for terrariums. In reality, all that you normally get for the extra money, is sand added to their regular potting mix. You may choose a pre-mixed terrarium soil, or, if you prefer, just add one part coarse builders sand, and one part leaf mold (or humus) to each two parts of your usual mix. Never use beach sand in any potting mix! Do not add any fertilizer to the potting mix. It already has enough nutrients to last a long time. Too much will cause the plants to out grow their surroundings, much too quickly.

Tuesday, March 18, 2008

Felting With Wool

Felting with wool was project I had wanted to try for a few weeks. There is a handy pattern and felting instructions included in a nifty book I recently bought entitled "One Skein Knitting" by Leigh Radford (referenced at end of post).

I began with two skeins of wool purchased from the local craft shop (not finding the bulky wool which the pattern suggested be used), held the two different colors of wool together and began knitting the project.

Then I discovered I had made a mistake. No worry. Since perfection is not in my vocabulary, I remembered the Japanese word/thought process which my brother John had told me about several years ago. The word is “wabi-sabi”, which means that to have something flawed in a hand-made item only increases its intrinsic worth.

From wikipedia...

Wabi and sabi both suggest sentiments of desolation and solitude. In theMahayana Buddhist view of the universe, these may be viewed as positive characteristics, representing liberation from a material world and transcendence to a simpler life.

And another source says:

The primary aesthetic concept at the heart of traditional Japanese culture is the value of harmony in all things. The Japanese world view is nature-based and concerned with the beauty of studied simplicity and harmony with nature. These ideas are still expressed in every aspect of daily life, despite the many changes brought about by the westernization of Japanese culture. This Japanese aesthetic of the beauty of simplicity and harmony is called wabi-sabi (wah-bee sah-bee). Wabi-sabi is a beauty of things imperfect, impermanent, and incomplete.It is the beauty of things modest and humble.It is the beauty of things unconventional.

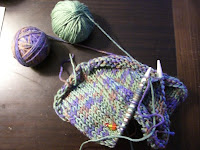
After that excursion into wabi-sabi, let’s continue on with this felting project.

Here is a picture of the beginning project, in which I inadvertently twisted the circular needle, making a twist in the final product. But I did not take out all the previous knitting in order to correct this minor mistake, and soldiered on, finishing the piece with that flaw incorporated into its beginning.


Then I washed the final circular knitted piece and began the felting process:

Felting Guidelines
"Fill washing machine with hot water at lowest water level possible and add 1-2 Tbsp of dishwashing soap. Place knitted piece in washing machine, along with a tennis show or some tennis balls for friction. Set machine to agitate and check progress every few minutes - felting time will vary, depending on temperature of water, type of soap, and intensity of agitation. When knitted stitches are no longer visible and the fabric is smooth and impermeable, remove the piece from the machine. Do not let the piece run through the spin cycle, doing so may cause permanent creases. Remove the piece, squeeze out the water, then roll it in a dry towel to remove excess water. Lay it flat to air-dry, checking on piece periodically and reshaping as needed. Depending on the climate where you live, it may take several days to fully dry.”

From One Skein: 30 Quick Projects to Knit and Crochet, Leigh Radford, published by Interweave Press, 2007, Loveland, CO, p.116

And here is the final result, on my kitchen work station, with no one the wiser for the one mistake initially begun while knitting the third round. It typifies the concept of wabi-sabi. It is impermanent, it is simplistic yet utilitarian, and by gosh, I like it.

I plan on making several more smaller bowls in different colors, using the recommended chunky wool yarn. Perhaps there will be no knitting mistakes in the next bowl.

But, perhaps there will be more wabi-sabis in many future projects and relationships, thereby somehow increasing their worth. After all, we are all flawed human beings, but valued in the eyes of God in spite of our individual personal wabi-sabis.

Monday, March 17, 2008

Acrylic Paints on Tote Bags


During our friendly art class/workshop a few weeks ago, a decorative artist brought in a black canvas tote bag on which she had painted a patriotic picture. She used regular acrylic paints (the ones you find in craft stores in a plethora of colors, each costing from $.69 to a bit over a dollar). Since I had never used my acrylics for anything other than stenciling, I thought I would give it a shot.

I used a Mary Englebreit picture from a purchased note card, and a Maxine cartoon found on the internet. Both images are fun and indicative of my taste in whimsy, so I decided to paint replicas of these images on an old cream colored tote bag. That tote bag was purchased for a previous project that I never got around to completing, so it offered the perfect surface for painting with those little bottles of acrylics.

The surface of the canvas was fortified by attaching it to a clip board. That way, it was easy to put the secured tote in my lap and paint while I watched television with my husband. After a weekend, I came up with this bag painted on each side. It was fun to do, and shading with the fast drying acrylics was not nearly as difficult as I had imagined. Give it a try with you favorite picture, or be even more original and let your creativity take you to a place you would like to be.

Knitting Markers with Colorful Beading

Knitting Markers made from beads and jump rings (close up below)

While listening to one of my favorite knitting podcasts over the weekend, I surfed over to one of the sponsoring knitting websites and found accessories which make knitting more fun. One of the accessories I found was knitting markers with beads attached. Since I have a collection of beading materials, I took the idea of colorful markers and made some of my own.

I am knitting two projects now, and am using six of the markers incorporated into the work. It makes the handwork even more fun as I come across one of the markers. Not shown are a couple of knitting markers where I used an old ring as the marker, and attached a small bead string to it. Make sure that if you are making these yourself, be aware of any closure of the rings which might snag your yarn. Just firmly crimp all attachments, and VOILA! You are in business.

Happy St. Patrick's Day!