Friday, June 19, 2009

Microwave Baked Potato Fabric Bags

Have you tried a cloth bag for baking potatoes in the microwave?

Potatoes baked in the fabric really are delicious, and have a different texture than the usual baking process from sticking a naked potato in the microwave.

There is no trick to it (other than using the bag); just wash and dry potatoes. Then wrap them in a paper towel. DO NOT PIERCE SKIN! Place potatoes in bag and microwave, as usual, for about five minutes (for one potato) or until done. You can put up to four potatoes in one bag. Remove the potato(es) from the bag and fluff with a fork, applying your favorite slathering of fattening delicious toppings. They taste like those slow roasted stuffed potatoes popular on restaurant menus.

If you want to get one for yourself or as a gift, you can purchase a baked potato bag here at Country Collectibles Microwave Bakers on the internet.

Or make one yourself with directions from Garden Web.

I was lucky and received one from a relative. This is the one she made: Baking potatoes in a bag is a novel idea, and the potatoes are delicious...there must be some magic in the process!

Wednesday, June 17, 2009

Pictures of Knitting Madonnas

This picture may not be new to you, but after Googling "Knitting Madonnas", this was one of my favorite renditions. It was painted around 1390, according to Howard Schwartz. This website gives a concise history of not only the artwork, but also of the knitting craft.
The above renedition, found at WikiMedia, dates the wood cut at 1400-1410 AD.

Other pictures of knitting madonnas can be found at The Shawl Ministry. This site will link to each US state that has a shawl ministry. This is their picture depicting their mission:

On Flickr, you can click on the link and see the rendition dated from 1345, entitled "A painting of the Holy Family"; it is attributed to Ambrogio Lorenzetti (ca. 1345) of Siena. Size 54.5 x 25.5 cm.

This search was a fun find for me, and the illlustrations can be used in a number of ways with knitting projects.

Tuesday, June 16, 2009

Creamy Pesto Chicken and Pasta

Here is an easy and quick recipe using pesto sauce with chicken and pasta. How can you go wrong with those ingredients? I came across this recipe over at Purpled Sky's blog a few months ago. It is tasty! (Feel free to use chicken thighs instead of chicken breasts for more flavor.)


Creamy Pesto Chicken Recipe

2 chicken breast fillet, quartered and sliced ...or dark meat!
1/2 tsp salt
2 tbsp olive oil

Prepare chicken slices thick or thin enough for a quick pan fry. Season with salt. Heat olive oil in a non-stick skillet. Fry chicken slices until brown.

1 tbsp olive oil
2 cloves garlic, grated
1/4 cup chicken stock
1/4 cup creamer
3 tbsp pesto sauce
pinch of salt

In the same pan, heat olive oil. Saute garlic. Once fragrant, pour in stock. Bring to a soft boil. Add creamer little by little, stirring as you do. Turn off heat; then add pesto sauce. Season with salt.Place the pan-fried chicken slices onto the pan and turn the heat back on. Coat the chicken slices with sauce. Once the sauce starts boiling again, turn off heat.

Boil up your favorite pasta or risotto. Serve atop the starch. Yum.

It is almost time to make bunches of pesto sauce for freezing. This post explains how to make up basil or arugula pesto to freeze and use later.

Friday, June 12, 2009

Preparing Fleece for Spinning: Dog Hair and Alpaca Blend

In knitting-with-dog-hair, written about a year ago, the subject of knitting with dog hair was discussed. It was then I started saving my pups' fur for knitting into a new project. Like the book says, "better a sweater from a dog you know and love than from a sheep you'll never meet". The book Knitting with Dog Hair can be purchased at this site on Amazon. It is on my reference shelf, and is full of information about this rather esoteric subject.

Once the fur was gathered from our two dogs and their home-style groomings over the past 18 months, the obvious next step was what to do with it to get it into shape for spinning. It would need some other fiber to mix in with the fur in order to make a good blend.

Luckily, here in western Colorado, there is a farm with 14 alpacas on it. Shearing time was last week, and new acquaintance Cori Elam saved me enough alpaca fur (all white) for the blending. We rendezvous last night at our first weekly summer Farmers' Market in Grand Junction, and I gave her my bag of saved dog fur. It looked like this, and I had about a pound of it:


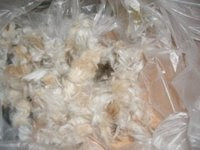
This fur will be mixed with Cori Elam's alpaca fiber. Cori's website can be accessed at Cori's Western Colorado Alpacas. She has all kinds of alpaca products for sale. Many of her alpaca fibers are imported from Peru; beautiful products were on display at her booth last night.

Back to the preparation process of the fibers: from the site how to prepare fleece for spinning, easy and concise information was gathered regarding the next steps:

Step 1 Take a chunk of fleece about the size of a basketball. Fill your sink with hot water and some dish soap. Step 2 Put the fleece in the sink and let it sink. If you are impatient, you can gently push it down. Slowly move it around but do not "agitate." Agitation will cause it to felt, making it useless for spinning. .... further steps .......remove the fibers and you are ready to spin.

Another website packed with information about using animals' fur is Spinning Straw into Gold. Take a gander at that site if you are interested in reading about one person's vocation with animal fur products. It is amazing.

But what would a knitted project with dog fur blended with wool look like? Sure enough, that source on the internet Ravelry with over 400,000 members world-wide was my best source for tracking down someone who had pictures AND and an explanation of her process of collecting fur. New friend Avedaggio on Ravelry from Boulder says about her dog Mulan's fur:

My mom has a shih-tzu, whom she keeps long-haired. Mulan’s fur is about 8 inches long. To keep her from becoming a matted mess, mom combs her every day and gives her a bath (complete with blow-dry!) every week. Since Mulan was a puppy, mom had been saving the fur she combed out in little plastic bags, and a couple years back she and my dad took it to the Estes Park Wool Market and got someone to spin it up (this was before I learned how to spin). Then I got 1200 yards of 2-ply Mulan yarn for Christmas! It smelled like Mulan right after the bath. It was so funny when we put a skein on the floor to let Mulan investigate– she sniffed and sniffed, and then picked it up, carried it to her favorite corner and curled around it as if it were a puppy! So cute. I ended up knitting a lap blanket for my mother out of it.

So the next steps of blending the alpaca and dog fur are in process. After the washing, carding, and spinning steps are completed, there should be more than enough yarn to whip up something as special as a Mulan's lap blanket shown above!

(Thanks, Avedaggio, for the use of your picture and your entertaining story.)

Wednesday, June 10, 2009

Hellen Keller: "In Light of a Brighter Day" essay in memory of Gale Barnwell

A brief acquaintance passed away this week. In memory and honor of her life, here is a podcast that I would like to share, written by Helen Keller, and found here at This I Believe:
I choose for my subject, faith wrought into life apart from creed or dogma. By faith, I mean a vision of good one cherishes and the enthusiasm that pushes one to seek its fulfillment, regardless of obstacles. Faith is a dynamic power that breaks the chain of routine, and gives a new, fine turn to old commonplaces. Faith reinvigorates the will, enriches the affections, and awakens a sense of creativeness. Active faith knows no fear, and it is a safeguard to me against cynicism and despair.
After all, faith is not one thing or two or three things. It is an indivisible totality of beliefs that inspire me: Belief in God as infinite goodwill and all-seeing Wisdom, whose everlasting arms sustain me walking on the sea of life. Trust in my fellow men, wonder at their fundamental goodness, and confidence that after this night of sorrow and oppression, they will rise up strong and beautiful in the glory of morning. Reverence for the beauty and preciousness of the earth, and a sense of responsibility to do what I can to make it a habitation of health and plenty for all men. Faith in immortality because it renders less bitter the separation from those I have loved and lost, and because it will free me from unnatural limitations, and unfold still more faculties I have in joyous activity.
Even if my vital spark should be blown out, I believe that I should behave with courageous dignity in the presence of fate, and strive to be a worthy companion of the beautiful, the good, and the true. But fate has its master in the faith of those who surmount it, and limitation has its limits for those who, though disillusioned, live greatly.
It was a terrible blow to my faith when I learned that millions of my fellow creatures must labor all their days for food and shelter, bear the most crushing burdens, and die without having known the joy of living. My security vanished forever, and I have never regained the radiant belief of my young years that earth is a happy home and hearth for the majority of mankind. But faith is a state of mind. The believer is not soon disheartened. If he is turned out of his shelter, he builds up a house that the winds of the earth cannot destroy.
When I think of the suffering and famine, and the continued slaughter of men, my spirit bleeds. But the thought comes to me that, like the little deaf, dumb, and blind child I once was, mankind is growing out of the darkness of ignorance and hate into the light of a brighter day.
As an infant, Helen Keller was struck by a fever that left her deaf and blind. But with the guidance of her teacher Anne Sullivan, she learned to communicate through the eyes and ears of others. After graduating from Radcliffe College, Keller became a renowned author, activist and lecturer.
In memomy and honor of Gale Elida Bardwell (February 15, 1940 - June 8, 2009)

Sunday, June 7, 2009

Baby Surprise Sweater

That little Baby Surpise Sweater is completed. It turned out smaller than I had hoped, but it gives me a reason to knit another in a larger size. The pattern is available from Schoolhouse Press.

Its dimensions on a size 6 circular needle are: body width at middle: 8.5 inches; length 11.5 inches.

An applied I cord was attached around the edges, a single crochet edging was used for the sleeves, and three purchased buttons in accompanying colors to the yarn (Tuscany Colorway, hand dyed 100% superwash Merino Wool, 330 yr/skein, approx. 4 oz) completed the project.

Thanks, Marie at KnittedGems, for your help in pattern interpretation, as well as from the Ravelry Forum group!

Thursday, June 4, 2009

Indian Rope or Indian Hoya Plant

Last year, this post had a topic of the Indian Hoya Plant. Ten comments from readers over past months showed this was a fun plant to display on a blog posting.

Dave says this house plant can grow to 4-6 feet in height. However, this elderly plant has never grown over about 3 inches tall. Its weight does cause it to drape attractively.

This year, sure enough, it bloomed again! Now in its 26th or 27th year in my home, here is a picture of its tiny porcelain looking blooms:

It is still going strong, needs little care and thrives on neglect. It is outside on the patio this summer soaking up the filtered rays and enjoying the high desert air with its lack of humidity.

The free program called picnik helped make the border and text on the picture. It is a fun little gizmo to play with; picnik has my full endorsement!

Tuesday, June 2, 2009

Three Colors for the Baby Jacket

Elizabeth Zimmerman's Baby Surprise Jacket (here is the first link) is in progress.

This is the basic yarn used for the EZ SBJ; 100% superwash merino wool, in the Tuscany Colorway, a hand dyed fiber from ShopYarnLove.

The other two added yarns are DK weight wool in lavender (10% cashmere) and another skein in rose/purple from New Zealand that incorporates possum fur into its merino wool.

Colors did not show true in the picture below, but I wanted to play with picnik, a program that allows tweaking of photos, including borders, text, colors, etc. Here is the picnik picture:


This shows the lavender yarn just being incorporated into the sleeve area above the cuff. It is an innovative pattern, complete with instructions available on You Tube here:

The videos (there are six of them) surely help in figuring out this challenging pattern. Kudos to L2Belt on YouTube for this step by step assistance.

Thursday, May 28, 2009

Anne Taintor: Thanks for the Picture

Today is a pretty full day of volunteering for me, so craft projects are on hold.

This picture from the 2009 Engagement Calendar (Anne Taintor) says it all:

But in another vein of awareness, here are some truisms:

How lovely to think that no one need wait a moment: we can start now, start slowly changing the world! How lovely that everyone, great and small, can make a contribution toward introducing justice straight away. Anne Frank

And

When you cease to make a contribution, you begin to die. Eleanor Roosevelt

And
Learn to lead in a nourishing manner.
Learn to lead without being possessive.
Learn to be helpful without taking the credit.
Learn to lead without coercion. Lao Tzu, philosopher

Wednesday, May 27, 2009

Scrabble

Hope you have a good Wednesday! I'll be playing Scrabble today at my kitchen table with fierce opponent, Allen, getting ready for the National Scrabble Tournament in August in Dayton, Ohio.
Myspace Comments
Myspace Comments

Tuesday, May 26, 2009

Knitting the Baby Surprise Jacket

Elizabeth Zimmerman is renowned as the quintessential knitter and designer in the knitting world. For several months now, I have been wanting to knit up her famous sweater designed for babies. She made the pattern in 1968, and it is still as widely followed now as then.

Here is a picture of the yarn I just ordered from fellow Ravelry member Jenn who had stashed it and was ready to sell to the next purchaser:

The yarn is washable wool, 5 ply, very soft, and should knit up into an interesting pattern. Both the yarn and the pattern should be arriving in a few days. The pattern was purchased from this site: Schoolhouse Press.

This is what Schoolhouse Press has to say about the Baby Surprise Jacket pattern:

Elizabeth Zimmermann's Baby Surprise Jacket has become near legendary since its conception in 1968. The jacket is knitted back and forth in garter stitch, then cleverly folded and completed by weaving the shoulder seams. This updated pattern includes Elizabeth's original Baby Surprise Jacket instructions, original Adult Surprise instructions, and instructions for the new Child's Surprise jacket (see below). We've also added row by row instructions for the Baby Surprise Jacket. Both the Adult and Child's Surprise are based on the construction of the baby jacket. Cully has included numbers to knit the Baby Surprise Jacket at different gauges and a chart to enable you to knit different sizes at different gauges. The pattern also includes an options section for adding hood, collar and other features such as EZ's Afterthought Pocket and more. Technique instruction is also included.

This is a picture of the same jacket recently completed by new friend Moonlight Baker on ravelry:

Nice job, Stacey! Love those colors.

Saturday, May 23, 2009

Foxes

Update: here is another Mama Fox and Baby Fox taken less than an hour ago about 1/2 mile from our house:


These shots were as good as I could get with my camera on ZOOM mode from about 15 yards away.

Pictures from around the Neighborhood

On my morning walk yesterday, nature paid off big time. I saw a fox! But alas, no picture of her. I think it was a female, because she looked a big pudgy and maybe ready to birth a kit.
Near where she was glimpsed, I found a burrow. Could it have been a foxhole? Probably it was a rabbit's hole. The entrance had a dig out that veered off to the left at a fairly sharp angle.


The hole in that tree trunk below could have been an animal's home, but likely it was just an interesting architectural phenomenon of the fallen cottonwood.

Happily walking along the road back from the neighborhood open space area for walking, and while listening to Julie D's Huffduffer podcasts on my iPod, here was a cairn I came across:

It looks like a happy face to say "have a good Memorial Day Weekend"! Every time I walk by, a new object will be added to the cairn, until someone messes up the playhouse. I'm thinking maybe a charm from my beading collection will be added today.

Thursday, May 21, 2009

Mint Sauce Recipe

We hit the jackpot on mint in our yard! Yes, it is everywhere, and even places where it is not welcome - as in our garden areas. It does hold down the soil on an incline in the back yard, so eradication is out of the question. And on the positive side, it smells so sweet after a lawn mowing.

So what to do with all this fragrant herb? Here is a great post I'll be using from All Free Crafts.

Mint sauce makes an excellent condiment to use with lamb chops, pork chops, and to flavor new potatoes and peas. Here is the recipe:

Ingredients:
1/2 cup finely chopped fresh mint leaves
1 cup malt vinegar
2 tablespoons white sugar
small bottles for storage
Mint

Sauce Instructions:Rinse young, healthy mint leaves, strip from the stems, and chop into fine pieces. I usually process most of the leaves in the blender, with a little of the vinegar, leaving some aside to chop by hand. The leaves chopped in the blender will be very fine, and infuse a fine flavor, while those done by hand are a little coarser and will be more visible in the decorative vinegar jar. Bring vinegar to a simmer in a small saucepan, add sugar and chopped leaves. Simmer for about 20 minutes to infuse. Add more sugar or add a little water to taste, depending on how strong or how sweet you want the sauce. (I add no extra water or sugar to this recipe, but you may prefer a less strong infusion.) You can re-use lots of different bottles for mint sauce...narrow jars look elegant, but short, squat jars allow you to use a spoon to serve the mint sauce.

Make sure the bottles are free of nicks or cracks and seal able with either a screw top or cork. Wash containers thoroughly, then sterilize by immersing the jars in a pan of hot water and simmering for 10 minutes. Once jars are sterilized, remove from the simmering water and invert on paper towel to dry. Fill while the jars are still warm and seal tightly. If using corks and you intend to store the vinegar for an extended time, seal the corks by dipping in paraffin; if using a screw top, place a small square of waxed paper on top of the jar before screwing the lid on tight. You can add a small fresh sprig of mint to your jars, if you wish, for visual appeal - just insert into the jar before adding the mint sauce. Use a funnel to add the sauce, stirring as you pour it into the funnel to make sure you get lots of mint leaves mixed with the vinegar. You'll find that the mint settles to the bottom of the jar, so the mint sauce should be gently shaken or stirred before serving. Vinegar has natural preservative qualities, and mint sauce should keep for 2 to 3 months in cold storage or for 6 to 8 months in the refrigerator.

Tuesday, May 19, 2009

Two Stories by Charles W. McCarroll, Jr.

A few weeks ago, I went to Dallas to celebrate my dad's 90th birthday. He remembers and tells many stories from his childhood and through World War II, and with the help of his son (my brother), he has written and collected over fifty reminiscent memories, written in two volumes.

Here is one of his stories about a watch that his father (born before 1890) owned before 1930:

THE GOLD POCKET WATCH

Prior to the 1940’s, the men wore suits with matching coats and vests to church and any social function. The heads of a business might take the coat off but the vest would remain buttoned. They wore felt hats in winter or a flat brim flat top ‘Straw Katy’ for the summer.

A man was not properly dressed until the watch and chain were attached. The watch was put in a vest pocket and the chain across the body and hooked to a buttonhole. Some watches were worn in a watch pocket in the trousers with a watch fob or a chain.

The quality of the timepiece and chains was important. The chain was adorned with medallions, such as a lodge insignia. An engraved gold pocket watch with a gold chain was stylish.

Our Dad had an adorned gold watch made in Illinois. He obtained as a settlement of a debt. He would tell about the debt and say “All I got was this watch”. Years later, there was a robbery with jewelry taken from our house in Junction. Dad thought the pocket watch was lost and he started wearing a wristwatch to replace the pocket watch.

Texas Ranger Captain Gully Cowsert a friend of Dad’s came to see him. He told of a robber in custody near Abilene. The peace officers were viewing the evidence from the suspect when Captain Cowsert said “That watch belongs to Charley McCarroll”. He asked Dad if he could keep it for a few days to show it off and tell the story.

I have the watch that is still a handsome piece of jewelry.

And here is another of Dad's stories about...

BARBERSHOPS DURING THE LATE 1920’s

Junction, Texas is between San Angelo and San Antonio in the hill country of west Texas. The climate and the rivers and make it a pleasant place to live and visit and many people retire in this area.

The city was established and grew after the 1880’s. The city lots were large enough for a residence, a barn for the horses and cows and room for a garden. A canal passed through the upper city. The railroad was 38 miles away. The Old Spanish Trail, the highway between the east and west coast, passed down the main street. The gas stations and garages catered to the tourist while two hotels and a tourist camp served the visitors. A general store, three drug stores, two meat markets and two grocery stores thrived in 1928. Mr. H. E. Butts ran a grocery. A wagon yard was east of the courthouse. A bank, wool warehouse and a small lumberyard were on Main Street.

Three barbershops were in town. Business was good on Saturday when the ranchers came to town to have a shave, haircut and a bath in the back room. Cowboys would bring clean clothes for the evening and many would leave the working things for the barber to give away.

There were barber chairs that could be raised and lowered and the back could be folded down for a comfortable shave. A sink, shelf and a mirror were behind each chair. A haircut cost 35 cents. Chairs were along the wall to make the waiting comfortable. The visitors told stories and traded gossip. Ladies seldom entered a barbershop, as they were patrons of the beauty shops.

When a man sat in the barber chair the first thing that barber wanted to know was how you wanted to look. Do you want a regular cut, a flat top, long on the sideburns or just a trim? The barber would trim the longer hair by using his comb to pull the hair out and use the scissors to clip the ends of the hair with a fast clip–clip sound. He would use his shears to start trimming the top. These manual clippers operated by squeezing the handles and made a clip-clop sound. He would then stir up the lather in a cup and then brush the foam on the sideburns and the back of the neck. The thing that I feared was the razor. The razor was a six-inch thin blade that folded out of the jeweled handle. The barber would unfold the blade, pull the leather strop that was tied to the chair and pull the blade back and forth very fast over the strop to sharpen the razor. This process made such a loud noise. He would then shave the sideburns and the back of the neck and seldom cut the skin.

Wilson Buster owned Busters Barber Shop, that had four chairs, but only one was in use most of the time. Ranchers that were also barbers appeared on Saturdays. A shoeshine schoolboy would shine the shoes for a dime, but boots cost more.

The Junction Barber Shop was owned by Agnes Jordan. O.Z. Jones was the main barber and Reverend did the shoeshines. Reverend was the only black person in Junction. He was a fun man enjoyed by the citizens.

The Burt Shop was on the west side of the square. Baldy Burt had his clients that included the men from the courthouse. He usually had the best shine boy and had some kind of a better shoe polish.

You can tell by these stories that Dad was already a blogger way before his time, eh? He only recently retired from teaching a writing class at the Plano Senior Recreation Center in Plano, Texas.

(Charles W. McCarroll at his 90th birthday party)

Monday, May 18, 2009

Prayer Garden, Iris Blooming


Welcome to my garden spot in Grand Junction, Colorado. Here is a quick tour...


Don't blink. Beneath the wall the bearded irises are in bloom, the tall uppermost petals so gauzy, so delicate, that each bloom, once opened, lasts hardly longer than a day. Look, you can almost see through them. As fleeting as a rainbow, and with the same rain-washed colours, they were named after Iris, the messenger of the gods, who as a rainbow linked heaven and earth. It's the same derivation as the iris of the human eye, the coloured membrane which separates the inner from the outer chamber. Both have the same mysterious, shifting, shimmering quality, the colours depending on the viewpoint of the observer, one colour flecked by, veined with, shot through with another.
... excerpted from The Morville Hours, by Katherine Swift (Walker & Company)
This is where I like to sit in the late afternoon, when the sun casts long shadows:


This is a plaque my mother had in her garden for several years, and one which I fondly display:


This garden spot provides the space and quiet environment for devotional time. Many people that I've come in contact with over the past days are remembered here, as well as prayers for friends and family who are near and far away. Our clients who benefit through therapy dog visits, including hospice patients, the inpatients and outpatients at St. Mary's Hospital, clients at the regional center, blogging buddies, those whom I keep up with on Care Pages are all remembered and prayed for, some especially in this garden.

Please come visit us here sometime soon. I would very much enjoy your company.

Saturday, May 16, 2009

Triangular Lace Shawl Completed

After two months of compulsively knitting, the persimmon color lace shawl is finally completed.

When it was just lying there in a big lump of knit stitches, it surely did not look like it would turn out to be similar to the finished product shown in the book A Gathering of Lace. (Meg Swanson)

Here is a picture from a previous blog post when the shawl was started....

Cotton fabric and beaded knitting markers are laid on the bottom of the picture, but the knit material is shown at the top; this was about five inches into the knitting project.

After it was knit, then the blocking of the shawl was begun. Here it is being blocked on towels after it was washed:


Can you tell it took up most of the available tile on the bathroom floor? And here it completed, dried, blocked and draped across a chair, in all its glory:


OK, I take that back about being in its glory because the camera image did not show the persimmon color of the yarn (100% washable merino wool from Knitpicks).

The finished dimensions are 63" on the top by 44" on each side of the triangle.

One modification I made to the pattern was to add a 2 stitch attached I cord on the top edge of the shawl. Not only did the extra edging add a bit of decoration, it also hid some of my knitting mistakes along the top. This video was helpful in explaining how to knit an attached I cord as edging:

Thanks, Julie, for this added instructional tip!

Tuesday, May 12, 2009

Do It Yourself Mosaic Table Tops

Here is a current picture of the completed small mosaic table topper. A week ago, its beginning was written about here at making-mosaic-table-top. Grouting has been completed and excess grout has been removed with water and a lot of elbow grease. Note to the wise: a manicure after the grouting process is recommended, as it takes a toll on the nails.

This site on E-How basically explains the process in making a mosaic. Ensure that the thickness of the ceramic tiles used by breaking up with a hammer are all the same if you desire a flat surface.

Ceramic tiles are less expensive than glass tiles, although both types of tiles have sharp edges when broken. The glass tiles give a bit more luster, so choice of tile material is a matter of personal preference. The small blue tiles shown in the above picture were made of glass, so the contrast was preferable not only in color, but also in textural effect.

The larger table top (44 " round) is almost finished. It still needs to have excess grout removed from the tiles. A picture of the larger table top (using same motif as smaller table) is shown below.

A Dremel tool to sand the edges will finish off the sides more smoothly.

While doing a bit of research on mosaics, I found this type craft goes back several thousands of years. One reference, found here says:

The history of mosaic goes back some 4,000 years or more, with the use of terracotta cones pushed point-first into a background to give decoration. By the eighth century BC, there were pebble pavements, using different coloured stones to create patterns, although these tended to be unstructured decoration. It was the Greeks, in the four centuries BC, who raised the pebble technique to an art form, with precise geometric patterns and detailed scenes of people and animals.

The mosaic here shows the god Neptune with Amphitrite (on the right) and is in Herculaneum, Italy. It is a wall mosaic which uses pieces of glass to give the vivid colours and reflect light. Glass was not suitable for floor mosaics.
Some mosaics from the Byzantine era look very similar to how they appeared over 4,000 years ago. So my table tops should hold up well outside under the patio roof, at least during our lifetime.

Saturday, May 9, 2009

Saturday Market Bag: Free Knitted download pattern

From Jodie Dannenberg's Ravelry site, she says:
In Eugene, Oregon we have an outdoor market every Saturday from April until November. Not only is it a great time in the sun, but a great place to get organic veggies and food grown nearby. I made this with the outdoor market use in mind. It’s a versatile bag that will stretch to the shape of it’s odd shaped contents perfectly. It can either be made as a hand bag or with a shoulder strap. Make several as reusable grocery bags or one for the occasional weekend picnic.
This bag was quick to knit (five days and over a long weekend), and will come in handy. I shortened the body a bit. Here is a picture of the finished market bag:


And here it is emptied of produce:


It is quite versatile. I made two modifications in the pattern: 1)shortened the length of the body of the bag; and 2) I used circular needles for knitting the top of the market bag. I just could not figure a way to use straight needles to knit the circular top area.

You can download the pattern here for free (in the middle of the page): Saturday-market-bag pattern. Thank you, designer Jodie!

Thursday, May 7, 2009

Birthday Reception for C.W. McCarroll

Here is a collage of pictures from Dallas and the mini family reunion that occurred around my dad's 90th birthday on May 2. Over 125 people came to his reception held at the Plano Senior Center. About 20 people were present for the evening family bar-b-que dinner at a neighborhood restaurant.


His second book of me moires, which brother John put together, was available for perusal.

High school friend Sharon Gardner, also a Dallas resident, drove down to Waco, Texas with me so that we could have a short visit with her mother and my Aunt Mary and Uncle Ed who live in Ridgecrest Retirement Center, just one block from the church where their SIL Gene Evans built Dayspring Baptist Church. One of the photos in the collage below is of this church.

Their daughter (my cousin Cindy who passed away last year) and the late Gene Evans have a beautiful garden sanctuary in the back of this church which was dedicated with love in their memory.


Picasa 3 was the Google program (free download) which enabled an almost ready made collage from a set of pictures.

Saturday, May 2, 2009

Lorica, A Poem by St. Patrick (c. 377 A.D.)

Today is my father's 90th birthday. He is celebrating it with all his family and friends in north Texas. Needless to say, Dad has seen much change occur in his life since 1919, the year he was born.

He has self published his memoirs in two booklet forms over the past ten years, with the help of his wife, Pat, and my brother John. His stories range in length from one page to several pages of typed information, and he loves to regale his audiences with sagas from the past.

Upon my return home after the birthday festivities, I will publish some of his stories on my blog. He might like to see some of his writing on the world wide web, an unimagined possibility at the time of his birth almost a century ago. And a few of his memories just might be interesting to readers!

One thing that has not changed in Dad's life is his Christian faith, and his belief in an enduring life after death. My grandmother, an old time prayer warrior, made sure he had a Biblical grounding.

In honor of his birthday and as he goes toward the century mark, here is the incantation Lorica, especially dedicated to him. It can be found on the internet at Christianity Today. It was a prayer written by Saint Patrick (ca. 377 A.D.) over 1,600 years ago, but is as timely now as it was then.
I arise today
Through a mighty strength, the invocation of the Trinity,
Through a belief in the Threeness,
Through confession of the Oneness
Of the Creator of creation.

I arise today
Through the strength of Christ's birth and His baptism,
Through the strength of His crucifixion and His burial,
Through the strength of His resurrection and His ascension,
Through the strength of His descent for the judgment of doom.
I arise today
Through the strength of the love of cherubim,
In obedience of angels,
In service of archangels,
In the hope of resurrection to meet with reward,
In the prayers of patriarchs,
In preachings of the apostles,
In faiths of confessors,
In innocence of virgins,
In deeds of righteous men.

I arise today
Through the strength of heaven;
Light of the sun,
Splendor of fire,
Speed of lightning,
Swiftness of the wind,
Depth of the sea,
Stability of the earth,
Firmness of the rock.
I arise today
Through God's strength to pilot me;
God's might to uphold me,
God's wisdom to guide me,
God's eye to look before me,
God's ear to hear me,
God's word to speak for me,
God's hand to guard me,
God's way to lie before me,
God's shield to protect me,
God's hosts to save me
From snares of the devil,
From temptations of vices,
From every one who desires me ill,
Afar and anear,
Alone or in a multitude.
I summon today all these powers between me and evil,
Against every cruel merciless power that opposes my body and soul,
Against incantations of false prophets,
Against black laws of pagandom,
Against false laws of heretics,
Against craft of idolatry,
Against spells of women and smiths and wizards,
Against every knowledge that corrupts man's body and soul.
Christ shield me today
Against poison, against burning,
Against drowning, against wounding,
So that reward may come to me in abundance.
Christ with me, Christ before me, Christ behind me,
Christ in me, Christ beneath me, Christ above me,
Christ on my right, Christ on my left,
Christ when I lie down, Christ when I sit down,
Christ in the heart of every man who thinks of me,
Christ in the mouth of every man who speaks of me,
Christ in the eye that sees me,
Christ in the ear that hears me.
I arise today
Through a mighty strength, the invocation of the Trinity,
Through a belief in the Threeness,
Through a confession of the Oneness
Of the Creator of creation.


(Picture courtesy of Lilly Oncology On Canvas, 2008 competition.)

Happy Birthday, Charles W. McCarroll, Patriarch of the McCarroll clan!
(More information about St. Patrick can be found at Catholic Organization.)

Thursday, April 30, 2009

Making a Mosaic Table Top

Pier I Imports has some attractive outdoor tables with mosaic tops. Depending on size, the prices range from $99 to $399. After some discussion about a possible purchase of one of these pricey tables, DH suggested we "recycle" two of our table tops. He encouraged me to make a mosaic pattern atop each table and to do it myself. That way, the pocketbook would barely be impacted, and the back patio would have a new look without purchasing a ready made item.

After some internet research, including this site on E-How and here at Homemade Simple, I decided to take the bait and try to make at least one mosaic table top. (Am aiming for a bigger piece, but learning on a small wooden circle...)

This is where I began the project:

1) Finding a design: often, coloring book pages for children have simple lines relating to a particular motif. The simpler the design, the easier it is to fill in the design with tiles. My first thought was to use a sunflower, so I sketched one using this design:

But, it was too complicated with too many lines in the design of the petals.

I redrew a sunflower using the design that a new blogger friend, Michele at Extremely Crafty in the UK, has on her blog. Check her out. She was so kind as to send her tutorial for this bag. You can receive it, too, if you email her with your request.

So Michele's flower looked easier to draw for a table top flower design (picture is courtesy of Michele, and her blog website is extremelycrafty.)

Step 2: Drawing the design on your work area. Here is a picture of a similar flower design on a wooden table topper that I drew yesterday:

3) Purchasing necessary materials

Home Depot provided three colors of ceramic tiles (reasonably priced at 39 cents apiece). And a sheet of 1 inch blue squares in glass was also purchased. Yellow, blue, and autumn brown tiles were broken by hitting with a hammer, and each piece was then loosely fit onto the table as shown in the picture below:

4) The next step is to adhere each broken piece of ceramic tile to the wood, then grout and cure. But that is a post for next week when I return from Dallas!

Monday, April 27, 2009

Tee Shirt Purse - Easy!

Previously, I blogged about making tee shirt purses and got lots of inquiries on "How to Sew a Tee Shirt Purse" from Google.

So, it must have meant people were looking for easy ways to make purses from retired cotton jersey shirts.

The references from the September 2008 posting about how to make the satchels were this website and the Craftbits website and the Curbly website.

Then I received a comment from a reader (Fenna), who said an even easier way to accomplish making a bag from a t-shirt was to:
1. Cut off the arms (she says to feel free to make a big arch for a more dramatic look)
2. Cut a large scoop out of the neck (this will vary depending on design of the t-shirt)
3. Turn it inside out and sew the bottom of the shirt together.

Fenna was right on!

Here was an old tee shirt from Hawaii that just begged to be used for a craft project, along with some scrap ribbon that was forlornly lurking in the knickknack bin in my crafts closet:


Following Fenna's directions, the sleeves were cut out and the neck was scooped down with scissors. The only sewing involved was turning the shirt inside-out and seaming the bottom closed. It was gussied up with ribbon around the raw edges overlaid with a buttonhole stitch, but that step was not really necessary.


The Maui t-shirt bag is now holding my hand made sock stretchers purchased from the Etsy Squire Country Craft Store, along with some yarn for the next sock project. These sock blockers are a very nice product for knitters, entirely made by Montana crafters.

Here is a picture of all the craft filled bags in my catch-all closet. They each hold a UFO (unfinished object) that I'll get around to finishing sometime (maybe).

Note that the black mice with their tails wrapped around the hangers stayed over from Halloween. Maybe they were sniffing around for an overlooked scrap of yarn or material to take back to their own sewing burrows.

Using an outgrown baby sized t-shirt with a whimsical motif on its front would make up into a darling little baby bag (bottle warmer?). You can think of many applications from this easy method of recycling t-shirts.