Thursday, May 21, 2009

Mint Sauce Recipe

We hit the jackpot on mint in our yard! Yes, it is everywhere, and even places where it is not welcome - as in our garden areas. It does hold down the soil on an incline in the back yard, so eradication is out of the question. And on the positive side, it smells so sweet after a lawn mowing.

So what to do with all this fragrant herb? Here is a great post I'll be using from All Free Crafts.

Mint sauce makes an excellent condiment to use with lamb chops, pork chops, and to flavor new potatoes and peas. Here is the recipe:

Ingredients:
1/2 cup finely chopped fresh mint leaves
1 cup malt vinegar
2 tablespoons white sugar
small bottles for storage
Mint

Sauce Instructions:Rinse young, healthy mint leaves, strip from the stems, and chop into fine pieces. I usually process most of the leaves in the blender, with a little of the vinegar, leaving some aside to chop by hand. The leaves chopped in the blender will be very fine, and infuse a fine flavor, while those done by hand are a little coarser and will be more visible in the decorative vinegar jar. Bring vinegar to a simmer in a small saucepan, add sugar and chopped leaves. Simmer for about 20 minutes to infuse. Add more sugar or add a little water to taste, depending on how strong or how sweet you want the sauce. (I add no extra water or sugar to this recipe, but you may prefer a less strong infusion.) You can re-use lots of different bottles for mint sauce...narrow jars look elegant, but short, squat jars allow you to use a spoon to serve the mint sauce.

Make sure the bottles are free of nicks or cracks and seal able with either a screw top or cork. Wash containers thoroughly, then sterilize by immersing the jars in a pan of hot water and simmering for 10 minutes. Once jars are sterilized, remove from the simmering water and invert on paper towel to dry. Fill while the jars are still warm and seal tightly. If using corks and you intend to store the vinegar for an extended time, seal the corks by dipping in paraffin; if using a screw top, place a small square of waxed paper on top of the jar before screwing the lid on tight. You can add a small fresh sprig of mint to your jars, if you wish, for visual appeal - just insert into the jar before adding the mint sauce. Use a funnel to add the sauce, stirring as you pour it into the funnel to make sure you get lots of mint leaves mixed with the vinegar. You'll find that the mint settles to the bottom of the jar, so the mint sauce should be gently shaken or stirred before serving. Vinegar has natural preservative qualities, and mint sauce should keep for 2 to 3 months in cold storage or for 6 to 8 months in the refrigerator.

Tuesday, May 19, 2009

Two Stories by Charles W. McCarroll, Jr.

A few weeks ago, I went to Dallas to celebrate my dad's 90th birthday. He remembers and tells many stories from his childhood and through World War II, and with the help of his son (my brother), he has written and collected over fifty reminiscent memories, written in two volumes.

Here is one of his stories about a watch that his father (born before 1890) owned before 1930:

THE GOLD POCKET WATCH

Prior to the 1940’s, the men wore suits with matching coats and vests to church and any social function. The heads of a business might take the coat off but the vest would remain buttoned. They wore felt hats in winter or a flat brim flat top ‘Straw Katy’ for the summer.

A man was not properly dressed until the watch and chain were attached. The watch was put in a vest pocket and the chain across the body and hooked to a buttonhole. Some watches were worn in a watch pocket in the trousers with a watch fob or a chain.

The quality of the timepiece and chains was important. The chain was adorned with medallions, such as a lodge insignia. An engraved gold pocket watch with a gold chain was stylish.

Our Dad had an adorned gold watch made in Illinois. He obtained as a settlement of a debt. He would tell about the debt and say “All I got was this watch”. Years later, there was a robbery with jewelry taken from our house in Junction. Dad thought the pocket watch was lost and he started wearing a wristwatch to replace the pocket watch.

Texas Ranger Captain Gully Cowsert a friend of Dad’s came to see him. He told of a robber in custody near Abilene. The peace officers were viewing the evidence from the suspect when Captain Cowsert said “That watch belongs to Charley McCarroll”. He asked Dad if he could keep it for a few days to show it off and tell the story.

I have the watch that is still a handsome piece of jewelry.

And here is another of Dad's stories about...

BARBERSHOPS DURING THE LATE 1920’s

Junction, Texas is between San Angelo and San Antonio in the hill country of west Texas. The climate and the rivers and make it a pleasant place to live and visit and many people retire in this area.

The city was established and grew after the 1880’s. The city lots were large enough for a residence, a barn for the horses and cows and room for a garden. A canal passed through the upper city. The railroad was 38 miles away. The Old Spanish Trail, the highway between the east and west coast, passed down the main street. The gas stations and garages catered to the tourist while two hotels and a tourist camp served the visitors. A general store, three drug stores, two meat markets and two grocery stores thrived in 1928. Mr. H. E. Butts ran a grocery. A wagon yard was east of the courthouse. A bank, wool warehouse and a small lumberyard were on Main Street.

Three barbershops were in town. Business was good on Saturday when the ranchers came to town to have a shave, haircut and a bath in the back room. Cowboys would bring clean clothes for the evening and many would leave the working things for the barber to give away.

There were barber chairs that could be raised and lowered and the back could be folded down for a comfortable shave. A sink, shelf and a mirror were behind each chair. A haircut cost 35 cents. Chairs were along the wall to make the waiting comfortable. The visitors told stories and traded gossip. Ladies seldom entered a barbershop, as they were patrons of the beauty shops.

When a man sat in the barber chair the first thing that barber wanted to know was how you wanted to look. Do you want a regular cut, a flat top, long on the sideburns or just a trim? The barber would trim the longer hair by using his comb to pull the hair out and use the scissors to clip the ends of the hair with a fast clip–clip sound. He would use his shears to start trimming the top. These manual clippers operated by squeezing the handles and made a clip-clop sound. He would then stir up the lather in a cup and then brush the foam on the sideburns and the back of the neck. The thing that I feared was the razor. The razor was a six-inch thin blade that folded out of the jeweled handle. The barber would unfold the blade, pull the leather strop that was tied to the chair and pull the blade back and forth very fast over the strop to sharpen the razor. This process made such a loud noise. He would then shave the sideburns and the back of the neck and seldom cut the skin.

Wilson Buster owned Busters Barber Shop, that had four chairs, but only one was in use most of the time. Ranchers that were also barbers appeared on Saturdays. A shoeshine schoolboy would shine the shoes for a dime, but boots cost more.

The Junction Barber Shop was owned by Agnes Jordan. O.Z. Jones was the main barber and Reverend did the shoeshines. Reverend was the only black person in Junction. He was a fun man enjoyed by the citizens.

The Burt Shop was on the west side of the square. Baldy Burt had his clients that included the men from the courthouse. He usually had the best shine boy and had some kind of a better shoe polish.

You can tell by these stories that Dad was already a blogger way before his time, eh? He only recently retired from teaching a writing class at the Plano Senior Recreation Center in Plano, Texas.

(Charles W. McCarroll at his 90th birthday party)

Monday, May 18, 2009

Prayer Garden, Iris Blooming


Welcome to my garden spot in Grand Junction, Colorado. Here is a quick tour...


Don't blink. Beneath the wall the bearded irises are in bloom, the tall uppermost petals so gauzy, so delicate, that each bloom, once opened, lasts hardly longer than a day. Look, you can almost see through them. As fleeting as a rainbow, and with the same rain-washed colours, they were named after Iris, the messenger of the gods, who as a rainbow linked heaven and earth. It's the same derivation as the iris of the human eye, the coloured membrane which separates the inner from the outer chamber. Both have the same mysterious, shifting, shimmering quality, the colours depending on the viewpoint of the observer, one colour flecked by, veined with, shot through with another.
... excerpted from The Morville Hours, by Katherine Swift (Walker & Company)
This is where I like to sit in the late afternoon, when the sun casts long shadows:


This is a plaque my mother had in her garden for several years, and one which I fondly display:


This garden spot provides the space and quiet environment for devotional time. Many people that I've come in contact with over the past days are remembered here, as well as prayers for friends and family who are near and far away. Our clients who benefit through therapy dog visits, including hospice patients, the inpatients and outpatients at St. Mary's Hospital, clients at the regional center, blogging buddies, those whom I keep up with on Care Pages are all remembered and prayed for, some especially in this garden.

Please come visit us here sometime soon. I would very much enjoy your company.

Saturday, May 16, 2009

Triangular Lace Shawl Completed

After two months of compulsively knitting, the persimmon color lace shawl is finally completed.

When it was just lying there in a big lump of knit stitches, it surely did not look like it would turn out to be similar to the finished product shown in the book A Gathering of Lace. (Meg Swanson)

Here is a picture from a previous blog post when the shawl was started....

Cotton fabric and beaded knitting markers are laid on the bottom of the picture, but the knit material is shown at the top; this was about five inches into the knitting project.

After it was knit, then the blocking of the shawl was begun. Here it is being blocked on towels after it was washed:


Can you tell it took up most of the available tile on the bathroom floor? And here it completed, dried, blocked and draped across a chair, in all its glory:


OK, I take that back about being in its glory because the camera image did not show the persimmon color of the yarn (100% washable merino wool from Knitpicks).

The finished dimensions are 63" on the top by 44" on each side of the triangle.

One modification I made to the pattern was to add a 2 stitch attached I cord on the top edge of the shawl. Not only did the extra edging add a bit of decoration, it also hid some of my knitting mistakes along the top. This video was helpful in explaining how to knit an attached I cord as edging:

Thanks, Julie, for this added instructional tip!

Tuesday, May 12, 2009

Do It Yourself Mosaic Table Tops

Here is a current picture of the completed small mosaic table topper. A week ago, its beginning was written about here at making-mosaic-table-top. Grouting has been completed and excess grout has been removed with water and a lot of elbow grease. Note to the wise: a manicure after the grouting process is recommended, as it takes a toll on the nails.

This site on E-How basically explains the process in making a mosaic. Ensure that the thickness of the ceramic tiles used by breaking up with a hammer are all the same if you desire a flat surface.

Ceramic tiles are less expensive than glass tiles, although both types of tiles have sharp edges when broken. The glass tiles give a bit more luster, so choice of tile material is a matter of personal preference. The small blue tiles shown in the above picture were made of glass, so the contrast was preferable not only in color, but also in textural effect.

The larger table top (44 " round) is almost finished. It still needs to have excess grout removed from the tiles. A picture of the larger table top (using same motif as smaller table) is shown below.

A Dremel tool to sand the edges will finish off the sides more smoothly.

While doing a bit of research on mosaics, I found this type craft goes back several thousands of years. One reference, found here says:

The history of mosaic goes back some 4,000 years or more, with the use of terracotta cones pushed point-first into a background to give decoration. By the eighth century BC, there were pebble pavements, using different coloured stones to create patterns, although these tended to be unstructured decoration. It was the Greeks, in the four centuries BC, who raised the pebble technique to an art form, with precise geometric patterns and detailed scenes of people and animals.

The mosaic here shows the god Neptune with Amphitrite (on the right) and is in Herculaneum, Italy. It is a wall mosaic which uses pieces of glass to give the vivid colours and reflect light. Glass was not suitable for floor mosaics.
Some mosaics from the Byzantine era look very similar to how they appeared over 4,000 years ago. So my table tops should hold up well outside under the patio roof, at least during our lifetime.

Saturday, May 9, 2009

Saturday Market Bag: Free Knitted download pattern

From Jodie Dannenberg's Ravelry site, she says:
In Eugene, Oregon we have an outdoor market every Saturday from April until November. Not only is it a great time in the sun, but a great place to get organic veggies and food grown nearby. I made this with the outdoor market use in mind. It’s a versatile bag that will stretch to the shape of it’s odd shaped contents perfectly. It can either be made as a hand bag or with a shoulder strap. Make several as reusable grocery bags or one for the occasional weekend picnic.
This bag was quick to knit (five days and over a long weekend), and will come in handy. I shortened the body a bit. Here is a picture of the finished market bag:


And here it is emptied of produce:


It is quite versatile. I made two modifications in the pattern: 1)shortened the length of the body of the bag; and 2) I used circular needles for knitting the top of the market bag. I just could not figure a way to use straight needles to knit the circular top area.

You can download the pattern here for free (in the middle of the page): Saturday-market-bag pattern. Thank you, designer Jodie!

Thursday, May 7, 2009

Birthday Reception for C.W. McCarroll

Here is a collage of pictures from Dallas and the mini family reunion that occurred around my dad's 90th birthday on May 2. Over 125 people came to his reception held at the Plano Senior Center. About 20 people were present for the evening family bar-b-que dinner at a neighborhood restaurant.


His second book of me moires, which brother John put together, was available for perusal.

High school friend Sharon Gardner, also a Dallas resident, drove down to Waco, Texas with me so that we could have a short visit with her mother and my Aunt Mary and Uncle Ed who live in Ridgecrest Retirement Center, just one block from the church where their SIL Gene Evans built Dayspring Baptist Church. One of the photos in the collage below is of this church.

Their daughter (my cousin Cindy who passed away last year) and the late Gene Evans have a beautiful garden sanctuary in the back of this church which was dedicated with love in their memory.


Picasa 3 was the Google program (free download) which enabled an almost ready made collage from a set of pictures.

Saturday, May 2, 2009

Lorica, A Poem by St. Patrick (c. 377 A.D.)

Today is my father's 90th birthday. He is celebrating it with all his family and friends in north Texas. Needless to say, Dad has seen much change occur in his life since 1919, the year he was born.

He has self published his memoirs in two booklet forms over the past ten years, with the help of his wife, Pat, and my brother John. His stories range in length from one page to several pages of typed information, and he loves to regale his audiences with sagas from the past.

Upon my return home after the birthday festivities, I will publish some of his stories on my blog. He might like to see some of his writing on the world wide web, an unimagined possibility at the time of his birth almost a century ago. And a few of his memories just might be interesting to readers!

One thing that has not changed in Dad's life is his Christian faith, and his belief in an enduring life after death. My grandmother, an old time prayer warrior, made sure he had a Biblical grounding.

In honor of his birthday and as he goes toward the century mark, here is the incantation Lorica, especially dedicated to him. It can be found on the internet at Christianity Today. It was a prayer written by Saint Patrick (ca. 377 A.D.) over 1,600 years ago, but is as timely now as it was then.
I arise today
Through a mighty strength, the invocation of the Trinity,
Through a belief in the Threeness,
Through confession of the Oneness
Of the Creator of creation.

I arise today
Through the strength of Christ's birth and His baptism,
Through the strength of His crucifixion and His burial,
Through the strength of His resurrection and His ascension,
Through the strength of His descent for the judgment of doom.
I arise today
Through the strength of the love of cherubim,
In obedience of angels,
In service of archangels,
In the hope of resurrection to meet with reward,
In the prayers of patriarchs,
In preachings of the apostles,
In faiths of confessors,
In innocence of virgins,
In deeds of righteous men.

I arise today
Through the strength of heaven;
Light of the sun,
Splendor of fire,
Speed of lightning,
Swiftness of the wind,
Depth of the sea,
Stability of the earth,
Firmness of the rock.
I arise today
Through God's strength to pilot me;
God's might to uphold me,
God's wisdom to guide me,
God's eye to look before me,
God's ear to hear me,
God's word to speak for me,
God's hand to guard me,
God's way to lie before me,
God's shield to protect me,
God's hosts to save me
From snares of the devil,
From temptations of vices,
From every one who desires me ill,
Afar and anear,
Alone or in a multitude.
I summon today all these powers between me and evil,
Against every cruel merciless power that opposes my body and soul,
Against incantations of false prophets,
Against black laws of pagandom,
Against false laws of heretics,
Against craft of idolatry,
Against spells of women and smiths and wizards,
Against every knowledge that corrupts man's body and soul.
Christ shield me today
Against poison, against burning,
Against drowning, against wounding,
So that reward may come to me in abundance.
Christ with me, Christ before me, Christ behind me,
Christ in me, Christ beneath me, Christ above me,
Christ on my right, Christ on my left,
Christ when I lie down, Christ when I sit down,
Christ in the heart of every man who thinks of me,
Christ in the mouth of every man who speaks of me,
Christ in the eye that sees me,
Christ in the ear that hears me.
I arise today
Through a mighty strength, the invocation of the Trinity,
Through a belief in the Threeness,
Through a confession of the Oneness
Of the Creator of creation.


(Picture courtesy of Lilly Oncology On Canvas, 2008 competition.)

Happy Birthday, Charles W. McCarroll, Patriarch of the McCarroll clan!
(More information about St. Patrick can be found at Catholic Organization.)

Thursday, April 30, 2009

Making a Mosaic Table Top

Pier I Imports has some attractive outdoor tables with mosaic tops. Depending on size, the prices range from $99 to $399. After some discussion about a possible purchase of one of these pricey tables, DH suggested we "recycle" two of our table tops. He encouraged me to make a mosaic pattern atop each table and to do it myself. That way, the pocketbook would barely be impacted, and the back patio would have a new look without purchasing a ready made item.

After some internet research, including this site on E-How and here at Homemade Simple, I decided to take the bait and try to make at least one mosaic table top. (Am aiming for a bigger piece, but learning on a small wooden circle...)

This is where I began the project:

1) Finding a design: often, coloring book pages for children have simple lines relating to a particular motif. The simpler the design, the easier it is to fill in the design with tiles. My first thought was to use a sunflower, so I sketched one using this design:

But, it was too complicated with too many lines in the design of the petals.

I redrew a sunflower using the design that a new blogger friend, Michele at Extremely Crafty in the UK, has on her blog. Check her out. She was so kind as to send her tutorial for this bag. You can receive it, too, if you email her with your request.

So Michele's flower looked easier to draw for a table top flower design (picture is courtesy of Michele, and her blog website is extremelycrafty.)

Step 2: Drawing the design on your work area. Here is a picture of a similar flower design on a wooden table topper that I drew yesterday:

3) Purchasing necessary materials

Home Depot provided three colors of ceramic tiles (reasonably priced at 39 cents apiece). And a sheet of 1 inch blue squares in glass was also purchased. Yellow, blue, and autumn brown tiles were broken by hitting with a hammer, and each piece was then loosely fit onto the table as shown in the picture below:

4) The next step is to adhere each broken piece of ceramic tile to the wood, then grout and cure. But that is a post for next week when I return from Dallas!

Monday, April 27, 2009

Tee Shirt Purse - Easy!

Previously, I blogged about making tee shirt purses and got lots of inquiries on "How to Sew a Tee Shirt Purse" from Google.

So, it must have meant people were looking for easy ways to make purses from retired cotton jersey shirts.

The references from the September 2008 posting about how to make the satchels were this website and the Craftbits website and the Curbly website.

Then I received a comment from a reader (Fenna), who said an even easier way to accomplish making a bag from a t-shirt was to:
1. Cut off the arms (she says to feel free to make a big arch for a more dramatic look)
2. Cut a large scoop out of the neck (this will vary depending on design of the t-shirt)
3. Turn it inside out and sew the bottom of the shirt together.

Fenna was right on!

Here was an old tee shirt from Hawaii that just begged to be used for a craft project, along with some scrap ribbon that was forlornly lurking in the knickknack bin in my crafts closet:


Following Fenna's directions, the sleeves were cut out and the neck was scooped down with scissors. The only sewing involved was turning the shirt inside-out and seaming the bottom closed. It was gussied up with ribbon around the raw edges overlaid with a buttonhole stitch, but that step was not really necessary.


The Maui t-shirt bag is now holding my hand made sock stretchers purchased from the Etsy Squire Country Craft Store, along with some yarn for the next sock project. These sock blockers are a very nice product for knitters, entirely made by Montana crafters.

Here is a picture of all the craft filled bags in my catch-all closet. They each hold a UFO (unfinished object) that I'll get around to finishing sometime (maybe).

Note that the black mice with their tails wrapped around the hangers stayed over from Halloween. Maybe they were sniffing around for an overlooked scrap of yarn or material to take back to their own sewing burrows.

Using an outgrown baby sized t-shirt with a whimsical motif on its front would make up into a darling little baby bag (bottle warmer?). You can think of many applications from this easy method of recycling t-shirts.

Friday, April 24, 2009

The Daffodil Principle

No matter how many times you might have seen this, it is worth another look:


One person CAN make a difference.

Thursday, April 23, 2009

The Economy: A Perspective

Just how bad IS the economy?


Cats are so dramatic

This came to my mailbox today via Dorothay. Thanks, Maud.

Monday, April 20, 2009

Easy Hummingbird Food

My friend Jan says that April 15 is the date not only to file taxes, but also THE DAY to put out your hummingbird feeders. Taking her advice, we purchased two new feeders and put them out over the weekend.
There was some attractive red liquid available for purchase at the store, but it is quick to make your own (the red color is not necessary).

The hummingbird recipe, from  AllFree Crafts:
1 part sugar/4 parts water

Boil the water first, then measure and add sugar, at the rate of 1/4 cup of sugar to 1 cup of water. Let cool and store excess in refrigerator until ready to use. Do not add food coloring, honey (which ferments), or artificial sweetener, which has no nutritional value.

Hummingbirds cannot smell and depend on their eyesight to seek out flowers and food sources. Inexpensive hummingbird feeders are readily available and will attract the busy little birds without the need for coloring the food - the bright red container and easy food source will keep them coming throughout the day. Since hummingbirds are territorial, you may want to hang two feeders - one in the back yard and one in the front, to accommodate as many hummingbirds as you can. Hanging the feeders in a shady spot will discourage fermentation and spoilage of the nectar.
Keeping lookout both Saturday and Sunday, we did not view any hummingbird males scouting out the territory for the females that will arrive a week to ten days later. Maybe the males were just hanging out, watching tv, or doing what hummingbirds do in their spare time.

In the meantime, I'll try to keep the nectar and feeders freshened once or twice a week and keep a lookout for the little critters.

Friday, April 17, 2009

Oil Paints on Wood Furniture; Minwax Wipe-On Poly

Last summer, I posted about painting a wooden table top with fine art oils. You know the type of medium: the small tubes of paint found at craft stores for canvas work. The individual tube of oil paint costs about $5. Compared with buying a new quart of paint for repainting a small project, this type refinishing product that you can mix up yourself is less expensive, and gives a stained result that allows the wood grain to show through the color.

A wooden rocker, painted for donation seven years ago for Hospice of Western Colorado, needed a face lift. It had set for about 2,500 days in a sunny east window of a business owner who generously purchased the rocker for the Hospice CHAIR-ity Fundraiser. He proudly shows off the CHAIR for CHAIR-ity in his waiting room, where his clients made good use of it. However, after seven years of strong sunlight exposure, the back slats were VERY washed out, as shown below:

So it was definitely time for a quick face lift to freshen up the red color. DH picked up the rocker from our accountant's office and carted it home so I could do a little color tuning on it. Here is how it the colorization was done:

Gather materials of oil paint, mineral spirits, rags or paper towels, a container for mixing the stain, a disposable stirring utensil, linseed oil, and rubber gloves for skin protection.

Squeeze out about a two inch ribbon of paint from the tube and mix it with about a 1/3 cup linseed oil and 1/3 cup minerals spirits. The mineral spirits will help dissolve the oil and allow the paint to spread more easily.

Spread the mixture over the wood (first primed with a light sandpaper brush to take off that old and faded top layer). Use several coats for thorough coverage. Let it dry for several days and then apply a polyurethane gloss for durability. I found a clear gloss product, Minwax Wipe-On Poly, that worked very well on the rocker. "Hand rubbed beauty with polyurethane protection" is labeled on the front of the can. It was accurate; truth in labeling definitely applied to Minwax.

Here is a picture of the rocker with its original colors (the yellow flower was not repainted):

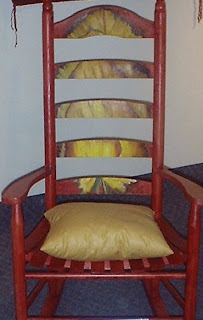
Refurbishing it made a HUGE difference in the looks of the rocker, and its backside is a bright new red. It is again ready to face the sun with a shiny new finish.

Now this rocker, donated and painted with butterflies and poppies in 2003, is the next one up for a face lift:

Monday, April 13, 2009

Geraniums: New Plants from Cuttings

Last spring, I wrote about attempting to keep geraniums alive over the winter. Not only did the three plants survive the winter in a pot watered only occasionally, they even blossomed in our non-heated garage. Here is a picture that I took yesterday of the straggly plants fresh out of the garage, a bit chilly but still green.

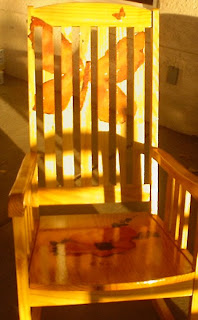
Now it was time to cut down this pot of geraniums and try to start growing new plants from the year-old stock.

Concise information about geranium propagation was found at Martha Stewart to-the-rescue.

A quick trip to the local gardening supply house would supply the potting medium and growth root stimulator. I still needed some pots for starting the propagation process, and knew there were a few that could be scrounged from prior gardening projects.

I came across a handy article about recycling tin cans for mini container gardening at Craft Stylish. The picture below is courtesy of the same website.

Opting for the packaged container of 2 inch peat moss flats (but alas, not incorporating the clever idea shown at Craft Stylish), here are the 18 geranium starts begun over Easter weekend:

These 18 new starts from the three "winterized" geraniums were transplanted using tips from Martha Stewart to-the-rescue.

Time, sun and water and a little luck should help in making even more viable plants that can be used on the patio this summer. And there will be sixfold the amount of new plants from the three geraniums kept over the winter.

Sunday, April 12, 2009

Friday, April 10, 2009

Good Friday Artwork

Good Friday, a most holy day in the Christian spiritual year, has been depicted in artwork over the centuries. Each work shows some form of Jesus' love, sacrifice, or death before resurrection.

This first work, a print of an original woodcut made by Sister Mary Grace Thul, (Caterina Benincasa Dominican Monastery, Dominican Nuns) shows Jesus washing a disciple's feet the night of the Last Supper. A print can be purchased at this site.

This stained glass picture came from Church Year. It shows the grief of Mary while placing Jesus' body in the tomb of Joseph of Arimathea.

Frederick Buechner talks about the symbol of Easter being the empty tomb. Please listen to Buechner speaking his 3 minute essay at 30 Good Minutes.

Windmill Ministries says:

The gospels mention that after the crucifixion Jesus was buried in the tomb of Joseph of Arimathea. On Easter morning that tomb was found empty. Finding an empty tomb by itself does not prove a resurrection, however it is an essential confirmation that the resurrection really happened.

This stained glass artwork was found at The Road Least Taken.
Good Friday is the Friday within Holy Week, and is traditionally a time of fasting and penance, commemorating the anniversary of Christ's crucifixion and death. For Christians, Good Friday commemorates not just a historical event, but the sacrificial death of Christ, which with the resurrection, comprises the heart of the Christian faith.
Have a blessed Good Friday.

Tuesday, April 7, 2009

Mud Time: Robert Frost

The sun was warm but the wind was chill.
You know how it is with an April day.
When the sun is out and the wind is still,
You're one month on in the middle of May.
But if you so much as dare to speak,
a cloud come over the sunlit arch,
And wind comes off a frozen peak,
And you're two months back in the middle of March.

- Robert Frost, Two Tramps in Mud Time, 1926

This is just the middle portion of Frost's poem that can be read in its completion here. It seems appropriate for this first week of a cool and wet Colorado April.

Frost's entire work of Two Tramps in Mud Time can be downloaded for your listening pleasure here.


Daffodils, crocuses and grape hyacinths are coming up in our garden patch. It snowed in the mountains just 45 minutes from our town over the past two days, but spring really is in the air.

Monday, April 6, 2009

Easter Craft - Edible Decorations

Do you need a new Easter project for the kids, or perhaps one to put in Easter baskets? How about one to use as a dining decoration? Try this edible treat for an easy, sweet craft that can be served several ways.

Start by making Rice Krispie Treats, modified with using chow mein noodles instead of cereal. The recipe can then be used to make little bird nests, a perennial spring time favorite and especially appropriate for Easter.

Use the standard marshmallow recipe, but substitute the cereal with chow mein noodles, and create a unique, sweet treat that looks like a small bird nest. Add a few jellybeans or chocolate eggs, and even the birds might go for it!

This idea came from Kendra, who has an insane amount of cool crafting ideas at this website.

From The Old Stand-By Rice Krispies Treat Recipe:
3 tablespoons butter or margarine
1 package (10 oz., about 40) regular marshmallows
6 cups Rice Krispies®

1. In large saucepan melt butter over low heat. Add marshmallows and stir until completely melted. Remove from heat.
2. Add KELLOGG'S RICE KRISPIES cereal. Stir until well coated.
3. Using buttered spatula or wax paper, evenly press mixture into 13 x 9 x 2-inch pan coated with cooking spray. Cool. Cut into 2 inch squares.
To make the bird nests, substitute chow mein noodles for the cereal, and carefully mash the sticky ingredients into large muffin tins. Use a greased piece of waxed paper for forming nests, and make a depression into the chow mein noodle mixture while in the muffin cup so the eggs can be placed there.

While the mixture is still malleable, you can form it into the desired shape. Don't worry about breaking up the noodles; remember that birds must tweak their long twigs into workable pieces to finish up their habitats.

Here is a picture of the finished product before complete drying time elapsed.

The marshmallows in the mixture looked a bit too white at this point, so you could use some Wilton's Color Mist Spray in brown and spray all over the entire confectionery nests. (The white does get darker as time elapses, and the nests looked more realistic later in the day.)

Lauren Whitney, local morning television anchor at Grand Junction's KKCO TV (see her blog page here), will talk about this project on air April 9, 2009 during the 6 AM News.

Have fun making these edible treats!

Friday, April 3, 2009

Easter Craft eBook Source

While blog hopping this morning, a thoroughly referenced eBook (FREE!) crossed my computer screen. It was too good not to share, and was found at this website hosted by Jamie.

This is a great resource for Easter Craft Ideas, including:
* 130 Pages of Craft Ideas for Easter
* 12 Easter Egg Decorating Projects
* 20 Easter Table Ideas: Centerpieces, Napkin Rings & More
* 10 Easter Chick Craft Projects
* 20 Easter Bunny Craft Projects
* 10 Easter Recipes
These Easter Craft Ideas can be found at Easter Craft eBook.

Another craft will follow for a spring dining table centerpiece next week. (But first, I have to get busy and work on a few.)

Tuesday, March 31, 2009

Beading Knitting Markers and Copper Wire

While taking a break from closet reorganization, I started another lace shawl (The Beginner's Triangle from the book A Gathering of Lace.) The shawl is made from a brownish golden DK weight wool. It was the dickens to start, but thanks to knitting friends with savvy, it is off and running.

The only minor glitch in knitting the project is that it requires many, many marker rings for clear delineation of repeat designs.

And I had only a few (maybe 15) rings on hand that I had made last year. The photo below shows those rings already in place in another project.

If you are interested in making some of these markers, hop back to the post a year ago (using jump rings and directions for making them explained there) .

So now it was time for more markers and a new technique. The finished markers were made with beads and 20 gauge copper wire, shown below.


Supplies: a small roll of 20 gauge copper wire from any craft store, beads, crimper beads, wire cutters, a round nose pair of jewelry pliers

Directions: I doubled up on the wire, making the strands stronger, then twisted the wires together, added beads, and closed up the ends with crimper beads. This is an easy, quick project (several pink ribbon markers are going to knitting friends). Be sure to crimp the wire together closely so that the ends will not nick into the yarn fiber while knitting.

If you make some of these beading markers with wire, please show me your designs (or just email me) and give hints on improving them.

Sunday, March 29, 2009

Organizing a Closet (aka Just Throw it Away)

Yep, my husband overstepped his bounds. He irreverently referred to my obsessive admirable habit of trying to organize my clothes closet, and even went so far as to tell the world about it. Honestly!

The chore of cleaning out my closet is an ongoing battle. The DH has a ridiculous and completely unnecessary house rule of "whatever item comes into the place, an item of the same size/category must go out of the house". Example: if he buys a new fishing rod, the old one is discarded. In his orderly mind, this is a way to keep clutter and unnecessary paraphernalia under control. This may be an admirable rule, but it is also a trial for me since I am more of a hoarder collector. After all, you just never know when that old wool sweater could be used for a felting craft project.

Yesterday, I had several empty shoe boxes, a couple pairs of shoes and a few articles of clothing separated out from the closet. These items were innocently placed in the adjacent bathroom ready for the next step of closet organization: sorting into piles of "throw away" or "give away", or "take to the resell shop". (Granted, the stuff had been there all day.) In steps DH with a snarky question about how long this pile would make its home on the bathtub rim. I told him this minor delay in organization was just part of the process of "staging" in the closet cleaning process.

And THEN he had the nerve to ridicule my staging process on his blog. Read it at Cleaning Closets on Living the Grand Life and see if YOU think it's funny. (It really is.)
(from 2009 Engagement Calendar by Anne Taintor)

"Staging" in the process of reorganization is a perfectly legitimate, although slow, method of getting rid of junk. In My Humble Opinion.

Maybe I SHOULD just throw everything away ... and start over.

Friday, March 27, 2009

Cooking in An Economic Depression

Looking for information about cooking in "hard times", you might find this 91 year old woman's recipe and remembrances thought provoking. Take a listen to her YouTube presentation on cooking a potato, adding a can of peas and then adding pasta to make a filling dinner for a family of four. Now that is saving a dollar!

Then there is this post from a fellow from Texas who said:

Never been to a DollarStore ? I have, and not just because I've been down on my luck financially. Dollar stores often are just where you need to go when your regular stores are closed or out of stock on a standard household item.They offer one-stop shopping, convenience and basic value in a crunch.

His post talks about buying food at a DollarStore, among other things, and is worth a read.

Another site you might like to visit is this: Menus for Moms Cooking in Hard Economic Times. This article puts things into a realistic perspective.

Thursday, March 26, 2009

Blog Material: Blog Hunt

I saw this on Jane's daughter's website and decided to copy the idea. The concept is to share good writing in the blogosphere.

So after considerable thought and intense snooping, my listing of blogs meeting the criteria is below. Be sure to stop by each one and see for yourself what incredible writing there is to be read in cyberspace.


In My Humble Opionion (Peggy Hill's favorite saying on King of the Hill), links to a blogger who:

has an online shop: Sweet William

has flawless taste: Keep it classy

has admirable qualities: Too Jazzed To Sleep and Throws like a Girl (both inspirational)

has awesome links to other blogs: Tip Junkie

is an artist: dianes mixed art

is intriguing: michelle perkett

is a daily read: country pleasures

is an old favorite: cast-on

is creative: a year from oak cottage

is a designer: sew liberated

is wildly prolific: daily danny

features fabulous layouts: grimitives

features loveliness: cates back porch

features fantasticness: Indie Collective

lives far away: Craft n Cook (India!)

lives pretty close: living the grand life (in the next room)

takes fantastic photographs: robin's woods

tells great stories: Gaston Studio

crafts up a storm: knitted gems

writes about life: a second cup

gives fabulous recipes: the pioneer woman

gives fabulous tips: tip junkie

makes me want to be her best friend: Heather at Craftlit

makes me believe in the goodness of people: Proverbs 31 Living

makes me laugh: What I Should Have Said

Check out these blogs; play along, and feel free to copy this neat idea for your blog.