Posted using ShareThis

I am using this idea to add a unique touch to an existing ivory colored camisole. (pictures tomorrow if this works out!)
Thank you so much, Dorothy, for passing this needlework on to me.
 This time of year, lavender is in bloom. Gorgeous! I was fortunate enough to see fields of lavender in bloom in both the state of Hawaii and in Provence (France) while on vacations. The sight of those flowers was breathtaking with surreal colors of purple waving across cultivated fields.
 The picture of a doily sachet and information about making easy paper sachet packets was first published by All Freecrafts. Here is what you need to make the sachet from paper:
Because I am now a pig in heaven with wonderfully scented Colorado lavender, courtesy of my friend Ronn, I added lavender to the sachets. They are tucked away ready to be used for little presents for friends, while currently bringing back memories of prior vistas of lavender fields.
2 Round paper doilies [5 to 6 inches]
Rose pattern rubber stamp
Heart pattern rubber stamp
Gold stamping ink
Gold paint pen
Clear drying craft glue
Cotton balls
Red and green pencils
Making the sachet:
Rubber stamp images on each of the two round paper doily with gold ink. Allow the ink to dry. Using colouring pencils, colour the rose and leaf areas of the stamped images.
With wrong sides of the paper doily together, glue together around the outer edge, leaving an opening of approximately two inches. Allow the glue to dry completely. A glue stick will work for this as well as any clear drying craft glue.
Spray a few cotton balls with cologne or add a few drops of essential oil. Place the cotton balls inside the doily sachet and glue the opening closed.
 The center of the magenta colored ornament at the lower right of the picture was made with a small crochet hook and sock yarn, again using the same technique. Then the small pink rose was sewn into the center of the larger crocheted flower. If made about the size of a US quarter, they will look cute on a baby sweater.
 Baking potatoes in a bag is a novel idea, and the potatoes are delicious...there must be some magic in the process!
  This site on E-How basically explains the process in making a mosaic. Ensure that the thickness of the ceramic tiles used by breaking up with a hammer are all the same if you desire a flat surface.
While doing a bit of research on mosaics, I found this type craft goes back several thousands of years. One reference, found here says:
Some mosaics from the Byzantine era look very similar to how they appeared over 4,000 years ago. So my table tops should hold up well outside under the patio roof, at least during our lifetime.The history of mosaic goes back some 4,000 years or more, with the use of terracotta cones pushed point-first into a background to give decoration. By the eighth century BC, there were pebble pavements, using different coloured stones to create patterns, although these tended to be unstructured decoration. It was the Greeks, in the four centuries BC, who raised the pebble technique to an art form, with precise geometric patterns and detailed scenes of people and animals.
The mosaic here shows the god Neptune with Amphitrite (on the right) and is in Herculaneum, Italy. It is a wall mosaic which uses pieces of glass to give the vivid colours and reflect light. Glass was not suitable for floor mosaics.
 But, it was too complicated with too many lines in the design of the petals.
I redrew a sunflower using the design that a new blogger friend, Michele at Extremely Crafty in the UK, has on her blog. Check her out. She was so kind as to send her tutorial for this bag. You can receive it, too, if you email her with your request.
So Michele's flower looked easier to draw for a table top flower design (picture is courtesy of Michele, and her blog website is extremelycrafty.)
Step 2: Drawing the design on your work area. Here is a picture of a similar flower design on a wooden table topper that I drew yesterday:

3) Purchasing necessary materials
Home Depot provided three colors of ceramic tiles (reasonably priced at 39 cents apiece). And a sheet of 1 inch blue squares in glass was also purchased. Yellow, blue, and autumn brown tiles were broken by hitting with a hammer, and each piece was then loosely fit onto the table as shown in the picture below:
 4) The next step is to adhere each broken piece of ceramic tile to the wood, then grout and cure. But that is a post for next week when I return from Dallas!
1. Cut off the arms (she says to feel free to make a big arch for a more dramatic look)
2. Cut a large scoop out of the neck (this will vary depending on design of the t-shirt)
3. Turn it inside out and sew the bottom of the shirt together.
Fenna was right on!
Here was an old tee shirt from Hawaii that just begged to be used for a craft project, along with some scrap ribbon that was forlornly lurking in the knickknack bin in my crafts closet:

Following Fenna's directions, the sleeves were cut out and the neck was scooped down with scissors. The only sewing involved was turning the shirt inside-out and seaming the bottom closed. It was gussied up with ribbon around the raw edges overlaid with a buttonhole stitch, but that step was not really necessary.

Here is a picture of all the craft filled bags in my catch-all closet. They each hold a UFO (unfinished object) that I'll get around to finishing sometime (maybe).

 So it was definitely time for a quick face lift to freshen up the red color. DH picked up the rocker from our accountant's office and carted it home so I could do a little color tuning on it. Here is how it the colorization was done:
 Squeeze out about a two inch ribbon of paint from the tube and mix it with about a 1/3 cup linseed oil and 1/3 cup minerals spirits. The mineral spirits will help dissolve the oil and allow the paint to spread more easily.
Spread the mixture over the wood (first primed with a light sandpaper brush to take off that old and faded top layer). Use several coats for thorough coverage. Let it dry for several days and then apply a polyurethane gloss for durability. I found a clear gloss product, Minwax Wipe-On Poly, that worked very well on the rocker. "Hand rubbed beauty with polyurethane protection" is labeled on the front of the can. It was accurate; truth in labeling definitely applied to Minwax.
Here is a picture of the rocker with its original colors (the yellow flower was not repainted):
 Refurbishing it made a HUGE difference in the looks of the rocker, and its backside is a bright new red. It is again ready to face the sun with a shiny new finish.
Now this rocker, donated and painted with butterflies and poppies in 2003, is the next one up for a face lift:

3 tablespoons butter or margarine
1 package (10 oz., about 40) regular marshmallows
6 cups Rice Krispies®
1. In large saucepan melt butter over low heat. Add marshmallows and stir until completely melted. Remove from heat.
2. Add KELLOGG'S RICE KRISPIES cereal. Stir until well coated.
3. Using buttered spatula or wax paper, evenly press mixture into 13 x 9 x 2-inch pan coated with cooking spray. Cool. Cut into 2 inch squares.

Lauren Whitney, local morning television anchor at Grand Junction's KKCO TV (see her blog page here), will talk about this project on air April 9, 2009 during the 6 AM News.
Have fun making these edible treats!
 While blog hopping this morning, a thoroughly referenced eBook (FREE!) crossed my computer screen. It was too good not to share, and was found at this website hosted by Jamie.
* 130 Pages of Craft Ideas for Easter
* 12 Easter Egg Decorating Projects
* 20 Easter Table Ideas: Centerpieces, Napkin Rings & More
* 10 Easter Chick Craft Projects
* 20 Easter Bunny Craft Projects
* 10 Easter Recipes
 If you are interested in making some of these markers, hop back to the post a year ago (using jump rings and directions for making them explained there) .
So now it was time for more markers and a new technique. The finished markers were made with beads and 20 gauge copper wire, shown below.

Supplies: a small roll of 20 gauge copper wire from any craft store, beads, crimper beads, wire cutters, a round nose pair of jewelry pliers
Directions: I doubled up on the wire, making the strands stronger, then twisted the wires together, added beads, and closed up the ends with crimper beads. This is an easy, quick project (several pink ribbon markers are going to knitting friends). Be sure to crimp the wire together closely so that the ends will not nick into the yarn fiber while knitting.
If you make some of these beading markers with wire, please show me your designs (or just email me) and give hints on improving them.
The theme is similar to the Boston Tea Party, in which colonial Americans protested British taxes on tea by dressing as Indians and dumping tea overboard from ships anchored in Boston Harbor. The events have sprung up in the wake of the economic stimulus package and President Obama’s budget proposal.You can dress up and attend your local Tea Party with a pair of newly minted GENUINE TEA PARTY EARRINGS like these beauties below.

Make your own protest earrings: buy a package of silver wires, open a tea bag from your kitchen cabinet and remove the outer packaging, tie the paper string onto the earwire, perhaps add your personalized slogan to the outside of the teabag.
You will surely want to wear a pair of these bold symbols of your conviction that you want to be heard and that you protest the slogan of CHANGE CHAINS WE CAN BELIEVE IN to your local Tea Party held next month. Make a few extra and hand them out. Sporting these aromatic earrings will show your protest over the national stimulus package that will cost you hard-earned dollars.
Maybe the national press will get hold of this idea to bring extra attention to the several trillion dollar stimulus package.
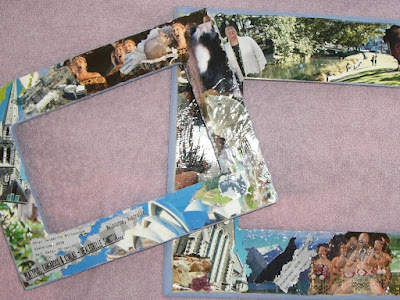
 This is an easy and fun project to create for your favorite vacation photos that will incorporate even more memories preserved on the surface of the frame.
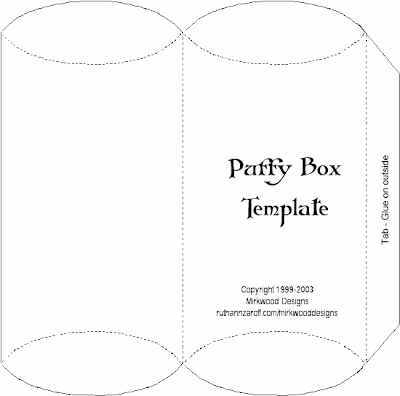
 Please note the restrictions:
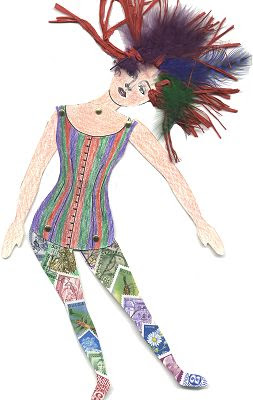
Copyright 1999-2008 Mirkwood Designs, a division of ruthannzaroff.com. These templates are free for your use to make craft items to give or sell, to use for teaching purposes, or for submitting projects to magazines. I would appreciate it if you provide a link to my Web site. The templates themselves may NOT be auctioned, sold, or published in any way without my permission.This adorable template could provide hours of fun for all age groups from children to adults. One of my blogpals, Diane at Dianes Mixed Art could go to town with her mixed media talents, making a spectacular work of art from this template, courtesy again of Mirkwood Designs:
 I am going to make this doll about 7-8" in height for an indoor potted plant, whimsically dangling from one of the leaves.
Here is the original template: 

I made a vow with myself several years back: I Will Not Get Into Needle Felting. I figured I had enough "hobbies" (let's just be honest and call them"obsessions," shall we?) and I didn't want any more reasons to spend money that might detract from my knitting stash expansion efforts. Plus...I know myself. I love all things crafty. I just thought it wise not to add one more obsession to my already craft-crazed psyche.My crafting interest aroused, I just had to Google "needle felting" and came up with two quick and easy tutorials on YouTube. The first video gives a textbook approach to making a more structured applique, while the second video is valuable in its approach to free thinking needle felting.


How simple is that?It’s so simple we can’t believe we didn’t think of it before: just slide a photo into a jar, turn it upside down and display your upcyclin’ genius for all to see.

 Hospice of Western Colorado will host a fundraiser and an appreciation dinner for their volunteers in April. The theme for the fundraiser is "Art for Hospice".

 One of the bowls I made is just perfect to be given to my friend undergoing chemotherapy for breast cancer. I filled it with candies and attached a little cross tied on to it with a pink ribbon, and filled it with peppermint candies. Here is the card I copied, with a verse from Walt Whitman, that she may enjoy pondering:
The Blessing Bowl is a vessel to share caring, love, thoughtfulness, compassion, joy, feelings, gratitude, and more. The Blessing Bowl... holds written acknowledgment of the blessings in your life.... it is a given as a gift of gratitude, a way to connect with our spirituality, a customized gift that celebrates life's blessings.
So often we forget to tell people in our life how much they mean, the Blessing Bowl gives you the opportunity to tell them how important they are.

"The Lord is gracious and full of compassion, slow to anger and great in mercy. The Lord is good to all, and His tender mercies are over all His works." (Psalm 145:8)