Thursday, September 11, 2008
Repairing a Beaded Watch Band
No worries; a simple repair put it right. This time, however, I used fishing line (black, 14 lb. weight and thin). The fishing line is sturdier than the stretchy bracelet cord I previously used for the watch band. It is also smaller in diameter than lots of the plastic types of threads used in beading. Even very small beads can be strung on fishing line.
Then the beads were re-strung on double strands of the fishing line, knot tied between beads, and finished off with a circle and arm closure link from the craft store. A dot of jewelry glue at the junction of the last bead and the end link sealed the deal.
Ta da! Fixed! And it should be even stronger than the first watch made with stretchy plastic cord.
Wednesday, September 10, 2008
Dogs as Helpers; Animals in Heaven
We two adults and our three pets visited the 32 people receiving highly specialized care in one section at the Center. Most of the people receiving care, although non-verbal, seemed to be highly receptive to the animals, and a few petted the dogs with enthusiasm and gentleness. I was very much impressed with the excellent care provided by the direct patient providers.
Previously, I have written about Therapy Dogs International here in an earlier post and here after Libby received her official Therapy Dog certification.
While on a visit last week to St. Mary's Hospital, Libby and I visited with a woman whose dog had died several years ago.
That conversation brought up the subject of "animals in heaven."
Wanting to check out this line of thinking, here are a few sites I visited:
(photo courtesy of saintfrancisfoundation)
Do Animals Go to Heaven? and reassurances can be found here.Both sites give assurances that life with beloved pets are valuable in many ways. This was certainly validated yesterday when I saw the positive interaction our dogs provided those with many special physical needs.
Here is a sweet poem given us upon the death of our older pet several years ago. The office staff of the veterinarian all signed the card that said:
Just this side of Heaven is a place called Rainbow Bridge. When an animal dies that has been especially close to someone here, that pet goes to Rainbow Bridge. There are meadows and hills for all of our special friends so they can run and play together. There is plenty of food and water and sunshine, and our friends are warm and comfortable. All the animals who had been ill and old are restored to health and vigor; those who were hurt or maimed are made whole and strong again, just as we remember them in our dreams of days and times gone by. The animals are happy and content, except for one small thing: they miss someone very special to them; who had to be left behind. They all run and play together, but the day comes when one suddenly stops and looks into the distance. The bright eyes are intent; the eager body quivers. Suddenly he begins to break away from the group, flying over the green grass, his legs carrying him faster and faster.
You have been spotted, and when you and your special friend finally meet, you cling together in joyous reunion, never to be parted again. The happy kisses rain upon your face; your hands again caress the beloved head, and you look once more into the trusting eyes of your pet, so long gone from your life but never absent from your heart.
Then you cross Rainbow Bridge together......."
Anonymous
Tuesday, September 9, 2008
Disastrous Experience with Faceted Rib Knit Technique
The directions were easy enough, if you know how to just hold the darn yarn. I had to go to my Knitting for Dummies (KFD) book to see why I kept repeating my knitting mistake. I remembered the Weight Watchers' slogan: "If you keep on doing the same thing, you will keep on getting the same results." Often, I need to be hit on the head to keep that truth in mind.
The KFD book helped me to literally "see" my mistake. Once I looked at the reference book, and saw how the diagram pictured holding the yarn, the written directions became clear.
While ripping out many inches of incorrect stitches on the beginning of this sock, I reflected on Chaucer's quote:
The lyf so shorte, the crafte so long to lerne...
I thought ... that the aim of craft was to become proficient and to spend a lifetime creating beautiful things. It seemed like something was wrong with a plan whereby you took a lifetime to achieve mastery over difficult techniques then died just when you had become really good. I learned ... that the purpose of the craft is not so much to make beautiful things as it is to become beautiful inside while you are making those things.
Monday, September 8, 2008
How to Make Altered Beaded Broach Jewelry
The two broaches are altered art projects. Heavy cardboard was cut from scrap material to make the backing, and also for stability of the pin. On the back of each broach, coordinating fabric was cut in the shape of the back base, glued to the cardboard and trimmed when dry.
Create a brooch/pin no larger that 2 ½ x 2 ½ inches. Anything goes for the faceas long as it implies a human face and has some beads. Polymer clay, buttons, paper, clay, felting, image transfer, bead or regular embroidery, what ever strikes your fancy. This is a 1 -1 swap. Due to me by September 26th. You must include return postage of $5.00 or a Priority Stamp and return mailing label. If you do not send return postage, your pin is mine. International swappers welcome and encouraged. Please include a note with your real name and screen name, mailing address, title of your piece and any other info you think might be nice to know about your piece. All pins/broaches will be swapped and mailed the first 2 weeks of October. This is a fun, fast swap and great opportunity for all you newbies to try your hand at creating something.
Friday, September 5, 2008
Blogger Follow Feature
Also, there is a list of blogs that you follow and you can import those from your Google Reader or enter the url's. The list of blogs that you follow will show up on your dashboard below your list of blogs. Here's a blog post explaining Blogger's new features.
Beaded Pins and Broach Contest
This is such a fun idea. More information about this contest can be obtained here; then click on the Yahoo Group to join.
Here is one broach submitted by Maggie Robinson last year that would be fun to wear:
Thursday, September 4, 2008
A Note from Denver International Airport
This marks the last leg of the United Airline return jaunt from North Carolina.
I'm sitting at United's Gate B92 using the DIA "free" wi-fi for connectivity. Other than a tight keyboard, the Little Asus Eee PC works fine for travel. It is short on memory, so toggling between windows makes it difficult to make links. That is a problem easily solved by adding a few extra dollars to the memory for an upgrade.
And I was disappointed that the hospital which I visited had a strong firewall which made emailing a hassle.Otherwise, the Eee PC worked fine.
A few random thoughts while on the plane from Chicago to Denver:
My cell phone was virtually unusable this trip because I brought the wrong phone battery charger, so this trip was similar to traveling 20 years ago without cellular service. My bad for not getting the correct charger. I heard yesterday that Cindy McCain has three blackberries to keep up with her seven children. I could not manage even keeping one cell phone energized.
Sarah Palin puts down her IPhone and picks up the breast pump at any given hour in her life; I barely wended my way back and forth from the motel to the hospital without making lots of wrong turns and missteps on exits. Speaking of Sarah Palin. I. Love. Her. Can you image relating to H.R. Clinton on that level? Uh uh.
Much more later; my flight is boarding.
Monday, September 1, 2008
Reflections from the Bedside
Chair side observations IMHO:
1) Nurses are overworked and stressed;
2) Hospital food is generally tasty;
3) The general public does not understand the importance of hand washing;
4) Hierarchical symbolism in the hospital has changed over the past few years -- every direct patient care provider slings a stethoscope around their neck and wears scrubs. Therefore, doctors distinguish themselves as "physicians" by wearing a sport coats over their scrubs, and leave steths to the assistants
5) RN's are the only nurses employed here at Carolinas Medical Center; LPN's are a thing of the past;
6) 12 hr. shifts are the norm for RNs; charting is half their workload;
7) Lab results still get misplaced/lost. (Julie's most important CSF labs are still "missing" after five days, and the risk of tapping her shunt for more lab work is risky.)
8) Drama is constant; one does not get too excited over minor crises;
9) Common courtesy is often overlooked by patients; a sense of entitlement often pervades the patient's outlook;
10) Ensure that the patient visitor can take care of themselves in all ways before "visiting" the patient, or the visitor will be a burden to all concerned;
11) An hallucinating patient can almost make one believe an outlandish story, simply because they are so convinced of their own reality;
11) In general, people surely do complain about minor annoyances;
12) Pain control is better managed.
Update on daughter Julie: lab reports are good, appliances are working, except for her shunt which diverts CSF (cerebrospinal fluid) for her hydrocephalous. She is to have more x-rays this hour to determine the amount of CSF fluid around her lungs.
Julie is stapled all the way from her clavicle to her bottom. She is quite coherent and the hallucinations have abated. She is not in pain.
Hurricanes, the Republican National Convention, and life goes on.
Wednesday, August 27, 2008
Urinary Diversion Surgery @ Carolinas Medical Center
Julie underwent a day long surgery Tuesday at the Carolinas Medical Center in Charlotte, North Carolina. Generalized information about this type surgery can be found at Surgery Facts. Another website with more stats can be accessed here at More Information. The procedure was a major ordeal, as the websites explain. I talked with the nurse a few hours ago; she was in stable condition.
Further complicating matters was the additional removal of previously undetected extended, large ovarian masses which pushed the surgery to over ten hours in length. She currently has a nasogastric feeding tube and a pic line for intervenous medication delivery.
Julie is being cared for through the McKay Urology Group, "dedicated to the highest standards of clinical care, research and education with the latest urologic technology". Its programs are nationally recognized for quality and were named as one of the Top 50 Urology Programs in the nation by U.S.News & World Report 2008 edition of America's Best Hospitals.
I am told that Julie's surgeon, Michael Kennelly, M.D., a principal in the McKay Group, is known nationally in this urological practice. She was fortunate to get a referral to this physician and practice.
We trust that Julie is receiving state of the art medical care from both her physicians and this teaching hospital affiliated with the University of North Carolina. I will be going to visit Julie in the next few days. This blog will be intermittently posted while I am away from Colorado and staying in a hotel nearby the medical center in Charlotte.CarolinasHealthcare:
Dr. Kennelly was one of the first physicians in North Carolina to subspecialize in female urology and neurourology; and, he is currently one of only three doctors in the state who concentrates in these highly specialized fields.
More about the birth defect she was born with can be accessed at The Spina_Bifida_Association or at Spina Bifida Facts.
Here is a picture of Julie and her dog Muggsy taken last January:
Prayers for Julie and Jack, her husband, are appreciated.
Tuesday, August 26, 2008
Colonial Foods and Carrot Puffs as Appetizer
Another handy cookbook entitled The Williamsburg Cookbook (1975 published by The Colonial Williamsburg Foundation and available through Amazon) says:
All sorts of recipes can be found in this cookbook stemming from colonial times. I picked up this book on a visit in the autumn season years ago in this historic Virginia town after having dinner at the Shield's Tavern in Williamsburg.Visitors return again and again for the delicious dishes served at Colonial Williamsburg’s famed taverns and restaurants—Chowning’s Tavern Brunswick Stew, Christiana Campbell’s Spoon Bread, Shields Tavern Syllabubs. In this best-selling cookbook, 193 traditional and contemporary recipes have been compiled and adapted for the home kitchen. Commentary discusses the cooking and eating habits of our colonial ancestors and describes meals served to VIP visitors to Virginia’s restored colonial capital.
A beautiful slide show of Colonial Williamsburg, VA can be accessed here: Historical Slide show of Williamsburg in the Fall. That will get you into the mood for fall cooking, for sure.
One recipe from this updated treasury of recipes is for The Shield's Tavern Sampler Carrot Puffs (4-6 servings):
We have made carrot puffs from these instructions as an appetizer. These tidbits were sweet an tasty. I will make them again soon, but will try frying them in just a skiff of olive oil as a nod to better nutrition.1 lb. carrots, peeled and sliced
1 egg and 2 egg yolks
1 cup bread crumbs
1 tsp. nutmeg, freshly grated
1 tsp orange flower water
3 Tbls. sugar
1/4 cup dry sherry
1/4 cup heavy cream
Cook the carrots until very soft. Drain well. Mash to a pulp. Combine and beat the egg and egg yolks. Mix the carrots, eggs and remaining ingredients together thoroughly.
Gently drop by heaping tablespoons into deep, hot shortening and fry until brown. Place on paper towels to drain. Serve immediately.
Cookbooks are always bestsellers. And historical cookbooks are a fun read, as well.
You might want to publish your own favorite recipes. Who knows, in 300 years, they might be republished. Here is one source that will help you put your cookbook together as either a fundraiser or just for posterity: Publish Your Own Cookbook.
Monday, August 25, 2008
Boob Prosthetic Inserts for Mastectomy in Knitted Cotton
Because I had many Google hits on a previous post about lymphodema (see lymphodema and compression sleeves post here), there must be a need for more information of this type for women with complications from breast cancer. So I want to share this new topic with other woman who might have use for this clever invention which Beryl Tsang came up with: a knit prosthetic breast. Crystal Palace Yarns has the pattern for knitting it on their website. It is a FREE pattern and can be found at this site. Thanks, Beryl, for this marvelous pattern!
The whole insert takes only a few hours hour to make, and a beginning knitter could easily make one (or two). Shout out in a comment below, and I'll walk you through the pattern if you have questions. One pattern alteration I found is to ensure a bind off after step #7 in the pattern.
So far, I have completed one insert and put it into a bra. My DH took this picture yesterday so that the blouse front with the insert on the right side could be shown. Now I just need to complete the second insert for my right side.
The advantages of this little cotton number (for me, at least) are:
1. It is 100% cotton, so it is soft next to either skin or scar tissue;
2. Because cotton is a natural fiber, there is not a risk of either allergy or skin irritation which occurs with synthetic products next to skin;
3. It has a knitted topknot that actually looks like a nipple under a bra cup; (yea! I have nipples again!)
4. It is absorbent, and completely machine washable;
5. Cotton is cooler than any synthetic material used as a bra cup filler, so again, it is more comfortable both against the skin and scar tissue;
6. The insert, when placed inside a bra cup, actually looks like an unaltered breast under clothing (see close-up picture below).
KNITTING NOTES:
Below is a picture of the insert about fifteen minutes into knitting it:
I used a total of 63 stitches on three needles, which is within the pattern guidelines for an "A" cup size.
To the right is a picture of both sides of the completely knitted insert.The picture below is the insert with both sides sewn together with a running stitch. The insert was filled with cotton fleece.
(Picture of Pink Prosthetic Above is for Size A Cup)
What a wonderful idea. I'm sharing it with Charity Knitting and the Pink Out groups on Ravelry.
And thanks again, Dorothay, for bringing this pattern and concept back to my attention.
Friday, August 22, 2008
Etsy Blog Carnival: Brothers Then and Now
If anything, it reinforced the teaching of using one's talents for the good of others. Both brothers are now generous men in many Godly ways, and I am proud to be their sister.
Thursday, August 21, 2008
Food, Glorious Food
We had a delicious supper mainly prepared by DH Gene Kinsey, often wrong but seldom uncertain. Gene cooked a beef brisket that slowly baked in the oven all afternoon.
We also served a version of Emeril LaGasse's Mexican-Cole-Slaw. (Gene and I had lunch at a local Mexican food restaurant recently and both remarked on the delicious Cabbage Salsa. Our waitress gave us the main ingredients, and a Google search for this salsa/cole slaw was on.)
Gene added LOTS of fresh cilantro (maybe a cup) to the basic recipe, and boiled rice vinegar and sugar for a smooth dressing, with additional cumin, onion and diced jalepenos.
Gene also made tasty spuds in the form of Twice Baked Potatoes and garden chives.
My paltry offering to the dinner fare was the dessert, Creeping Crust Peach Cobbler, with a little added brown sugar, cinnamon and nutmeg on top. Peaches are plentiful in our happy valley this time of year, so the time was right to use up some local fruit produce.
Let's do that again!
Wednesday, August 20, 2008
Starry, Starry Night - Don McClean
This YouTube is mesmerizing. I must have watched and listened to McClean singing "Starry, Starry Night" several dozen times already. It is powerful in itself, but also could be an entertaining background vocal for surfing the net. It was originally made into a PowerPoint presentation, although not as accessible via email as the YouTube version above. Full screen and speakers tuned up, you can imagine the visual and auditory effects would be spectacular. This video, though, ain't bad!
In 2005, my National Scrabble Association tournament player friends and I made a trip to the British Isles. One of the stops on the cruise was to visit the Van Gogh Museum in Amsterdam. The above pictures are from the Van Gogh Flckr pool.
I've always been fascinated by Vincent Van Gogh; poor ear, poor dear.
Tuesday, August 19, 2008
Making Sculpey Beads for Jewelry
Here are a couple of pairs of earrings that I made from the beads using the Japanese silversmith method of "Makume Gane".
The beads could be a bit more glossy, which means that more intense buffing with wet sandpaper after the baking process would be required.
The earrings were made in the same manner as discussed in a previous post on making earrings. Here is an excellent video explaining how to string, wire and finish off earrings:
Monday, August 18, 2008
Making Beads from Polymer Clay - Makume Gane Technique
If you are interested in the process of Japanese bead making using this silversmithing technique, this video is excellent to review and follow. Just click here: Makume Gane
I used that YouTube video to make about four dozen colorful blue, green, pink, gold and aqua beads. Following the steps in the video tutorial, here are my steps in making Makume Gane clay beads, shown in pictures:
First, I rolled five colors of Sculpey clay (available at craft stores for about $1 per cube, sale price) with my pasta maker machine. This machine saves your hands fro
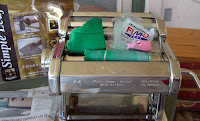
m a workout, and thoroughly mixes the clay while taking out air bubbles at the same time. (Use any of the clay colors to make scrap balls which will be layered with the Makume Gane processed clay slices.)
Next, I layered five colors of clay together. Different colors can be created by mixing the clays from their primary colors originally purchased; this is how I made the aqua and the pink colors from the purchased primary colors of clay.
Translucent clay is necessary to add to the layers of clay, because it gives a nice sheen to the finished bead. The translucent clay looks white, so make sure you purchase the clay clearly marked "translucent".
The gold leaf sheet was added last, then folded over several times (not in the pasta machine during this process) to make a stack of clays about 1/2 inch thick.
Then the stack of clays was shaved off to wrap around balls of clay. This makes the design on the covering of the previously molded bead from scrap clay. I made three differing sizes of beads. After trying to get them into uniform sizes, I learned that the trick is to take one round ball (again, scrap clay) which you have shaped, and cut it into two equal halves...ta da....each 
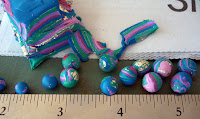
ball will then be the same diameter after rolling. This shaping was done by hand, but there are various little machines to purchase if you think you are going to get into this hobby in a big way.
The colors I chose to make are some of my favorites, and will complemen
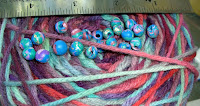
t some yarn recently received in a yarn swap on Ravelry.
Next, a hole was bored through the bead with a T-pin (used in jewelry making), or a large needle could be used to make the center hole. When the beads looked symetrical after poking the center hole and with a litte more cylindrical or round reshaping, I placed them on foil and baked them on a cookie sheet in the oven for 25 minutes at 265 degrees. After baking and cooling, the beads were buffed with wet sandpaper a few times.
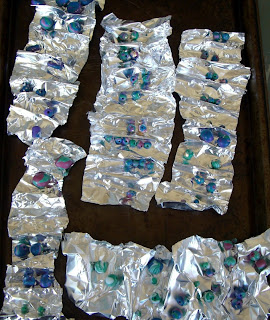
Then I sprayed the beads with acrylic spray several times to make a shiny surface.
I'm in the process of making earrings with these beads and will show more pictures of the finished beads in the next post. There are enough beads to make another watch band with earrings to match, similar to what was posted a few weeks ago in this blog.
If this process sounds like work, I can only say that in my humble opinion (IMHO), it was a lot of fun. And it was rewarding to make beads in the colors I desired, while at a fraction of the cost to purchase ready-made beads. And I ended up with a slew of cool beads.
Friday, August 15, 2008
Emmeline Apron by Meg McElwee
It is reversible, and each side has this a pocket made from a vintage apron, transfers, and embroidery.
A few of the steps on the embroidering of the flapper girl pocket are shown in the photo below and previously written up here.
Coloring with crayons on fabrice is a neat and easy concept. The idea was blatantly copied from giggleface studios for all steps of the Flapper Girl face.
The apron has a flattering fit over both the bodice and hips, and I'm wearing it today over crop pants.
Thursday, August 14, 2008
Making Transfer Images for Collages Using Transparencies
By definition, collage is an artistic composition of materials and objects pasted over a surface, often with unifying lines and/or color. The origin of the word "collage" comes from the French word "coller," which means to glue. Simply put, anything that is glued or pasted onto something else might be broadly interpreted as collage. Historically, collage has existed for many centuries; and, notably, Pablo Picasso and Georges Braque launched collage into the art world of Paris in the twentieth century and made it a mainstream term with a more widely accepted understanding. But, much earlier, experimentation in collage took place in France (Madison ArtShop).
Ensure that you are using the correct transparency type and print onto the textured side of either Great White Photo & Imaging paper (#86010, or Apollo Jet Printer Transparency Film (Not Quick Dry) or JetPrint Inkjet Imagining Photo Paper or JetPrint Multi Purpose Imagining Paper, glossy. Note: I could not find any of the cited transparencies available in stock at local stores, so I ended up with this product: Brand name: 3M, “Transparency Film for Inkjet Printers CG3480”
Here are the basic instructions:
1. Copy your image from your inkjet printer onto the textured side of the transparency paper. All to dry for 15 min. after printing.
2. Paint a thin coat of the Golden fluid (not gel) matte medium atop the image you want to transfer to the paper (or fabric). Easy clean up can be accomplished by using a small foam brush for the application of fluid medium. Also apply some fluid matte medium to the object where it will adhere.
3 Put a sheet of waxed paper over this wet image.
4. Then roll over it with a rolling pin or the back of a spoon for burnishing.
5. Wait one minute and carefully lift off backing paper, and the picture will be transferred.
Reminder: Do NOT USE anything BUT the recommended Photo paper, an inkjet printer, Golden Brand Matte Medium, and heavy paper to transfer an image onto (like heavy watercolor paper) … as your skill level increases, you might add metal or glass under the image transfer.
Any little slubs or wrinkles acquired in the burnishing process just adds to the vintage look.
The person who first originated (or documented) and copyrighted this innovative process was Leslie Riley in 2002 . Riley also administers the inkjet transfer group at the InkJet Yahoo Group, where you can find her original documentation in the "Files Folder".
Some lovely work can be found here: art-e-zine by Donia Nance.
Free vintage art can be found here: Transfers and at art-e-zine. Here are a couple of pictures I plan on using for inkjet transfers from these sources:
Have a go at it. It is fun!
Wednesday, August 13, 2008
Tuesday, August 12, 2008
Making Boxes from Cardboard
Over 50 box shapes that you can craft are given at this site. Here is just one of them:
SMALL BOX:
You never know when you might like a teapot shaped box (it is the last one in the series).
Monday, August 11, 2008
Banana Split Cake and Sheep Cake for Birthday
So yesterday, I made Paula Deen's Banana Split Cake, and it was a hit at the end of our bar-b-que meal outside. It was very tasty, cool for summer, and an easy recipe that will feed up to 20 guests.
Since Betty (Granny) reached eight decades in age, and is a collector of "anything sheep," I decided to also make her a sheep birthday cake. Err, I mean a birthday cake in the shape of a sheep.
I looked at various places on the internet searching for how to make a cake in the form of about any object you can imagine. In this web hunt, I came across a cool video for making a DOG CAKE . Click here if you want to see a spectacular dog cake made over four days, compressed into a four minute video:
This sheep cake was shown at Family Fun with Recipe Finder:
It was cute, but who would eat all those marshmallows?
I came up with a different cake by using a boxed white cake mix, the required ingredients, and then baked the cake in a 9" x 15" jelly roll pan. After the cake cooled and was then frozen overnight, I cut out a sheep cardboard form and cut around the form placed atop the frozen cake. (It helped to freeze the cake thoroughly before cutting it.) The "waste" cake taken from around the edges of the sheep form was frozen for later use with strawberries in a different dessert.
After spreading the cut-out sheep cake with white icing, I sprinkled on colored sugar daisy petals purchased at the craft store. And I added two goofy eyes to the face of the sheep. With a little imagination, you can see the result looks a bit like a sheep:
This cake was a separate dessert for the birthday girl.
Granny's birthday present from Gene and me is this original watercolor by Maggie Ehmann. Matted and framed, it measures 23" x 25." I purchased this several months ago in anticipation of the Big Eight-O:
Maggie did a beautiful job with the sheep, shepherd and dog!
This is Betty blowing out candles on the cake at her birthday party yesterday.
Friday, August 8, 2008
Watercolored Altered Art* Vintage Girl
Similar ones (with applicable baby's name) will be for sale at my Etsy Shop.
Socks for Soldiers Finished
About three weeks ago, I posted about Kim Opperham's Project for Our Soldiers. After two months in progress, my first pair of socks is ready to be mailed off to Major Reyher in Afghanistan. They were knit on size 1 needles (about the size of toothpicks!) and they are relatively error free.
Our thoughts and prayers are with you, Marc. Enjoy your socks.
Thursday, August 7, 2008
Watercolor Paints & Pencils- Picture for Baby's Room
Another small gift will be a hand water colored 5" x 7" little girl in an old fashioned dress. It will be drawn, painted and personalized for little "Ella Ann." The original stamp block can be purchased from stampington.
Congratulations, Kim and Jeremy, on adding this new life to the world!